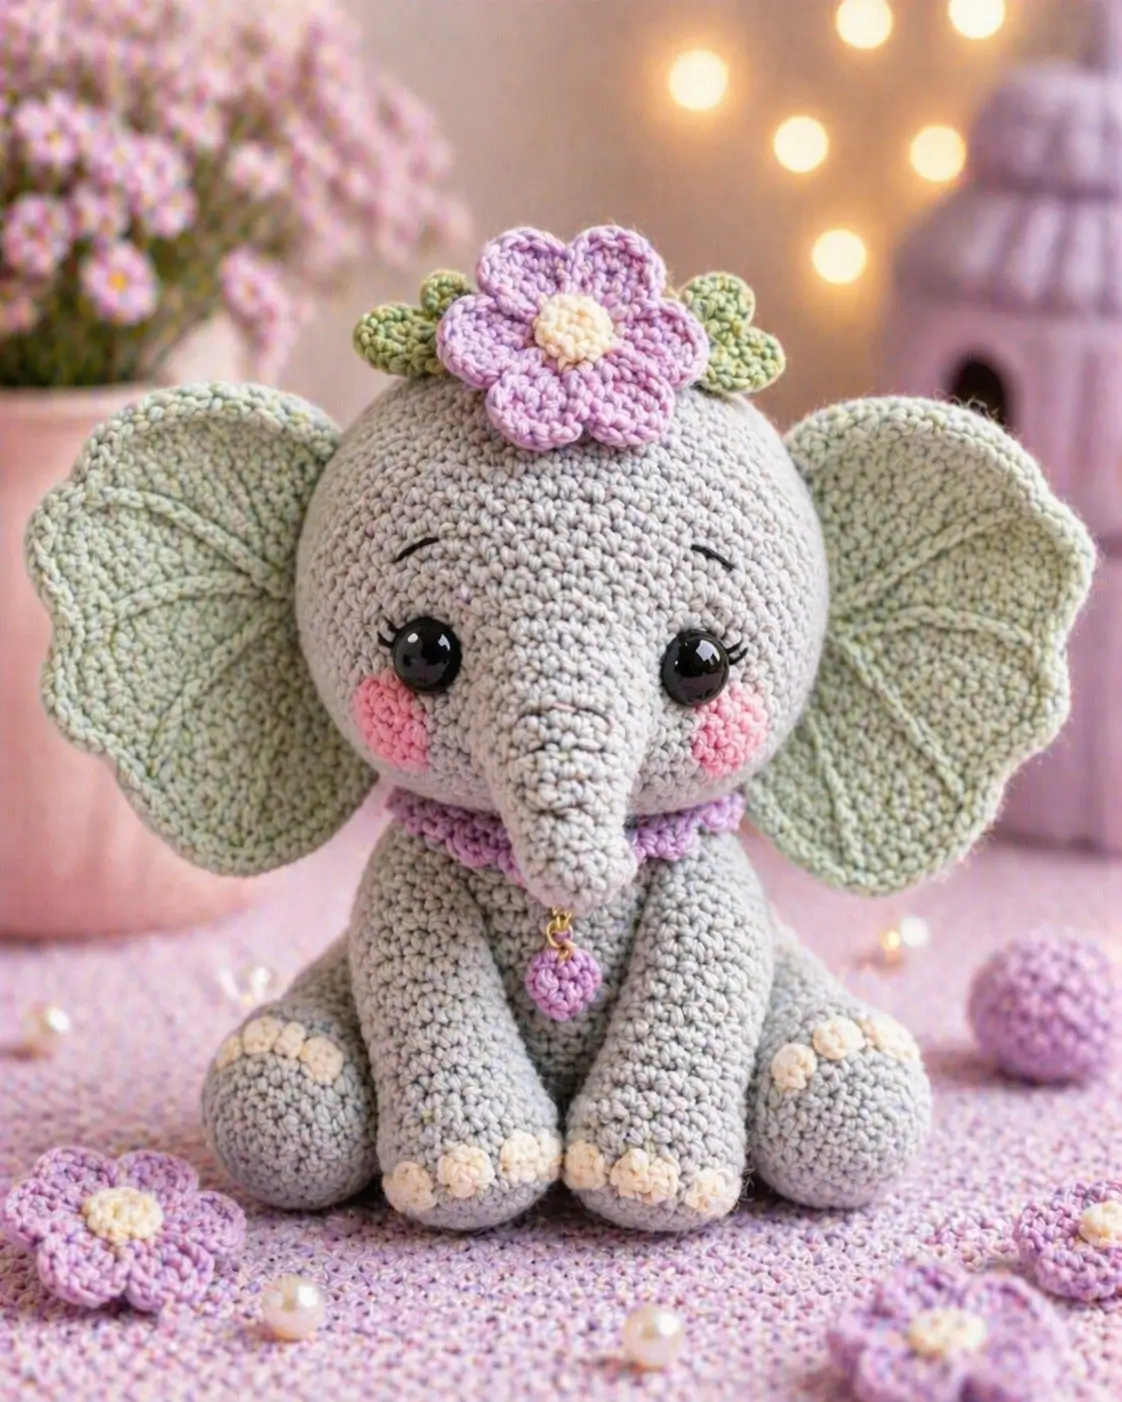
An elephant trunk cannot sit like a carrot on a round face. This elephant amigurumi crochet pattern uses DK cotton, a 2.5 mm hook, 10 mm safety eyes, and a 20 cm sitting target for an intermediate build. Make it when a nursery shelf needs a stable sitting toy with oversized ears, balanced limbs, and removable decorative flowers.
The Design: What Makes Flora Different
Flora is built around three elephant-specific choices: a forward trunk, wide ears, and a low seated body. A trunk needs a broad base, so this version increases from 6 to 18 stitches before sewing; that keeps the face from looking pinched. Oversized ears act like visual counterweights, and the surface stitch veins stop them from reading as plain circles. The sitting body uses heavy back legs and long front legs, which gives the toy a grounded posture rather than a standing-animal silhouette. Many makers place the eyes too far apart on a baby elephant amigurumi pattern. This design keeps 10 stitches between the eyes so the trunk still owns the center line. The flower crown and cheek patches also support a decorative crochet elephant pattern without changing the animal’s core shape.
Project Info at a Glance
| Skill Level | Time | Finished Size | Hook | Best For |
|---|---|---|---|---|
| Intermediate | Not verified | 20 cm sitting | 2.5 mm | Shelf display, nursery styling, photo prop |
Materials and Tools
Yarn
- Pale gray-mint — DK cotton or cotton-acrylic — 90–100 g — Stylecraft Special DK, Paintbox Cotton DK, or similar
- Lavender — DK cotton — 8 g — head flower, neck ruffle, pendant
- Cream — DK cotton — 6 g — flower centers and toe flowers
- Pink — DK cotton — 4 g — cheek patches
- Sage green — DK cotton — 7 g — leaves
- Black embroidery thread — small amount — brows and lashes
Tools
- Hook 2.5 mm
- 10 mm black safety eyes
- Polyester stuffing, about 100 g
- Yarn needle
- Locking stitch markers
- Straight pins
- Scissors
- Small gold jump ring, optional
Abbreviations
MR = magic ring; sc = single crochet; inc = 2 sc in next stitch; dec = single crochet decrease; sl st = slip stitch; ch = chain; BLO = back loop only; hdc = half double crochet; dc = double crochet.
Invisible decrease works through the front loops of the next two stitches, which reduces gaps on the trunk, head, and body closures.
Pattern — Step by Step
Continuous spiral unless noted. This is an original photo-matched pattern.
Head
Yarn: pale gray-mint — Source: Standard amigurumi math
R1: 6 sc in MR (6)
R2: inc ×6 (12)
R3: (sc, inc) ×6 (18)
R4: (2 sc, inc) ×6 (24)
R5: (3 sc, inc) ×6 (30)
R6: (4 sc, inc) ×6 (36)
R7: (5 sc, inc) ×6 (42)
R8: sc around (42)
R9: sc around (42)
R10: sc around (42)
R11: sc around (42)
R12: sc around (42)
R13: sc around (42)
R14: sc around (42)
R15: sc around (42)
R16: (5 sc, dec) ×6 (36)
R17: sc around (36)
R18: (4 sc, dec) ×6 (30)
R19: sc around (30)
R20: (3 sc, dec) ×6 (24)
R21: (2 sc, dec) ×6 (18)
R22: (sc, dec) ×6 (12)
R23: dec ×6 (6)
Insert safety eyes between R11 and R12 with 10 visible stitches between them. Stuff firmly before R20, then close the top after R23.
Fasten off. Leave a 25 cm tail.
Body
Yarn: pale gray-mint — Source: Standard amigurumi math
R1: 6 sc in MR (6)
R2: inc ×6 (12)
R3: (sc, inc) ×6 (18)
R4: (2 sc, inc) ×6 (24)
R5: (3 sc, inc) ×6 (30)
R6: (4 sc, inc) ×6 (36)
R7: (5 sc, inc) ×6 (42)
R8: sc around (42)
R9: sc around (42)
R10: sc around (42)
R11: sc around (42)
R12: sc around (42)
R13: sc around (42)
R14: sc around (42)
R15: (5 sc, dec) ×6 (36)
R16: sc around (36)
R17: sc around (36)
R18: (4 sc, dec) ×6 (30)
R19: sc around (30)
R20: (3 sc, dec) ×6 (24)
R21: (2 sc, dec) ×6 (18)
R22: (sc, dec) ×6 (12)
R23: dec ×6 (6)
Stuff the base more firmly than the shoulder area so the elephant sits without tipping forward.
Fasten off. Leave a 35 cm tail for joining to the head.
Front Legs / Arms
Make 2. Yarn: pale gray-mint — Source: Standard amigurumi math
R1: 6 sc in MR (6)
R2: inc ×6 (12)
R3: (sc, inc) ×6 (18)
R4: sc around (18)
R5: sc around (18)
R6: sc around (18)
R7: (sc, dec) ×6 (12)
R8: sc around (12)
R9: sc around (12)
R10: sc around (12)
R11: sc around (12)
R12: sc around (12)
R13: sc around (12)
R14: sc around (12)
R15: sc around (12)
R16: sc around (12)
Stuff the lower half only. Flatten the top across 6 stitch pairs.
Fasten off. Leave a 30 cm tail.
Back Legs
Make 2. Yarn: pale gray-mint — Source: Standard amigurumi math
R1: 6 sc in MR (6)
R2: inc ×6 (12)
R3: (sc, inc) ×6 (18)
R4: (2 sc, inc) ×6 (24)
R5: sc around (24)
R6: sc around (24)
R7: sc around (24)
R8: sc around (24)
R9: (2 sc, dec) ×6 (18)
R10: sc around (18)
R11: sc around (18)
R12: sc around (18)
R13: (sc, dec) ×6 (12)
R14: sc around (12)
Stuff the foot firmly and the upper section lightly. Flatten the top before sewing.
Fasten off. Leave a 35 cm tail.
Ears
Make 2. Yarn: pale gray-mint — Source: Standard amigurumi math
R1: 6 sc in MR (6)
R2: inc ×6 (12)
R3: (sc, inc) ×6 (18)
R4: (2 sc, inc) ×6 (24)
R5: (3 sc, inc) ×6 (30)
R6: (4 sc, inc) ×6 (36)
R7: (5 sc, inc) ×6 (42)
R8: sc around (42)
R9: sc around (42)
R10: (5 sc, dec) ×6 (36)
R11: sc around (36)
R12: (5 sc, inc) ×6 around outer edge only (42)
Do not stuff. Fold the base slightly so the top edge curves forward. Embroider four pale gray-mint surface-slip-stitch veins from the lower base toward the outer edge.
Fasten off. Leave a 45 cm tail.
Trunk
Yarn: pale gray-mint — Source: Standard amigurumi math
R1: 6 sc in MR (6)
R2: sc around (6)
R3: sc around (6)
R4: sc around (6)
R5: inc ×6 (12)
R6: sc around (12)
R7: sc around (12)
R8: sc around (12)
R9: sc around (12)
R10: (sc, inc) ×6 (18)
R11: sc around (18)
R12: sc around (18)
Stuff only the base. Leave the tip soft so it can angle down naturally.
Fasten off. Leave a 35 cm tail.
Cheek Patches
Make 2. Yarn: pink — Source: Standard flat-circle math
R1: 6 sc in MR (6)
R2: inc ×6 (12)
R3: (sc, inc) ×6 (18)
Keep flat. Steam lightly if the edge cups.
Fasten off. Leave a 20 cm tail.
Head Flower
Yarn: lavender and cream — Source: Standard amigurumi math
Center, cream:
R1: 6 sc in MR (6)
R2: inc ×6 (12)
R3: sc around (12)
Petals, lavender, make 6:
R1: 6 sc in MR (6)
R2: inc ×6 (12)
R3: sc around (12)
R4: dec ×6 (6)
Flatten each petal and sew the six petals around the cream center. Keep the flower shallow so it does not pull the head forward.
Fasten off. Leave a 30 cm tail on the center.
Leaf Clusters
Make 6 leaves. Yarn: sage green — Source: Standard amigurumi math
R1: 6 sc in MR (6)
R2: inc ×6 (12)
R3: sc around (12)
R4: dec ×6 (6)
Flatten each leaf into an oval. Place three leaves on each side of the head flower.
Fasten off. Leave a 15 cm tail per leaf.
Neck Ruffle
Yarn: lavender — Source: Standard row construction
Row 1: ch 37, sc in second ch from hook and across (36)
Row 2: ch 1, turn, (sl st in next st, 3 hdc in next st) ×18 (72)
Wrap under the head after head and body are joined. The ruffle should sit above the arms, not between them.
Fasten off. Leave a 25 cm tail.
Pendant
Yarn: lavender; optional gold jump ring — Source: Standard amigurumi math
R1: 6 sc in MR (6)
R2: inc ×6 (12)
R3: sc around (12)
R4: dec ×6 (6)
Stuff with a pinch of yarn scraps. Attach to the center front of the neck ruffle with the jump ring or a yarn loop.
Fasten off. Leave a 15 cm tail.
Toe Flowers
Make 10. Yarn: cream — Source: Standard flat-circle math
R1: 6 sc in MR (6)
R2: inc ×6 (12)
Use three on each front foot and two on each back foot. Sew with the starting tail hidden under each circle.
Fasten off. Leave a 12 cm tail on each flower.
Eyebrows and Lashes
Yarn: black embroidery thread — Source: Standard amigurumi embroidery
Cut two 20 cm strands. Stitch one shallow eyebrow arc above each eye, then add two short lash stitches at the outer edge of each eye. Keep every lash under 6 mm so the eyes stay round rather than cat-shaped.
Assembly
- Pin the head to the body with the head centered over R1–R7 of the body and the trunk line facing forward.
- Sew the head to the body through every stitch around the neck opening, then repeat once more for strength.
- Pin the trunk between the eyes with the base covering head R12–R17, then sew around the 18-stitch base.
- Sew the cheek patches to either side of the trunk across head R13–R15.
- Attach the ears to the left and right sides of the head from R8 to R18, with the lower ear edge slightly behind the cheek patches.
- Sew the front legs to the body from R10 to R18, angling them toward the center line.
- Sew the back legs to the lower sides of the body between R5 and R12 so the flat bottoms touch the table.
- Attach the flower crown first, then sew three leaves to each side of the flower.
- Wrap the neck ruffle under the head, join the short ends at the back, and hang the pendant at the front center.
- Sew toe flowers to the feet, embroider brows and lashes, bury all tails, and trim only after the toy sits upright.
The completed elephant has a seated DK-scale body, broad ears, centered trunk, cheek patches, head flower, leaf clusters, neck ruffle, pendant, and cream toe flowers.
7 Technical Tips
- Mark the first stitch of every round with a locking marker; losing the start point on a 42-stitch head shifts the trunk base by 3–5 stitches. That error makes the face twist even when the eyes are level.
- Stuff the body base to firm resistance, then reduce stuffing near the neck by about 25 percent. Overstuffed shoulders push the head upward and create a visible gap under the ruffle.
- Use invisible decrease on R16–R23 of the head and R15–R23 of the body. Standard decreases leave diagonal holes that show most on pale gray yarn.
- Place the eyes before closing R18 of the head, not after the head is shut. A 10-stitch gap between 10 mm eyes leaves enough center width for the 18-stitch trunk base.
- Pin each ear at three points before sewing: top, lower base, and widest outer curve. A 5 mm mismatch between left and right ear height is visible because the ears are wider than the face.
- Keep each cheek patch below the eye center line by one round. Cheeks sewn too high crowd the lashes and make the trunk look shorter.
- Weave accessory tails through the flower or ruffle backing, not through the stuffed head alone. A loose 12 cm tail behind a petal can work forward after handling and form a visible loop.
Conclusion
Block the ears before the final photo because their width defines the whole toy. Check the trunk angle from the front, then confirm the back legs touch the surface at the same height. The next practical step is making one sample in solid gray and one in heathered yarn, then comparing how the surface veins show on the ears. Share the finished sitting elephant on Pinterest and Instagram with a front-facing image, one side image, and one close-up of the flower crown. Save this elephant amigurumi crochet pattern with your safari toy set. Hashtag: #FloraElephantAmigurumi. Should the next version keep the pendant, or should the trunk hold a tiny flower instead?









