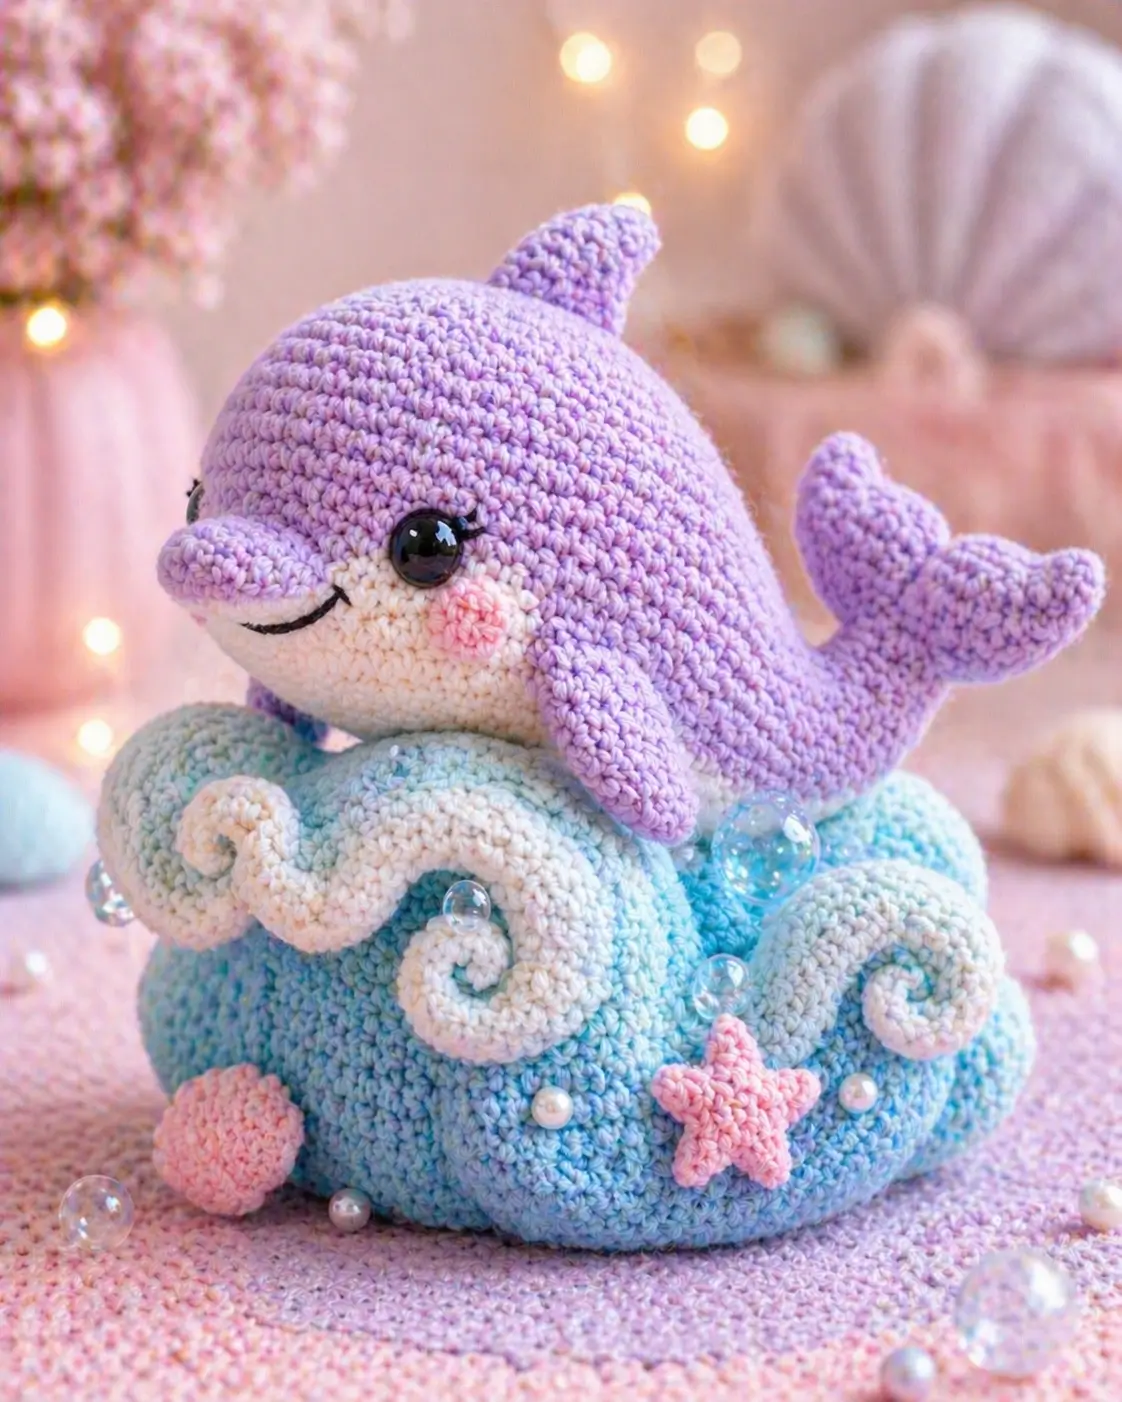
A dolphin’s beak has to project without tipping the toy forward. This dolphin amigurumi crochet pattern uses DK cotton, a 3.5 mm hook, and 12 mm safety eyes to make a 19 cm advanced-beginner toy with a wave display base. The base gives the curved body a stable mount for shelf photography, while the cheek patches and starfish keep the face readable from the front.
The Design: What Makes This Dolphin Different
You solve the dolphin shape by separating the head, body, beak, and tail stem instead of forcing one long tube to do everything. The beak stays lightly stuffed so the smile can curve under it without flattening the cream snout. A 36-stitch head and body keep this dolphin crochet pattern medium-sized, matching the photo’s round toy style rather than a realistic marine-animal silhouette. Short flippers sit low on the sides because higher placement makes the animal read as a whale. Many ocean amigurumi projects skip the base, but the wave mound matters here; it supports the upward body angle and gives the tail flukes room to lift. This dolphin amigurumi crochet pattern also avoids the common mistake of making the dorsal fin too tall. A tall dorsal fin pulls the eye away from the face.
Project Info at a Glance
| Skill Level | Time | Finished Size | Hook | Best For |
|---|---|---|---|---|
| Advanced beginner | 4–5 hours | 19 cm dolphin length | 3.5 mm | Shelf display, nursery prop, ocean set |
Materials and Tools
Yarn
- Lavender — DK cotton — 60 g — Paintbox Cotton DK, YarnArt Jeans, or similar
- Cream — DK cotton — reserve one 50 g skein; about 10–15 g used — Paintbox Cotton DK or YarnArt Jeans
- Sky blue / aqua — DK cotton — reserve one 50 g skein — variegated cotton works for the wave base
- White — DK cotton — 10 g — foam curls
- Pink — DK cotton — 5 g — cheek patches, starfish, shell
Tools
- Hook 3.5 mm
- 12 mm black safety eyes
- Polyester stuffing
- Tapestry needle
- Stitch markers
- Black embroidery floss
- Pins
- Optional 6 mm pearl beads and 8–10 mm clear bubble beads
Abbreviations
MR = magic ring; sc = single crochet; inc = increase; dec = decrease; sl st = slip stitch; ch = chain; BLO = back loop only; FO = fasten off; inv dec = invisible decrease. Invisible decrease works through the front loops of the next two stitches to reduce bulk at closure points.
Pattern — Step by Step
Continuous spiral unless noted. Dolphins have no external ears, wings, or back legs in the photo, so the paired side flippers carry the limb role and the paired tail flukes carry the rear silhouette.
Head — Make 1
Yarn: lavender DK cotton.
R1: 6 sc in MR (6)
R2: inc ×6 (12)
R3: (sc 1, inc) ×6 (18)
R4: (sc 2, inc) ×6 (24)
R5: (sc 3, inc) ×6 (30)
R6: (sc 4, inc) ×6 (36)
R7: sc around (36)
R8: sc around (36)
R9: sc around (36)
R10: sc around (36)
R11: sc around (36)
R12: sc around (36)
R13: sc around (36)
R14: sc around (36)
R15: sc around (36)
R16: (sc 4, dec) ×6 (30)
R17: (sc 3, dec) ×6 (24)
R18: (sc 2, dec) ×6 (18)
R19: (sc 1, dec) ×6 (12)
R20: dec ×6 (6)
Insert safety eyes between R10 and R11, about 10 stitches apart, before closing. Stuff firmly but keep the front smooth for the snout.
Fasten off. Leave 20 cm tail.
Body — Make 1
Yarn: lavender DK cotton.
R1: 6 sc in MR (6)
R2: inc ×6 (12)
R3: (sc 1, inc) ×6 (18)
R4: (sc 2, inc) ×6 (24)
R5: (sc 3, inc) ×6 (30)
R6: (sc 4, inc) ×6 (36)
R7: sc around (36)
R8: sc around (36)
R9: sc around (36)
R10: sc around (36)
R11: sc around (36)
R12: sc around (36)
R13: sc around (36)
R14: (sc 4, dec) ×6 (30)
R15: sc around (30)
R16: (sc 3, dec) ×6 (24)
R17: (sc 2, dec) ×6 (18)
R18: (sc 1, dec) ×6 (12)
R19: dec ×6 (6)
Stuff more firmly at the chest than at the rear so the body angles upward on the wave base.
Fasten off. Leave 25 cm tail.
Snout / Beak — Make 1
Yarn: cream DK cotton.
R1: 6 sc in MR (6)
R2: inc ×6 (12)
R3: (sc 1, inc) ×6 (18)
R4: sc around (18)
R5: sc around (18)
R6: sc around (18)
R7: (sc 1, dec) ×6 (12)
R8: dec ×6 (6)
Stuff lightly; overstuffing makes the snout look like a ball instead of a dolphin beak.
Fasten off. Leave 25 cm tail.
Cream Belly Patch — Make 1
Yarn: cream DK cotton.
R1: 6 sc in MR (6)
R2: inc ×6 (12)
R3: (sc 1, inc) ×6 (18)
R4: (sc 2, inc) ×6 (24)
R5: sc around (24)
Block into a soft oval with pins before sewing under the head and front body.
Fasten off. Leave 30 cm tail.
Side Flippers / Front Limbs — Make 2
Yarn: lavender DK cotton.
R1: 6 sc in MR (6)
R2: sc around (6)
R3: inc ×6 (12)
R4: sc around (12)
R5: sc around (12)
R6: sc around (12)
R7: dec ×6 (6)
Do not stuff. Flatten each flipper so the seam sits along the lower edge.
Fasten off. Leave 20 cm tail.
Dorsal Fin — Make 1
Yarn: lavender DK cotton.
R1: 6 sc in MR (6)
R2: sc around (6)
R3: inc ×6 (12)
R4: sc around (12)
R5: (sc 1, inc) ×6 (18)
R6: sc around (18)
R7: sc around (18)
Flatten without stuffing. Pin on the top center of the body before sewing.
Fasten off. Leave 25 cm tail.
Tail Stem — Make 1
Yarn: lavender DK cotton.
R1: 6 sc in MR (6)
R2: inc ×6 (12)
R3: sc around (12)
R4: sc around (12)
R5: sc around (12)
R6: sc around (12)
R7: sc around (12)
R8: dec ×6 (6)
Stuff only the first half nearest the body; the fluke end should stay flexible.
Fasten off. Leave 25 cm tail.
Tail Flukes — Make 2
Yarn: lavender DK cotton.
R1: 6 sc in MR (6)
R2: inc ×6 (12)
R3: sc around (12)
R4: sc around (12)
R5: dec ×6 (6)
Flatten both flukes. Angle them into a shallow V before stitching to the tail stem.
Fasten off. Leave 20 cm tail on each piece.
Cheek Patches — Make 2
Yarn: pink DK cotton.
R1: 6 sc in MR (6)
R2: inc ×6, sl st to first sc (12)
Keep these flat. Sew one patch below each eye, slightly behind the snout edge.
Fasten off. Leave 15 cm tail.
Smile and Lashes
Yarn: black embroidery floss.
Work one curved smile about 2.5 cm wide under the snout. Add two 4 mm lash stitches at the outer side of each eye if the safety-eye washers are already locked.
Wave Base — Make 1
Yarn: sky blue / aqua DK cotton.
R1: 6 sc in MR (6)
R2: inc ×6 (12)
R3: (sc 1, inc) ×6 (18)
R4: (sc 2, inc) ×6 (24)
R5: (sc 3, inc) ×6 (30)
R6: (sc 4, inc) ×6 (36)
R7: (sc 5, inc) ×6 (42)
R8: sc around (42)
R9: sc around (42)
R10: sc around (42)
R11: sc around (42)
R12: sc around (42)
R13: (sc 5, dec) ×6 (36)
R14: (sc 4, dec) ×6 (30)
R15: (sc 3, dec) ×6 (24)
R16: (sc 2, dec) ×6 (18)
R17: (sc 1, dec) ×6 (12)
R18: dec ×6 (6)
Stuff heavily enough that the base does not collapse under the dolphin body.
Fasten off. Leave 30 cm tail.
Large Foam Curls — Make 2
Yarn: white DK cotton.
Row 1: ch 31, sc in second ch from hook and across (30)
Row 2: ch 1, turn, sc BLO across (30)
Roll each strip into a loose spiral and stitch through the lower edge to hold the curl.
Fasten off. Leave 20 cm tail.
Small Foam Curl — Make 1
Yarn: white DK cotton.
Row 1: ch 25, sc in second ch from hook and across (24)
Row 2: ch 1, turn, sc BLO across (24)
Roll tighter than the large curls so it reads as a small wave cap.
Fasten off. Leave 18 cm tail.
Starfish — Make 1
Yarn: pink DK cotton.
R1: 6 sc in MR (6)
R2: inc ×6, sl st to first sc (12)
Point 1: ch 5, sc in second ch from hook and next 3 ch, sl st into next center st (4)
Point 2: ch 5, sc in second ch from hook and next 3 ch, sl st into next center st (4)
Point 3: ch 5, sc in second ch from hook and next 3 ch, sl st into next center st (4)
Point 4: ch 5, sc in second ch from hook and next 3 ch, sl st into next center st (4)
Point 5: ch 5, sc in second ch from hook and next 3 ch, sl st into next center st (4)
Space the five points across the front half of the 12-stitch center and leave two center stitches unused at the back.
Fasten off. Leave 20 cm tail.
Pink Shell — Make 1
Yarn: pink DK cotton.
R1: 6 sc in MR (6)
R2: inc ×6 (12)
R3: (sc 1, inc) ×6 (18)
R4: sc around (18)
R5: (sc 1, dec) ×6 (12)
R6: dec ×6 (6)
Flatten slightly and embroider three short vertical ridges with pink yarn.
Fasten off. Leave 18 cm tail.
Pearl and Bubble Beads
Material: pearl beads and clear acrylic beads.
Use six bead placements total: two clear bubbles near the foam curls, two pearls on the front of the wave, one pearl near the starfish, and one clear bubble behind the dolphin body. Sew through each bead twice with strong thread.
Assembly
- Pin the head to the front of the body with the head tilted slightly down toward the snout side.
- Sew the head to the body with the 25 cm body tail, then weave through the neck twice for support.
- Attach the cream snout between the eyes, with its lower edge sitting just below the eye line.
- Sew the cream belly patch under the snout and across the front body, stretching it into an oval as you stitch.
- Add the cheek patches below the eyes and embroider the curved smile after the snout is secure.
- Sew the side flippers to the lower left and right sides of the body, about two rounds behind the head join.
- Attach the dorsal fin to the top center of the body and check that it points upward, not backward.
- Sew the tail stem to the rear body, then attach the two tail flukes in a shallow V shape.
- Stitch the dolphin to the top of the wave base, then add the foam curls around the front and sides.
- Add the starfish, shell, pearls, and clear bubble beads last so the accessories do not block the body seam.
The finished toy has a forward-facing dolphin, raised wave base, and three accessory types.
7 Technical Tips
- Stitch marker drift: If the marker moves more than 2 stitches by R10, the head seam will rotate toward one eye. Recount the 36-stitch plateau before installing safety eyes.
- Stuffing firmness: A beak stuffed below medium firmness collapses when the smile is pulled tight. Add stuffing in pea-sized amounts and stop before the cream fabric domes.
- Invisible decrease gaps: Holes larger than 2 mm on lavender decreases will show white stuffing. Use front-loop invisible decreases on R16–R20 of the head and R14–R19 of the body.
- Eye placement timing: Installing eyes after R15 traps the washer at an angle. Place 12 mm eyes between R10 and R11 while the inside is still reachable.
- Velvet tension: If switching to velvet yarn, the 3.5 mm hook will make the fabric stiff and oversized stress can split stitches. Test a 12-stitch tube first and change hook size only after checking for stuffing gaps.
- Pinning angle: Tail flukes tilted more than 15 degrees downward make the toy read as a fish. Pin the flukes level with the dorsal fin before sewing.
- Tail weaving: Ends shorter than 12 cm can pull out of the wave base after handling. Weave each yarn tail in two directions for at least 3 cm per direction.
Conclusion
Check the dolphin’s side profile before final sewing: snout forward, dorsal fin centered, tail flukes lifted, and wave base firm enough to hold the angle. Pin this project to Pinterest with a side-view photo and share the finished piece on Instagram with the wave accessories visible. Use the hashtag #LavenderDolphin so the color version stays searchable. A practical next step is to make the wave base first, then test the body angle before attaching facial details. This dolphin amigurumi crochet pattern works best when the beak, cheek patches, and smile are aligned as one face unit. Would you make this dolphin’s beak slimmer or rounder?









