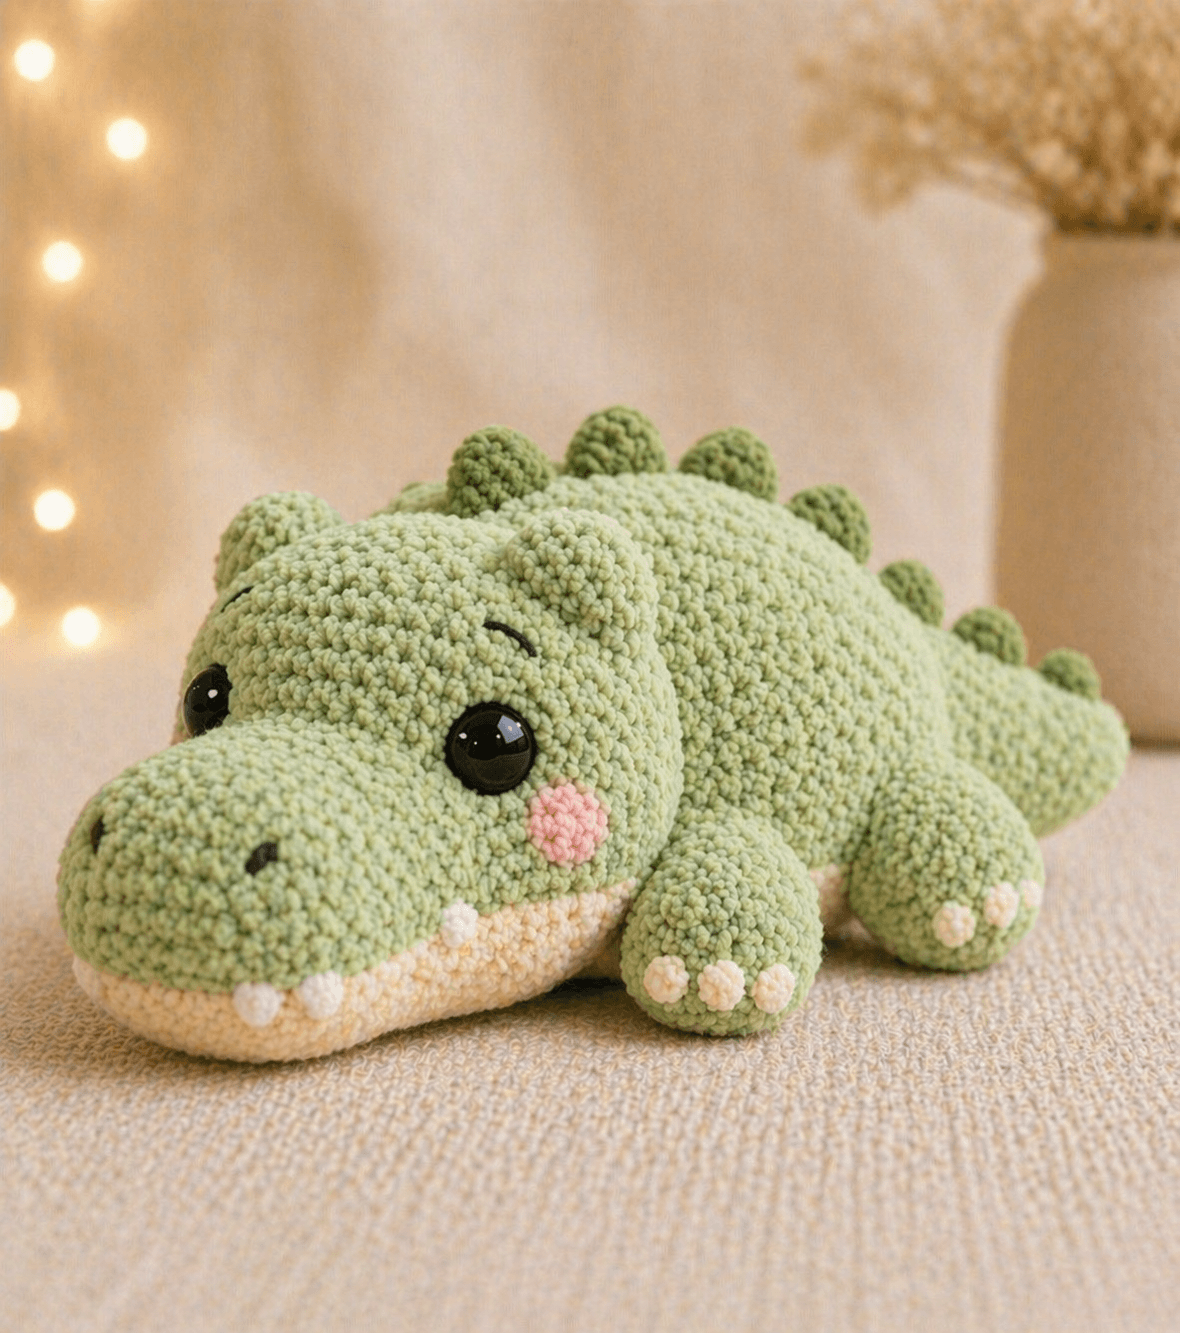
A crocodile without a long, flat snout stops reading as a crocodile before the first eye is attached. This crocodile amigurumi crochet pattern uses chenille yarn, a 4 mm hook, and 12 mm safety eyes to build a low, 32 cm plush for intermediate makers. You can work it over a weekend as a shelf toy or nursery gift. The body stays compact while the tail carries the length.
The Design: What Makes This Crocodile Different
Three structure choices matter here. First, the snout is built as a separate padded tube with a flat jaw-and-belly panel under it, because plush yarn tends to swell sideways and blur crocodile anatomy. Second, the head stays on a medium 36-stitch plateau instead of climbing farther; that keeps the skull broad but still low against the body. Third, the back bumps are sewn as small domes rather than worked as surface bobbles, which keeps chenille stitches readable. A common failure point is eye placement. Put the eyes too high and the toy stops reading as a crocodile and starts reading as a frog. Many crocodile pattern pages and plush listings skip the flat underjaw or the cheek circles entirely.
Project Info at a Glance
| Skill Level | Time | Finished Size | Hook | Best For |
|---|---|---|---|---|
| Intermediate | 4–6 hours | Approx. 32 cm long | 4 mm | Shelf toy or gift plush |
Materials and Tools
This crocodile amigurumi crochet pattern is calibrated to current chenille builds that cluster around 4 mm hooks, 12 mm eyes, and a finished length in the mid-20s to low-30s centimeters, with larger versions also common.
Yarn
- Sage green chenille/velvet — super bulky plush — 200 g — Himalaya Dolphin Velvet or similar
- Cream chenille/velvet — super bulky plush — 50 g — lower jaw, belly line, claws, teeth
- Dark olive chenille/velvet — scrap amount — back bumps
- Blush pink yarn — scrap amount — cheek patches
- Black embroidery thread — scrap amount — nostrils and brows
Tools
- Hook 4 mm
- 12 mm safety eyes
- Polyester stuffing
- Blunt yarn needle
- Stitch markers
- Pins
Abbreviations
- MR = magic ring
- sc = single crochet
- inc = increase
- dec = invisible decrease
- sl st = slip stitch
- ch = chain
- BLO = back loop only
- FO = fasten off
Invisible decrease matters here because plush yarn hides the front loops well but still shows blunt reduction lines when a regular decrease is used.
Pattern — Step by Step
Continuous spiral unless noted.
The rounds below are photo-matched. This version stays on a medium 36-stitch plateau and separates the snout, jaw panel, cheek circles, and dorsal bumps for cleaner shaping.
Head (Make 1)
Yarn: sage green
R1: 6 sc in MR (6)
R2: inc x6 (12)
R3: (sc, inc) x6 (18)
R4: (2 sc, inc) x6 (24)
R5: (3 sc, inc) x6 (30)
R6: (4 sc, inc) x6 (36)
R7: sc around (36)
R8: sc around (36)
R9: sc around (36)
R10: sc around (36)
R11: (4 sc, dec) x6 (30)
R12: sc around (30)
R13: (3 sc, dec) x6 (24)
R14: sc around (24)
R15: (2 sc, dec) x6 (18)
R16: sc around (18)
Insert 12 mm eyes between R8 and R9, spaced 8 sts apart. Stuff the snout side of the head more firmly than the crown.
R17: (sc, dec) x6 (12)
R18: dec x6 (6)
Fasten off. Leave a 20 cm tail.
Body (Make 1)
Yarn: sage green
R1: 6 sc in MR (6)
R2: inc x6 (12)
R3: (sc, inc) x6 (18)
R4: (2 sc, inc) x6 (24)
R5: (3 sc, inc) x6 (30)
R6: (4 sc, inc) x6 (36)
R7: sc around (36)
R8: sc around (36)
R9: sc around (36)
R10: sc around (36)
R11: sc around (36)
R12: sc around (36)
R13: sc around (36)
R14: sc around (36)
R15: sc around (36)
R16: (4 sc, dec) x6 (30)
R17: sc around (30)
R18: sc around (30)
R19: sc around (30)
R20: (3 sc, dec) x6 (24)
R21: sc around (24)
R22: sc around (24)
R23: sc around (24)
R24: (2 sc, dec) x6 (18)
R25: sc around (18)
R26: sc around (18)
R27: sc around (18)
R28: (sc, dec) x6 (12)
R29: sc around (12)
R30: sc around (12)
R31: sc around (12)
Stuff the front two-thirds firmly. Keep the tail lighter so it tapers instead of bulging.
R32: dec x6 (6)
Fasten off. Leave a 20 cm tail.
Front Legs (Make 2)
Yarn: sage green
R1: 6 sc in MR (6)
R2: inc x6 (12)
R3: (sc, inc) x6 (18)
R4: sc around (18)
R5: sc around (18)
R6: (sc, dec) x6 (12)
R7: sc around (12)
Stuff only the paw end. Flatten the opening.
Fasten off. Leave a 20 cm tail.
Back Legs (Make 2)
Yarn: sage green
R1: 6 sc in MR (6)
R2: inc x6 (12)
R3: (sc, inc) x6 (18)
R4: sc around (18)
R5: sc around (18)
R6: sc around (18)
R7: (sc, dec) x6 (12)
R8: sc around (12)
Stuff only the first 2 cm of each leg. Flatten the opening.
Fasten off. Leave a 20 cm tail.
Head Bumps / Ear Ridges (Make 2)
Yarn: sage green
R1: 6 sc in MR (6)
R2: inc x6 (12)
R3: sc around (12)
R4: sc around (12)
Do not overstuff. These need to sit as low domes, not upright ears.
Fasten off. Leave a 15 cm tail.
Snout (Make 1)
Yarn: sage green
R1: 6 sc in MR (6)
R2: inc x6 (12)
R3: (sc, inc) x6 (18)
R4: (2 sc, inc) x6 (24)
R5: sc around (24)
R6: sc around (24)
R7: sc around (24)
R8: sc around (24)
R9: sc around (24)
R10: sc around (24)
R11: (2 sc, dec) x6 (18)
R12: sc around (18)
Stuff lightly. Flatten the last round slightly before sewing so the top stays broad and the underside stays level.
Fasten off. Leave a 30 cm tail.
Jaw and Belly Panel (Make 1)
Yarn: cream — worked in rows
Row 1: ch 7, sc in 2nd ch from hook and across (6)
Row 2: ch 1, turn, inc, 4 sc, inc (8)
Row 3: ch 1, turn, inc, 6 sc, inc (10)
Row 4: ch 1, turn, sc across (10)
Row 5: ch 1, turn, sc across (10)
Row 6: ch 1, turn, sc across (10)
Row 7: ch 1, turn, sc across (10)
Row 8: ch 1, turn, sc across (10)
Row 9: ch 1, turn, sc across (10)
Row 10: ch 1, turn, sc across (10)
Row 11: ch 1, turn, sc across (10)
Row 12: ch 1, turn, dec, 6 sc, dec (8)
Row 13: ch 1, turn, sc across (8)
This panel sits under the snout and then runs onto the chest. Pin it before sewing; chenille spreads once tension is released.
Fasten off. Leave a 30 cm tail.
Back Spikes (Make 7)
Yarn: dark olive green
R1: 6 sc in MR (6)
R2: inc x6 (12)
R3: sc around (12)
Make 3 larger spikes exactly as written. For the remaining 4, stop after R2 if you want a smaller tail end.
Fasten off. Leave a 12 cm tail on each.
Cheek Patches (Make 2)
Yarn: blush pink
R1: 6 sc in MR (6)
R2: inc x6 (12)
sl st to next st
Fasten off. Leave a 12 cm tail.
Teeth (Make 4)
Yarn: white or cream
R1: 6 sc in MR (6)
R2: dec x3 (3)
Pull tight to form a small cone.
Fasten off. Leave a 10 cm tail.
Assembly
- Sew the snout to the lower front half of the head, centered so its top edge sits below the eye line.
- Attach the jaw and belly panel under the snout, then extend it onto the front body so the cream section reads as one continuous underside.
- Place the head bumps slightly behind and above the eyes, with at least 1 stitch of green fabric visible between eye and bump seam.
- Sew the head to the front of the body, keeping the head tilted only slightly upward.
- Attach the front legs near the body’s widest section, one round below the head seam.
- Attach the back legs 5 to 6 rounds behind the front pair so the body stays low instead of arched.
- Sew the three largest spikes from crown to mid-back, then grade the smaller spikes toward the tail.
- Add the cheek patches directly under the outer corners of the eyes.
- Sew two teeth to each side of the front jaw and embroider nostrils, brows, and cream claw dots on all four feet.
- Weave all tails back through the body twice, trim, and reshape the snout by hand before the last fluffing pass.
The finished crocodile should lie flat, with the jaw panel holding the snout level and the tail taper reading clean from side view.
7 Technical Tips
- Marker drift on the head: Count every sixth stitch during R6 through R10. If the eye line shifts even 2 stitches off center, the snout seam will pull to one side.
- Snout stuffing density: Fill the snout to roughly 70% of its volume, not full compression. Too much stuffing rounds the profile and removes the crocodile read from the side view.
- Invisible decreases in chenille: Work the dec slowly and tug only after both front loops are on the hook. Pulling early can strip fuzz from the strand and leave a thin spot on the face.
- Eye placement timing: Test-pin the snout before locking the washers on the eyes. A 12 mm eye that sits 1 round too high will visually shorten the muzzle.
- Velvet tension control: Stay with one hook for the whole toy unless your stitches spread enough to show stuffing. Mixed tension between head and body makes the seam ridge obvious on plush yarn.
- Pinning before sewing: Use four pins on the snout, two on the jaw panel, and one on each side of every leg opening. Fewer pins often lets chenille twist during whipstitching, which makes the paws cant outward.
- Tail-end weaving: Run each tail back through at least 3 cm of stuffing path before trimming. A short buried tail can work loose on the narrow 12-stitch tail section after handling.
Conclusion
The shaping work here is concentrated in the snout, jaw panel, and eye line. Get those three parts right and the rest of the crocodile reads cleanly, even in plush yarn. Next step: make the head first, test the 12 mm eye spacing against the snout, and only then commit to the full body. When you post the result, add one overhead shot for Pinterest and one side-profile shot for Instagram so the flat muzzle is visible. Use the tag #FlatSnoutCrocodile when sharing your crocodile amigurumi crochet pattern. Did you keep seven back bumps, or did you reduce them to five for a younger alligator look?









