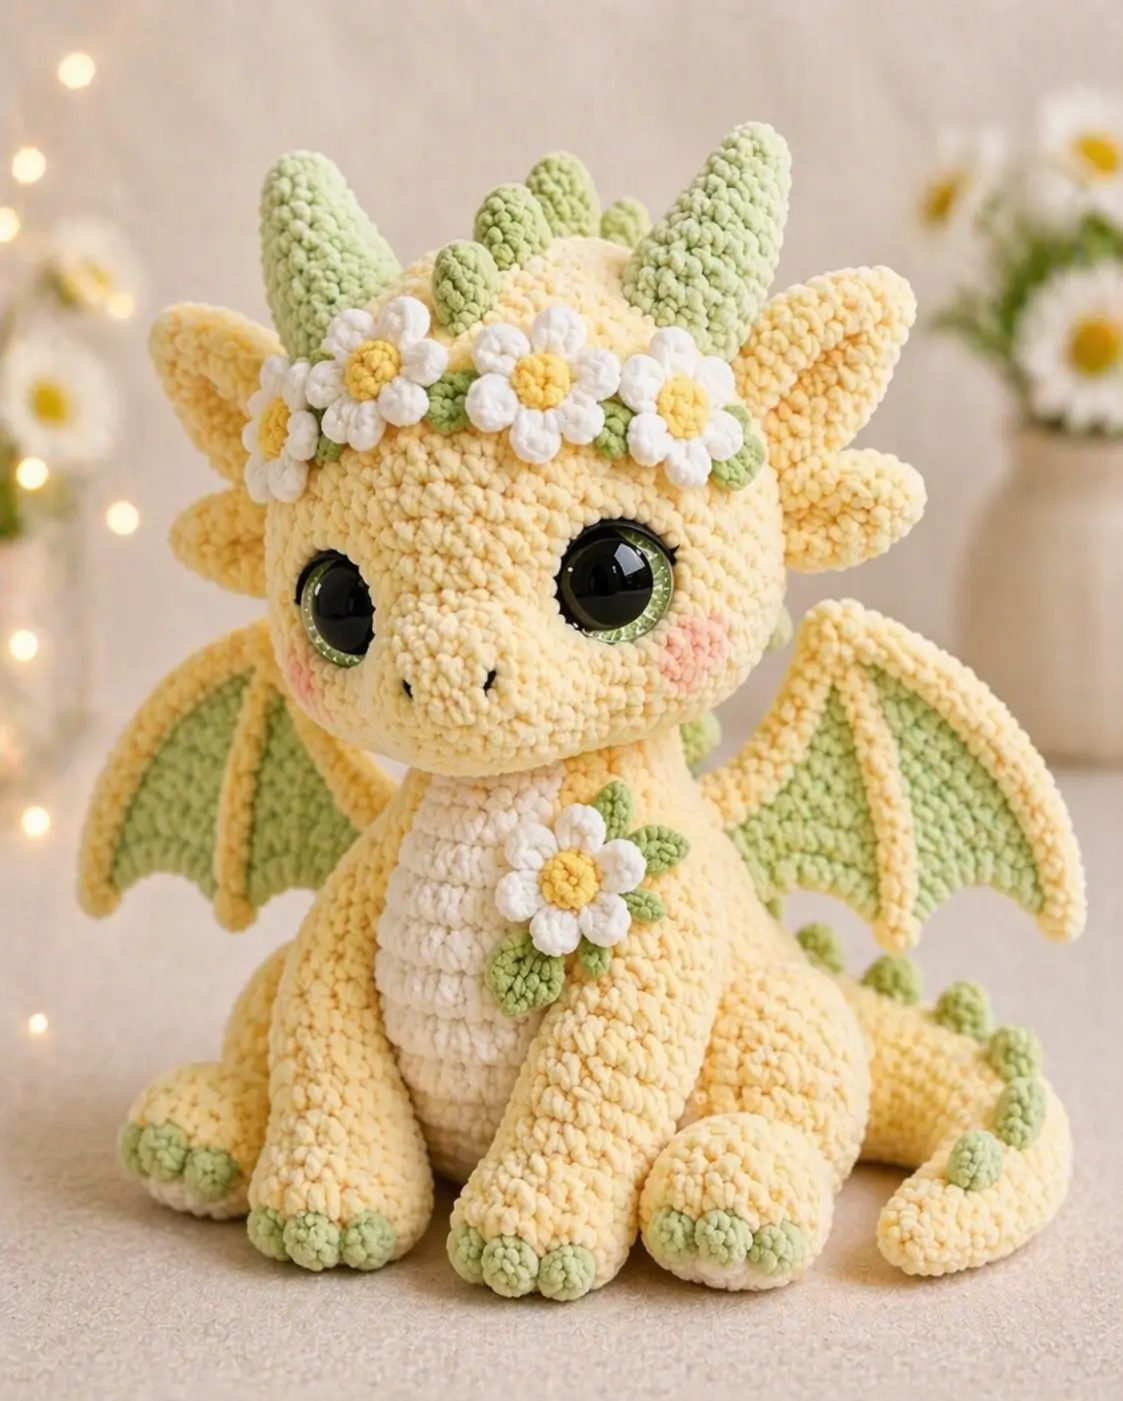
A flower dragon stops reading as a dragon the moment the daisy crown sits higher than the brow spikes. This flower dragon amigurumi pattern keeps the crown low, the snout short, and the wings broad enough for balance. Expect chunky chenille yarn, a 5.0 mm hook, an approximate seated height of 33 cm, and intermediate shaping. It fits spring market stock, fantasy nursery decor, and themed gift tables.
The Design: What Makes This Dragon Different
This build depends on proportion control more than exotic stitches. You need a wide head, but the snout still has to project forward so the face does not flatten into a bear profile. The wings also matter more than usual. On a crochet flower dragon, narrow wings disappear behind the shoulders, while oversized ones push the body off balance when the toy sits. The third decision is crown placement. Set the flower band across the forehead, not the skull peak, so the horn line stays visible and the dragon silhouette remains intact. A common mistake in a plush dragon crochet pattern is adding too much stuffing at the neck. That forces the head upward, shortens the face visually, and makes the front legs flare away from the chest. This version corrects that with a closed neck point, light upper-body stuffing, and separate floral details added last.
Project Info at a Glance
| Skill Level | Time | Finished Size | Hook | Best For |
|---|---|---|---|---|
| Intermediate | 8–10 hours | Approx. 33 cm seated | 5.0 mm | Spring market plush, shelf display, themed gift |
Materials and Tools
Yarn
- Butter yellow chenille — chunky — approx. 230 g — body, head, legs, tail, outer wings
- Soft sage chenille — chunky — approx. 70 g — wing inserts, horns, spikes, toes
- Ivory chenille — chunky — approx. 60 g — belly panel
- White cotton or smooth chenille — DK to chunky — approx. 20 g — daisy petals
- Golden yellow cotton or smooth chenille — DK to chunky — approx. 8 g — daisy centers
- Blush pink yarn — small amount — cheek patches
Tools
- Hook 5.0 mm
- 18 mm safety eyes
- Polyester stuffing
- Tapestry needle
- Stitch markers
- Straight pins
- Black embroidery thread for nostrils
Abbreviations
MR = magic ring, sc = single crochet, inc = increase, dec = decrease, sl st = slip stitch, ch = chain, BLO = back loop only, hdc = half double crochet, dc = double crochet.
Work invisible decrease through the front loops only so the chenille surface stays cleaner across the face, limbs, and tail.
Pattern — Step by Step
All pieces are worked in a continuous spiral unless noted otherwise.
Head (Make 1)
Yarn: butter yellow chenille — Source: standard amigurumi math, photo-based proportions
R1: 6 sc in MR (6)
R2: inc ×6 (12)
R3: (sc 1, inc) ×6 (18)
R4: (sc 2, inc) ×6 (24)
R5: (sc 3, inc) ×6 (30)
R6: (sc 4, inc) ×6 (36)
R7: (sc 5, inc) ×6 (42)
R8–R14: sc around (42)
R15: (sc 5, dec) ×6 (36)
R16: sc around (36)
R17: (sc 4, dec) ×6 (30)
R18: (sc 3, dec) ×6 (24)
R19: (sc 2, dec) ×6 (18)
R20: (sc 1, dec) ×6 (12)
R21: dec ×6 (6)
Insert the 18 mm safety eyes between R11 and R12 with 10 visible stitches between them. Stuff firmly from R17 onward, but leave the last 2 rounds slightly softer so the neck seam compresses cleanly.
Fasten off. Leave a 20 cm tail.
Snout (Make 1)
Yarn: butter yellow chenille — Source: photo-based shaping
R1: 6 sc in MR (6)
R2: inc ×6 (12)
R3: sc around (12)
R4: sc around (12)
R5: (sc 1, dec) ×4 (8)
Lightly stuff. The snout should stay rounded, not hard. Embroider two small black nostrils after sewing, spaced 2 stitches apart.
Fasten off. Leave a 20 cm tail.
Body (Make 1)
Yarn: butter yellow chenille — Source: standard amigurumi math, seated plush adjustment
R1: 6 sc in MR (6)
R2: inc ×6 (12)
R3: (sc 1, inc) ×6 (18)
R4: (sc 2, inc) ×6 (24)
R5: (sc 3, inc) ×6 (30)
R6: (sc 4, inc) ×6 (36)
R7–R10: sc around (36)
R11: (sc 4, dec) ×6 (30)
R12–R13: sc around (30)
R14: (sc 3, dec) ×6 (24)
R15–R16: sc around (24)
R17: (sc 2, dec) ×6 (18)
R18: sc around (18)
R19: (sc 1, dec) ×6 (12)
R20: dec ×6 (6)
Stuff the lower half firmly for sitting support. Keep the top third lighter so the neck bends slightly forward instead of standing straight up.
Fasten off. Leave a 20 cm tail.
Belly Panel (Make 1)
Yarn: ivory chenille — Source: photo-based applique
Row 1: ch 8, sc in 2nd ch from hook and across (7)
Row 2–Row 11: ch 1, turn, sc across (7)
Row 12: ch 1, turn, dec, sc 3, dec (5)
Row 13: ch 1, turn, sc across (5)
Do not stretch the panel while sewing. Let it sit naturally so the chest keeps its rounded shape.
Fasten off. Leave a 25 cm tail.
Arms / Front Legs (Make 2)
Yarn: sage chenille for toes, then butter yellow chenille — Source: standard limb math
R1: 6 sc in MR in sage (6)
R2: inc ×6 (12)
R3: BLO sc around (12)
Change to butter yellow.
R4–R6: sc around (12)
R7: (sc 1, inc) ×6 (18)
R8–R12: sc around (18)
R13: (sc 1, dec) ×6 (12)
R14: sc around (12)
R15: dec ×6 (6)
Stuff the paw and lower leg firmly. Leave the final third softer so the shoulder line can curve against the body.
Fasten off. Leave a 20 cm tail.
Back Legs (Make 2)
Yarn: sage chenille for toes, then butter yellow chenille — Source: seated plush shaping
R1: 6 sc in MR in sage (6)
R2: inc ×6 (12)
R3: (sc 1, inc) ×6 (18)
R4: BLO sc around (18)
Change to butter yellow.
R5: (sc 2, inc) ×6 (24)
R6–R7: sc around (24)
R8: (sc 2, dec) ×6 (18)
R9–R11: sc around (18)
R12: (sc 1, dec) ×6 (12)
R13: sc around (12)
R14: dec ×6 (6)
Pack the front half of the foot firmly. Keep the upper back of the thigh much softer so the dragon sits without rocking.
Fasten off. Leave a 20 cm tail.
Wings (Make 2)
Yarn: outer wing in butter yellow chenille, insert in sage chenille — Source: photo-based layered wing
Wing Frame
Row 1: ch 9, sc in 2nd ch from hook and across (8)
Row 2: ch 1, turn, inc, sc 6, inc (10)
Row 3: ch 1, turn, inc, sc 8, inc (12)
Row 4: ch 1, turn, inc, sc 10, inc (14)
Row 5: ch 1, turn, inc, sc 12, inc (16)
Row 6: ch 1, turn, inc, sc 14, inc (18)
Row 7: ch 1, turn, inc, sc 16, inc (20)
Wing Insert
Row 1: ch 7, sc in 2nd ch from hook and across in sage (6)
Row 2: ch 1, turn, inc, sc 4, inc (8)
Row 3: ch 1, turn, inc, sc 6, inc (10)
Row 4: ch 1, turn, inc, sc 8, inc (12)
Row 5: ch 1, turn, inc, sc 10, inc (14)
Sew the sage insert centered on the yellow frame. Add 3 vertical surface lines in yellow from the top edge to the lower edge to mimic wing fingers.
Fasten off. Leave a 25 cm tail on the frame.
Large Horns (Make 2)
Yarn: sage chenille — Source: photo-based horn scaling
R1: 6 sc in MR (6)
R2: inc ×6 (12)
R3–R5: sc around (12)
R6: dec ×6 (6)
Lightly stuff. Pin them first. They should angle outward, not straight up.
Fasten off. Leave a 20 cm tail.
Small Spikes (Make 10)
Yarn: sage chenille — Source: photo-based embellishment
R1: 6 sc in MR (6)
R2: sc around (6)
R3: sc around (6)
Do not stuff. Make 4 for the crown line behind the flower band and 6 for the back and tail.
Fasten off. Leave a 10 cm tail.
Tail (Make 1)
Yarn: butter yellow chenille — Source: standard tapered tail math
R1: 6 sc in MR (6)
R2: inc ×6 (12)
R3: sc around (12)
R4: (sc 1, inc) ×6 (18)
R5–R10: sc around (18)
R11: (sc 1, dec) ×6 (12)
R12–R13: sc around (12)
R14: dec ×6 (6)
Stuff the base only. The upper half should stay lighter so the tail can curl around the side.
Fasten off. Leave a 25 cm tail.
Cheek Patches (Make 2)
Yarn: blush pink — Source: flat circle standard math
R1: 6 sc in MR (6)
R2: inc ×6 (12)
These sit low on the face, below the eyes and slightly toward the snout.
Fasten off. Leave a 12 cm tail.
Daisy Motifs (Make 6)
Yarn: white for petals, golden yellow for centers — Source: photo-based accessory detail
Petal Ring
In white: MR, *(ch 3, 2 dc into MR, ch 3, sl st into MR)* ×6.
Center
In yellow: R1: 6 sc in MR (6)
R2: inc ×6 (12)
Make 5 daisies for the forehead crown and 1 daisy for the chest. Sew each yellow center on top of one white petal ring.
Fasten off. Leave a 15 cm tail on each center.
Leaves (Make 8)
Yarn: sage chenille or smooth sage cotton — Source: accessory shaping
Ch 4, starting in 2nd ch from hook: sc, hdc, sc.
Make 6 for the crown and 2 for the chest blossom cluster.
Fasten off. Leave an 8 cm tail.
Flower Crown Band (Make 1)
Yarn: sage — Source: photo-based accessory layout
Ch 31.
Row 1: sl st in 2nd ch from hook and in each ch across (30)
The band should sit from one large horn base to the other. Sew 5 daisies evenly across it, then tuck 6 leaves between the flowers.
Fasten off. Leave a 20 cm tail.
Chest Blossom Cluster (Make 1)
Yarn: 1 daisy motif, 2 leaves — Source: photo-based accessory
Sew 1 daisy with 2 leaves beneath it as a small angled cluster.
Place it high on one side of the chest panel rather than centered. The offset placement breaks the symmetry in a useful way.
Assembly
- Sew the head to the top of the body, matching the closed neck points and tilting the muzzle slightly downward.
- Sew the snout centered between the eyes over the lower front of the head, then embroider the nostrils.
- Attach the ivory belly panel from the neck area down toward the lower body front.
- Sew the front legs to the chest so the paws touch the floor and frame the belly panel.
- Sew the back legs lower and wider than the front legs, then test the dragon on a flat surface before locking the final stitches.
- Attach the large horns first, then sew 4 small spikes in a row between them behind the forehead line.
- Sew the wings to the upper back, one round below the head seam, with the top edges angled slightly outward.
- Attach the tail low on the back so it curves around the side and acts as a third support point.
- Sew the remaining 6 small spikes from the back seam onto the tail, spacing them evenly toward the tip.
- Attach the cheek patches, tie or stitch the flower crown across the forehead, then sew the chest blossom cluster in place.
The finished plush should sit without support when the back feet and curled tail share the weight line.
7 Technical Tips
- Mark R11 on the head before you install the eyes. Dropping the eyes even 1 round lower makes the snout look compressed and the brow line disappear.
- Pack the front legs firmly only through the paw and lower shin. Overstuffing above R10 forces the shoulders outward and widens the chest more than the photo shows.
- Use invisible decreases on the face, body taper, and tail. Standard decreases leave small ridges in chenille, and those ridges catch the light on pale yarn.
- Pin both back legs and test the sit before sewing. A difference of 5 mm in leg height is enough to make the dragon rock from side to side.
- Keep the neck area softer than the lower body. Dense stuffing at the neck lifts the head too high and turns the dragon into a more upright dinosaur shape.
- Place the wing tops about 2 cm below the head seam. Higher placement crowds the flower crown zone, while lower placement makes the back look empty.
- Weave every floral tail through at least 5 cm of matching stitches. Plush yarn sheds short ends, and the crown is the first place that starts loosening with handling.
Conclusion
This version keeps the fantasy shape readable by controlling three pressure points: snout length, wing width, and crown height. The body stays compact, the paws sit flat, and the flower work adds contrast without hiding the dragon outline. If you make this flower dragon amigurumi pattern, photograph the front view and the side profile before gifting or listing it so the horn angle and wing placement stay documented. Save the finished piece to Pinterest, post the result on Instagram, and tag it with #DaisyDragon. One detail is worth comparing across finished samples: did your crown sit best between the large horns, or slightly in front of them near the brow line?









