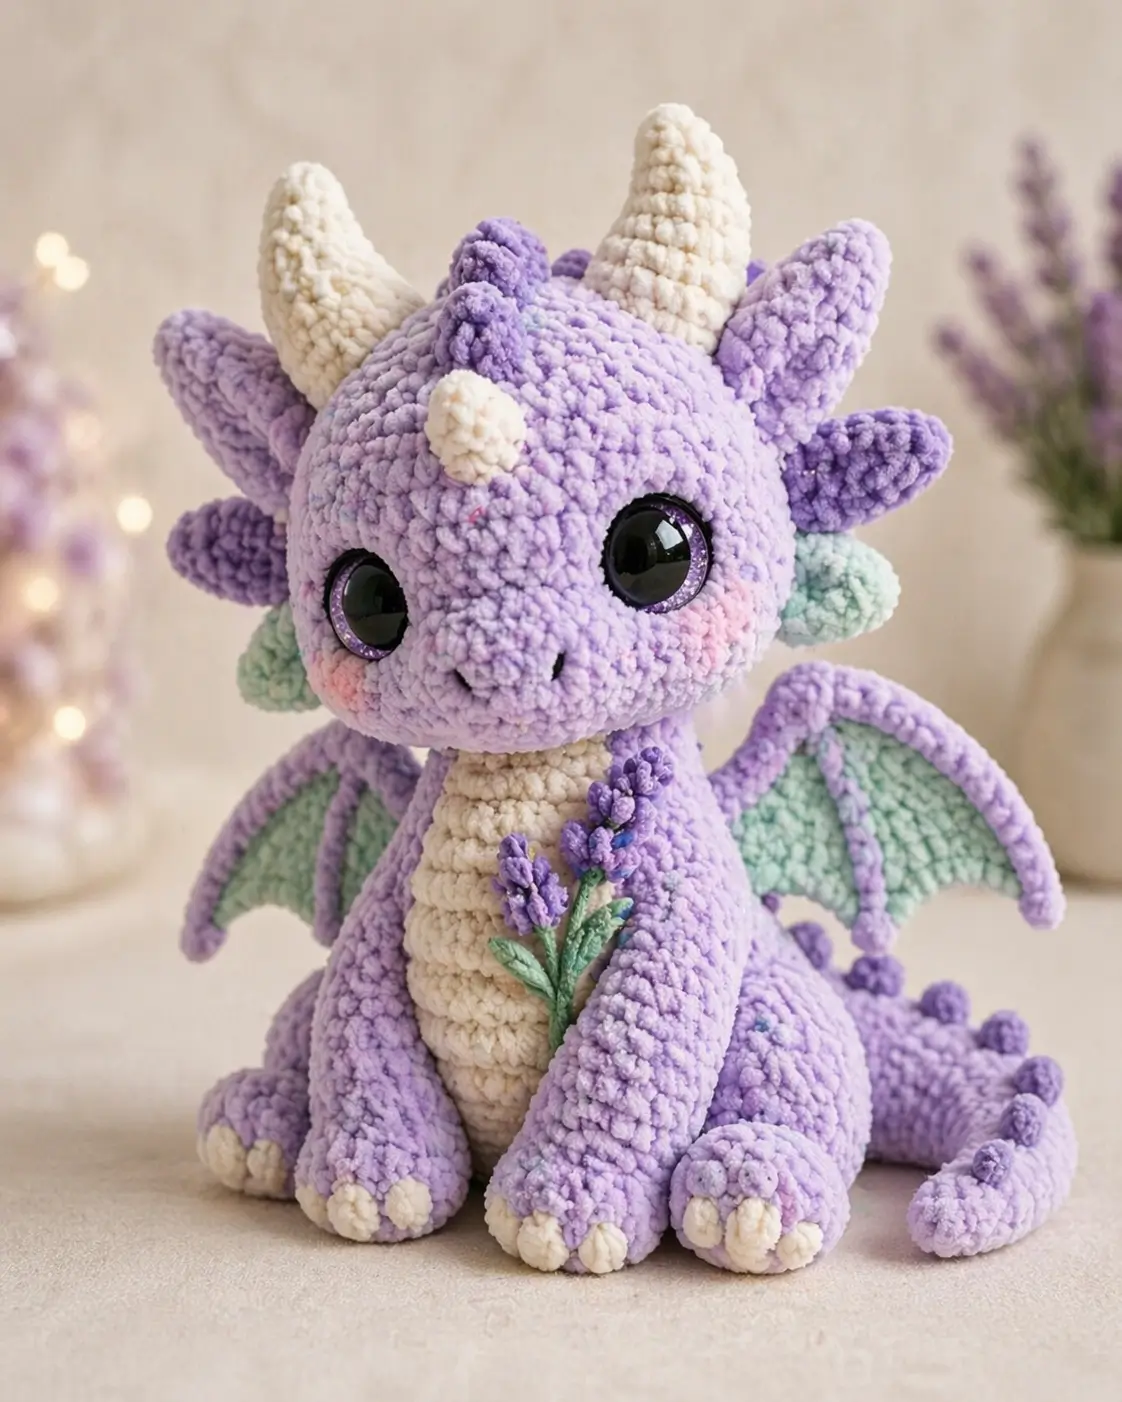
A dragon reads wrong the moment the wing root drops below the shoulder line. This dragon amigurumi crochet pattern uses super bulky chenille, a 5 mm hook, and 12 mm eyes to build a seated lavender figure about 15 cm tall. It suits an intermediate maker who wants a stable shelf sample, nursery prop, or market prototype with a floral detail stitched on after assembly.
The Design: What Makes This Dragon Different
You need three projection points on this dragon: a snout that sits forward, horns that rise above the forehead, and wings anchored high on the back. Push the snout out as a separate part, or the face turns flat once chenille bloom fills the stitches. Keep the horn bases near the centerline; wide placement makes the skull read like a cow instead of a dragon. The pattern also uses a short, deep body so the seated pose stays upright without wire. In a plush dragon crochet pattern, that weight balance matters more than extra scale texture. A common error in any sitting dragon crochet pattern is attaching the wings too low, which drags the silhouette backward and hides the neck curve. This version keeps the side frills and cheek patches separate so the face stays readable.
Project Info at a Glance
| Skill Level | Time | Finished Size | Hook | Best For |
|---|---|---|---|---|
| Intermediate | 5–7 hrs | 15.3 cm high / 22 cm long | 5 mm | Shelf display, gift, market sample |
Materials and Tools
Yarn
- Lavender — super bulky chenille — approx. 120 g — Hobbii Honey Bunny or Toucan
- Cream — super bulky chenille — approx. 25 g — same yarn base
- Mint — super bulky chenille — approx. 25 g — same yarn base
- Pink — super bulky chenille — approx. 5 g — same yarn base
- Purple — super bulky chenille — approx. 15 g — same yarn base
- Green — DK cotton or embroidery cotton — approx. 5 g — mercerized cotton for the sprig
Tools
- Hook 5 mm
- 12 mm safety eyes
- Polyfill stuffing
- Tapestry needle
- Stitch markers
- Pins
- Small scissors
Abbreviations
- MR = magic ring
- sc = single crochet
- inc = 2 sc in one stitch
- dec = invisible decrease
- sl st = slip stitch
- ch = chain
- BLO = back loop only
- FLO = front loop only
Work invisible decrease through the front loops of the next two stitches; chenille hides the join better when the decrease stays on the fabric face.
Pattern — Step by Step
Continuous spiral unless noted.
Head (Make 1)
Yarn: lavender
- R1: 6 sc in MR [6]
- R2: inc x6 [12]
- R3: (sc, inc) x6 [18]
- R4: (sc 2, inc) x6 [24]
- R5: (sc 3, inc) x6 [30]
- R6: (sc 4, inc) x6 [36]
- R7: (sc 5, inc) x6 [42]
- R8: sc around [42]
- R9: sc around [42]
- R10: sc around [42]
- R11: sc around [42]
- R12: sc around [42]
- R13: sc around [42]
- R14: (sc 5, dec) x6 [36]
- R15: (sc 4, dec) x6 [30]
- Place eyes between R10 and R11, about 11 sts apart.
- R16: (sc 3, dec) x6 [24]
- R17: (sc 2, dec) x6 [18]
- Stuff firmly before the final round.
- R18: (sc, dec) x6 [12]
Fasten off. Leave 30 cm tail, thread through front loops, and close.
Snout (Make 1)
Yarn: lavender
- R1: 6 sc in MR [6]
- R2: inc x6 [12]
- R3: (sc, inc) x6 [18]
- R4: sc around [18]
- R5: sc around [18]
- Stuff lightly. Embroider nostrils after sewing on.
Fasten off. Leave 25 cm tail.
Body (Make 1)
Yarn: lavender
- R1: 6 sc in MR [6]
- R2: inc x6 [12]
- R3: (sc, inc) x6 [18]
- R4: (sc 2, inc) x6 [24]
- R5: (sc 3, inc) x6 [30]
- R6: (sc 4, inc) x6 [36]
- R7: sc around [36]
- R8: sc around [36]
- R9: sc around [36]
- R10: sc around [36]
- R11: sc around [36]
- R12: (sc 4, dec) x6 [30]
- R13: sc around [30]
- R14: sc around [30]
- R15: sc around [30]
- R16: (sc 3, dec) x6 [24]
- R17: (sc 2, dec) x6 [18]
- Stuff the lower half firmly so the seated pose holds.
- R18: (sc, dec) x6 [12]
Fasten off. Leave 35 cm tail and close.
Belly Patch (Make 1)
Yarn: cream
- Ch 7.
- R1: inc in 2nd ch from hook, sc 4, 4 sc in last ch, working on opposite side sc 4, inc in last ch [14]
- R2: inc 2, sc 4, inc 4, sc 4, inc 2 [22]
- R3: (sc, inc) x2, sc 4, (sc, inc) x4, sc 4, (sc, inc) x2 [30]
Fasten off. Leave 25 cm tail.
Front Legs (Make 2)
Yarn: cream then lavender
- R1: 6 sc in MR with cream [6]
- R2: inc x6 [12]
- Change to lavender.
- R3: (sc, inc) x6 [18]
- R4: sc around [18]
- R5: sc around [18]
- R6: (sc, dec) x6 [12]
- R7: sc around [12]
- R8: sc around [12]
- R9: sc around [12]
- R10: sc around [12]
- R11: sc around [12]
- R12: sc around [12]
- R13: sc around [12]
- Stuff paw and lower leg only.
Fasten off. Leave 25 cm tail. Flatten opening.
Back Legs (Make 2)
Yarn: cream then lavender
- R1: 6 sc in MR with cream [6]
- R2: inc x6 [12]
- Change to lavender.
- R3: (sc, inc) x6 [18]
- R4: sc around [18]
- R5: (sc, dec) x6 [12]
- R6: sc around [12]
- R7: sc around [12]
- R8: sc around [12]
- Stuff lightly.
Fasten off. Leave 25 cm tail. Flatten opening.
Horns (Make 2)
Yarn: cream
- R1: 6 sc in MR [6]
- R2: sc around [6]
- R3: inc x6 [12]
- R4: sc around [12]
- R5: sc around [12]
- R6: sc around [12]
- Stuff lightly so the tips stay tapered.
Fasten off. Leave 20 cm tail.
Ears (Make 2)
Yarn: lavender
- R1: 6 sc in MR [6]
- R2: inc x6 [12]
- R3: (sc, inc) x6 [18]
- R4: sc around [18]
- R5: sc around [18]
- R6: (sc, dec) x6 [12]
Fasten off. Flatten the base slightly. Leave 20 cm tail.
Side Frills (Make 2)
Yarn: mint
- R1: 6 sc in MR [6]
- R2: inc x6 [12]
- R3: sc around [12]
- R4: (sc, dec) x4 [8]
Fasten off. Flatten gently. Leave 20 cm tail.
Wings (Make 2)
Yarn: mint membrane with lavender edging
- Ch 10.
- Row 1: sc in 2nd ch from hook and across [9]
- Row 2: ch 1, turn, dec, sc 5, dec [7]
- Row 3: ch 1, turn, dec, sc 3, dec [5]
- Row 4: ch 1, turn, dec, sc 1, dec [3]
- Row 5: ch 1, turn, sc 3 [3]
Fasten off mint.
Attach lavender at base and sc evenly around the perimeter, placing 3 sc in the top point [19].
Fasten off. Leave 25 cm tail.
Dorsal Spikes (Make 7)
Yarn: purple
- R1: 6 sc in MR [6]
- R2: sc around [6]
- R3: inc x6 [12]
- R4: sc around [12]
Fasten off. Leave 15 cm tail.
Use 3 on the head ridge and 4 on the tail.
Tail (Make 1)
Yarn: lavender
- R1: 6 sc in MR [6]
- R2: inc x6 [12]
- R3: (sc, inc) x6 [18]
- R4: sc around [18]
- R5: sc around [18]
- R6: (sc, dec) x6 [12]
- R7: sc around [12]
- R8: sc around [12]
- R9: sc around [12]
- R10: sc around [12]
- R11: sc around [12]
- R12: sc around [12]
- R13: sc around [12]
- R14: dec x6 [6]
- R15: sc around [6]
- R16: sc around [6]
- R17: sc around [6]
- R18: sc around [6]
- Stuff the base and first half only so the tail can curl.
Fasten off. Leave 35 cm tail.
Cheek Patches (Make 2)
Yarn: pink
- R1: 6 sc in MR [6]
- R2: inc x6 [12]
- sl st to first st [12]
Fasten off. Leave 20 cm tail.
Lavender Sprig Accessory (Make 1 Cluster)
Yarn: green with purple buds
- Main stem: ch 18, starting in 2nd ch from hook sl st 17 [17]
- Side stem A: ch 5, starting in 2nd ch sl st 4 [4]
- Side stem B: ch 4, starting in 2nd ch sl st 3 [3]
- Side stem C: ch 5, starting in 2nd ch sl st 4 [4]
- Leaves (make 2): ch 5, sl st in 2nd ch, sc, hdc, sc [4]
- Buds (make 6): ch 3, sl st in 2nd ch, sl st in next ch [2]
Sew 2 buds to the tip of each side stem. Attach both leaves low on the main stem. Leave short tails for stitching to the front of the body.
Assembly
- Sew the snout to the lower center of the head, spanning roughly R10 to R14. Add a pinch of stuffing before the final stitches.
- Embroider two nostrils on the snout with black yarn. Place the cheek patches under the eyes, slightly off center toward the snout.
- Pin the horns on top of the head with 5–6 stitches between their inner edges. Stitch them down with the tips angled slightly outward.
- Sew the ears behind the horns. Add the mint side frills lower on the head, roughly level with the bottom of the eyes.
- Stitch three dorsal spikes from the forehead back toward the crown. Keep the center spike exactly on the midline.
- Sew the belly patch to the front of the body. The bottom edge should sit just above the body close.
- Join the head to the body with the body decrease rounds centered under the chin. Add extra stuffing at the neck while closing the seam.
- Attach the front legs high on the body front and the back legs low on the sides so four contact points touch the surface. Pin both sides first, then sew.
- Sew the wings to the upper back with the top edge near the neck seam. Attach the tail low at the center back, then stitch four spikes along the tail ridge.
- Place the lavender sprig over the lower chest and anchor it through the belly patch. Weave every tail inward through stuffing and trim.
The finished dragon supports its own seated pose on four contact points.
7 Technical Tips
- Mark R1 on every cone part with a hard plastic stitch marker. Soft yarn markers vanish in chenille and horn seams drift by one stitch when the start point is lost.
- Pack the head until it feels firm but still compresses by about 5 mm under thumb pressure. Overfilling pushes the eyes outward and makes the snout seam buckle.
- Work invisible decreases on the head, body, and tail only through the front loops. Standard decreases leave diagonal gaps that show the core through pastel plush yarn.
- Install the safety eyes no later than the 30-stitch stage on the head. After that point, the opening tightens and the washers distort the face while locking.
- Keep the mint wing membranes a touch looser than the lavender edging. Tight edging curls the wing inward and shortens the top arc.
- Pin the wings so the top corner starts within one round of the neck seam. Lower placement shifts the visual weight back and the dragon stops reading as upright.
- Bury each yarn tail at least 4 cm through stuffed sections before trimming. Short chenille tails back out under handling, especially on the tail base and wing roots.
Conclusion
This build prioritizes silhouette first, then color placement, then accessory detail. Save the dragon amigurumi crochet pattern, crochet the base once in plain lavender, and record your exact eye spacing before adding the sprig on version two. Pin a front view and a side view to Pinterest so the horn angle, wing height, and tail curl are visible. Post the same pair on Instagram with your yarn brand, hook size, and final height, then tag it with #LavenderDragon. The next adjustment is simple: swap only the wing membrane color and compare the profile. Did you place the forehead spikes exactly between the horns, or slightly behind them?









