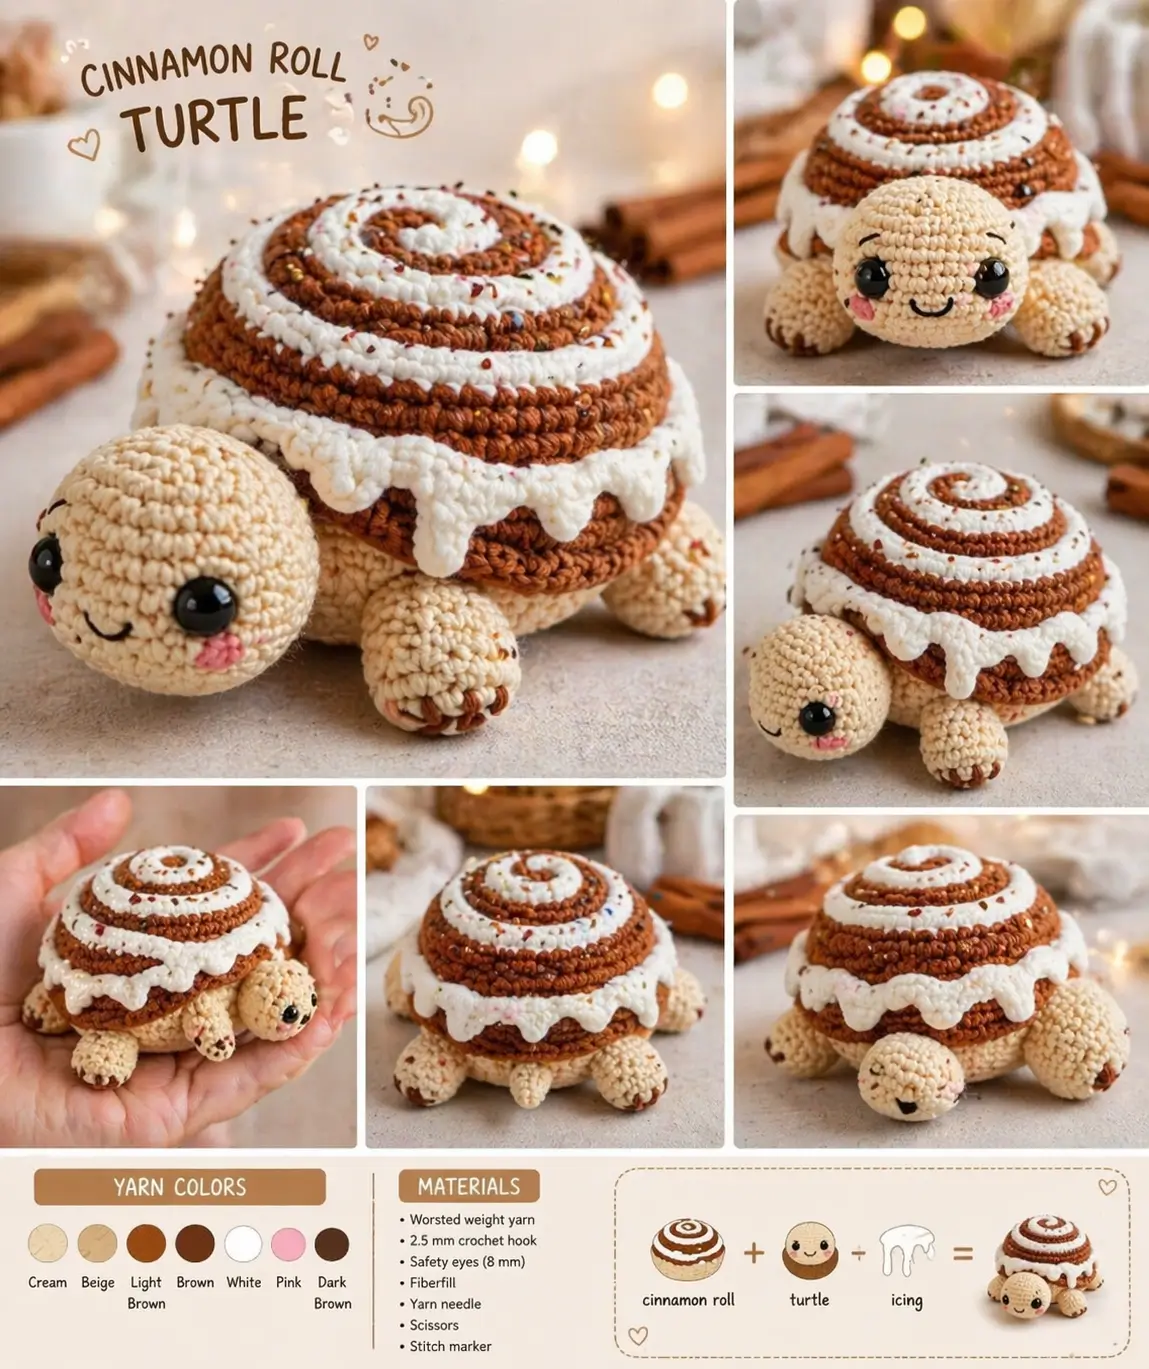
A cinnamon roll shell rises higher than a turtle dome, so balance fails before the face does. This cinnamon roll turtle amigurumi uses worsted yarn, a 2.5 mm hook, and 8 mm eyes to produce a palm-size plush for intermediate beginners. The compact footprint makes it practical for market tables, shelf styling, or small gift inventory.
The Design: What Makes This Turtle Different
You need three structural choices here. First, the shell has to sit on a flatter body than a standard sea turtle, because a tall pastry dome lifts the center of gravity. Next, the icing drip ring should be a separate piece, not surface embroidery, or the side profile reads flat. In a strong cinnamon roll turtle crochet pattern, the maker treats the shell as stacked pastry rather than a thin cap. Most weak dessert turtle amigurumi builds sag at the neckline because the head is sewn too low and the front legs are spaced too wide. Another decision matters: the head should stop one increase round earlier than the shell, which keeps the silhouette reptile-first instead of bun-first.
Project Info at a Glance
| Skill Level | Time | Finished Size | Hook | Best For |
|---|---|---|---|---|
| Intermediate beginner | Quick market make | 10.2 × 10.2 × 3.8 cm | 2.5 mm | Shelf plush / small gifts |
Materials and Tools
Yarn
- Cream — worsted — 30 g — Paintbox Cotton Aran or similar
- Beige — worsted — 16 g — same base yarn
- Light Brown — worsted — 18 g — same base yarn
- Brown — worsted — 8 g — same base yarn
- White — worsted — 12 g — same base yarn
- Pink — worsted — 2 g — same base yarn
- Dark Brown — worsted — 2 g — same base yarn
Tools
- Hook 2.5 mm
- 8 mm safety eyes
- Polyester stuffing
- Yarn needle
- Scissors
- Stitch markers
Abbreviations
MR = magic ring / sc = single crochet / inc = increase / dec = invisible decrease / sl st = slip stitch / ch = chain / BLO = back loop only / FLO = front loop only.
Work invisible decrease through the front loops only when closing rounded pieces so the head and body keep a cleaner line.
Pattern — Step by Step
Continuous spiral unless noted.
Head (Make 1)
Yarn: Cream
R1: 6 sc in MR [6]
R2: inc x6 [12]
R3: (sc, inc) x6 [18]
R4: (2 sc, inc) x6 [24]
R5: (3 sc, inc) x6 [30]
R6: sc around [30]
R7: sc around [30]
R8: sc around [30]
R9: sc around [30]
R10: (3 sc, dec) x6 [24]
R11: (2 sc, dec) x6 [18]
R12: (sc, dec) x6 [12]
R13: dec x6 [6]
Place 8 mm safety eyes between R7 and R8, 8 stitches apart. Stuff firmly after R10 and finish stuffing before R12.
Fasten off. Leave 25 cm tail.
Body (Make 1)
Yarn: Beige
R1: 6 sc in MR [6]
R2: inc x6 [12]
R3: (sc, inc) x6 [18]
R4: (2 sc, inc) x6 [24]
R5: (3 sc, inc) x6 [30]
R6: sc around [30]
R7: sc around [30]
R8: (3 sc, dec) x6 [24]
R9: sc around [24]
R10: (2 sc, dec) x6 [18]
R11: (sc, dec) x6 [12]
R12: dec x6 [6]
Stuff lightly only. Flatten the body as you close it; this piece supports the shell and should stay low.
Fasten off. Leave 25 cm tail.
Front Legs (Make 2)
Yarn: Dark Brown, then Cream
R1: 6 sc in MR with dark brown [6]
R2: inc x6 [12]
R3: change to cream, (sc, inc) x6 [18]
R4: sc around [18]
R5: sc around [18]
R6: (sc, dec) x6 [12]
R7: dec x6 [6]
Stuff lightly. Keep the toe tip dense and the upper half softer so the leg can bend under the shell.
Fasten off. Leave 18 cm tail.
Back Legs (Make 2)
Yarn: Dark Brown, then Cream
R1: 6 sc in MR with dark brown [6]
R2: inc x6 [12]
R3: change to cream, (sc, inc) x6 [18]
R4: sc around [18]
R5: (sc, dec) x6 [12]
R6: dec x6 [6]
Stuff lightly. These should finish a little shorter than the front pair.
Fasten off. Leave 18 cm tail.
Tail (Make 1)
Yarn: Beige
R1: 6 sc in MR [6]
R2: sc around [6]
Do not stuff. Fold the tail slightly before sewing so it reads as a small nub under the shell.
Fasten off. Leave 10 cm tail.
Shell Dome (Make 1)
Yarn: Light Brown
R1: 6 sc in MR [6]
R2: inc x6 [12]
R3: (sc, inc) x6 [18]
R4: (2 sc, inc) x6 [24]
R5: (3 sc, inc) x6 [30]
R6: (4 sc, inc) x6 [36]
R7: sc around [36]
R8: sc around [36]
R9: sc around [36]
R10: BLO, (4 sc, dec) x6 [30]
R11: sc around [30]
R12: (3 sc, dec) x6 [24]
Work R10 in BLO. That ridge is the attachment line for the icing drip ring. Do not close this part.
Fasten off. Leave 35 cm tail.
Icing Spiral (Make 1)
Yarn: White
Row 1: Ch 26. Starting in 2nd ch from hook, 2 sc in each chain across [50]
Roll the strip from the starting tail to form a raised spiral. Stitch only through the underside so the top edge stays lifted.
Fasten off. Leave 25 cm tail.
Icing Drip Ring (Make 1)
Yarn: White
R1: Ch 43, sl st to first ch to form a ring [42]
R2: (sl st in next 2 ch, hdc in next ch, dc in next ch, hdc in next ch, sl st in next 2 ch) repeat 6 times [42]
Pin this ring around the BLO ridge on the shell before sewing. Each dc marks the center of one drip.
Fasten off. Leave 30 cm tail.
Cheek Patches (Make 2)
Yarn: Pink
R1: 6 sc in MR [6]
R2: inc x6 [12]
Flatten before sewing. Place them lower than a standard blush dot so the head stays wide-looking.
Fasten off. Leave 12 cm tail.
Cinnamon Sugar Speckles (Accessory)
Yarn: Brown and Dark Brown
Embroider 12–18 short flecks across the shell top and 6–8 around the drip ring.
Keep the speckles uneven. A regular grid looks like polka dots, not pastry dusting.
Assembly
- Close the body opening and pinch the shape flat so the long axis runs left to right.
- Join the head to the front third of the body, with the eye line level to the table.
- Set the cheek patches one round below the eyes and about 2 stitches out from the smile line.
- Embroider a shallow smile across 3 stitches and add short brows if you want the same expression as the photo.
- Place the front legs just behind the head, angled slightly forward.
- Position the back legs wider than the front pair so the shell does not rock.
- Attach the tail centered between the back legs.
- Center the shell dome over the body and sew the open edge down evenly all around.
- Sew the icing spiral to the top center and stitch the drip ring onto the BLO ridge.
- Add the brown speckles and weave every end deep into the nearest stuffed section.
The plush is complete when it sits flat and the drip ring clears all four legs by roughly the same amount.
7 Technical Tips
- Stitch marker drift: Mark R1 on the shell and move the marker every round. Missing one increase shifts the pastry top off center and the icing spiral will look twisted from the front.
- Stuffing firmness: Pack the head firmly and keep the body softer. A soft head sinks under 8 mm eyes, while an overstuffed body lifts the shell too high.
- Invisible decrease line: Use invisible decreases on the head, body, and legs. Standard decreases leave six visible dents that show immediately on pale worsted yarn.
- Eye placement timing: Insert the eyes before the final two decrease rounds. Waiting until the head is nearly closed stretches the socket and can split the stitches around the washer.
- White-yarn tension: Crochet the icing pieces slightly looser than the shell. Tight white edging pulls upward and turns the drip ring into a collar instead of an overhang.
- Pinning order: Pin the shell at six points first: front, back, left, right, and two diagonals. Sewing without those anchors makes the shell rotate, which pushes the face off center.
- Tail weaving: Split each finishing tail and weave the halves in opposite directions for at least 3 cm. One-path weaving comes loose fastest on short legs that get handled often.
Conclusion
This build works because the shell reads as pastry from the side, not just from above. Once your last tail is woven in, photograph the plush at eye level and check that the drip ring sits evenly over all four legs. That gives you the cleanest Pinterest pin and a stronger Instagram cover image for this cinnamon roll turtle amigurumi. Post the front view, the shell close-up, and the underside, then tag it with #CinnamonRollTurtle. After that, decide whether the next version needs darker cinnamon stripes, extra sugar speckles, or a wider drip edge. Would your turtle look better with a tighter top spiral or a heavier icing overhang?









