Introduction
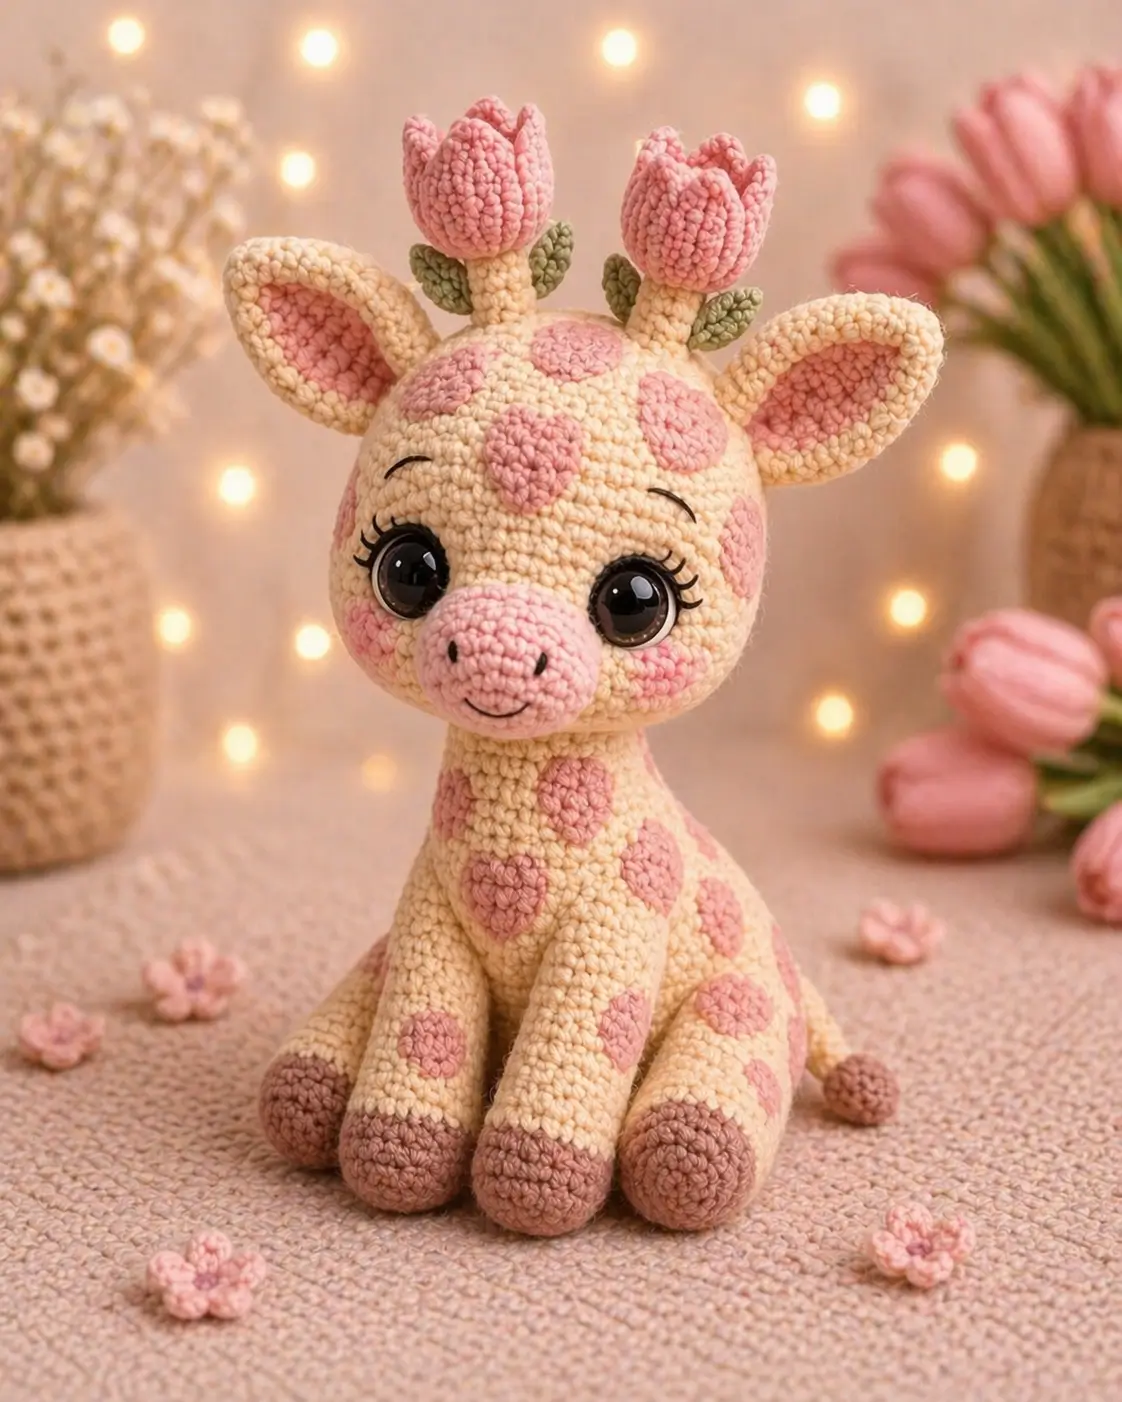
Ossicones are the first structural problem here, because this giraffe amigurumi crochet pattern replaces them with tulips that must stay upright. You will use plush chenille yarn, a 30 cm target size, and intermediate shaping with separate spots, a muzzle, and floral toppers. The result works as nursery decor, a themed gift, or a photographed shop sample.
The Design: What Makes This Giraffe Different
You are not building a generic safari toy. This version shifts mass into a broad head, narrow neck, and low seated body so the plush stays balanced instead of tipping forward. The second decision is the tulip crown: real giraffe ossicones sit proud of the skull, so short stuffed stalks work better than flat appliqué flowers. The third decision is the oversized round muzzle, which pushes the eyes outward and creates the baby proportion visible in the photo. Most top-ranking free giraffe patterns keep standard horns, brown spots, and conventional safari palettes; that leaves room for a floral variation with blush cheek patches and a more decorative nursery finish. That gap is why a plush giraffe crochet pattern with tulip toppers reads differently from a standard crochet giraffe step by step tutorial.
Project Info at a Glance
| Skill Level | Time | Finished Size | Hook | Best For |
|---|---|---|---|---|
| Intermediate | 4–6 hours | 30 cm | 5.0 mm | Nursery decoration / handmade gift |
Published giraffe references place plush chenille versions around 30–40 cm with 5.0 mm hooks, while standard worsted seated builds run smaller. This photo-based draft follows the plush range.
Materials and Tools
Yarn
- Pale cream/yellow — plush chenille — about 1 main ball — body, head, ears, stalks
- Blush pink — plush chenille — small amount — muzzle, cheek patches, spots, tulips, inner ears
- Dusty mauve-brown — plush chenille — small amount — hooves and tail tip
- Sage green — plush chenille — very small amount — tulip leaves
- Black embroidery thread — facial details
Tools
- Hook 5.0 mm
- 15 mm safety eyes
- Polyester stuffing
- Yarn needle
- Stitch markers
- Pins
- Sharp scissors
Published giraffe patterns split into two usable material paths: medium/worsted yarn around 4.0 mm hooks for smaller toys, or plush chenille around 5.0 mm hooks with larger 15 mm eyes for fuller display pieces. Jess Huff’s yardage breakdown also gives a practical baseline for how little contrast yarn a giraffe actually needs.
Abbreviations
- MR = magic ring
- sc = single crochet
- inc = increase
- dec = decrease
- sl st = slip stitch
- ch = chain
- BLO = back loop only
- FO = fasten off
Use invisible decrease by working through the front loops of the next two stitches; it closes the head and neck more cleanly than a standard decrease.
Pattern — Step by Step
Continuous spiral unless noted.
This giraffe amigurumi crochet pattern is drafted from the photo and uses a 36-stitch medium plateau for the main forms. The stitch architecture below is original, photo-derived, and built with standard amigurumi math.
Head (Make 1)
Yarn: pale cream/yellow — Source: Standard amigurumi math + photo reference
R1: 6 sc in MR (6)
R2: inc x6 (12)
R3: (sc, inc) x6 (18)
R4: (2 sc, inc) x6 (24)
R5: (3 sc, inc) x6 (30)
R6: (4 sc, inc) x6 (36)
R7–R11: sc around (36)
R12: (4 sc, dec) x6 (30)
R13: (3 sc, dec) x6 (24)
Insert 15 mm eyes between R8 and R9, 10 stitches apart.
R14: (2 sc, dec) x6 (18)
R15: (sc, dec) x6 (12)
Stuff firmly, with extra fill at the lower face.
R16: dec x6 (6)
Fasten off. Leave a 20 cm tail.
Snout (Make 1)
Yarn: blush pink — Source: Standard amigurumi math + photo reference
R1: 6 sc in MR (6)
R2: inc x6 (12)
R3: (sc, inc) x6 (18)
R4: (2 sc, inc) x6 (24)
R5–R7: sc around (24)
R8: (2 sc, dec) x6 (18)
Lightly stuff before sewing to the face.
Fasten off. Leave an 18 cm tail.
Body (Make 1)
Yarn: pale cream/yellow — Source: Standard amigurumi math + photo reference
R1: 6 sc in MR (6)
R2: inc x6 (12)
R3: (sc, inc) x6 (18)
R4: (2 sc, inc) x6 (24)
R5: (3 sc, inc) x6 (30)
R6: (4 sc, inc) x6 (36)
R7–R11: sc around (36)
R12: (4 sc, dec) x6 (30)
R13–R14: sc around (30)
R15: (3 sc, dec) x6 (24)
R16–R17: sc around (24)
R18: (2 sc, dec) x6 (18)
R19–R21: sc around (18)
Stuff firmly through the lower body and medium-firm in the neck.
Fasten off. Leave a 25 cm tail.
Front Legs (Make 2)
Yarn: dusty mauve-brown then pale cream/yellow — Source: Standard amigurumi math + photo reference
R1: 6 sc in MR (6)
R2: inc x6 (12)
R3: (sc, inc) x6 (18)
R4–R5: sc around (18)
Change to pale cream/yellow.
R6: (sc, dec) x6 (12)
R7–R18: sc around (12)
Stuff the lower two-thirds firmly; leave the top section softer for sewing.
R19: Flatten opening and sc through both sides across (6)
Fasten off. Leave a 20 cm tail.
Back Legs (Make 2)
Yarn: dusty mauve-brown then pale cream/yellow — Source: Standard amigurumi math + photo reference
R1: 6 sc in MR (6)
R2: inc x6 (12)
R3: (sc, inc) x6 (18)
R4: (2 sc, inc) x6 (24)
R5–R6: sc around (24)
Change to pale cream/yellow.
R7: (2 sc, dec) x6 (18)
R8–R12: sc around (18)
Stuff the front half more firmly than the back half so the leg rests in a seated angle.
R13: Flatten opening and sc through both sides across (9)
Fasten off. Leave a 20 cm tail.
Ears (Make 2)
Yarn: pale cream/yellow — Source: Standard amigurumi math + photo reference
R1: 6 sc in MR (6)
R2: inc x6 (12)
R3: (sc, inc) x6 (18)
R4: (2 sc, inc) x6 (24)
R5–R6: sc around (24)
R7: (2 sc, dec) x6 (18)
R8: sc around (18)
R9: Flatten opening and sc through both sides across (9)
Pinch the base after flattening so the ear tips upward.
Fasten off. Leave a 15 cm tail.
Inner Ear Inserts (Make 2)
Yarn: blush pink — Source: Standard amigurumi math + photo reference
R1: 6 sc in MR (6)
R2: inc x6 (12)
R3: (sc, inc) x6 (18)
R4: sc around (18)
R5: (sc, dec) x6 (12)
Fasten off. Leave a 12 cm tail.
Cheek Patches (Make 2)
Yarn: blush pink — Source: Standard amigurumi math + photo reference
R1: 6 sc in MR (6)
R2: inc x6 (12)
Fasten off. Leave a 10 cm tail.
Tail (Make 1)
Yarn: pale cream/yellow then blush pink — Source: Standard amigurumi math + photo reference
R1: 6 sc in MR (6)
R2–R5: sc around (6)
Change to blush pink.
R6: inc x6 (12)
R7: sc around (12)
R8: dec x6 (6)
Stuff the pom-pom tip only.
Fasten off. Leave a 15 cm tail.
Spots (Make 6 medium, 8 small)
Yarn: blush pink — Source: Standard amigurumi math + photo reference
Medium Spot
R1: 6 sc in MR (6)
R2: inc x6 (12)
R3: (sc, inc) x6 (18)
Fasten off. Leave a sewing tail.
Small Spot
R1: 6 sc in MR (6)
R2: inc x6 (12)
Fasten off. Leave a sewing tail.
Tulip Stalks (Make 2)
Yarn: pale cream/yellow — Source: Standard amigurumi math + photo reference
R1: 6 sc in MR (6)
R2–R6: sc around (6)
Stuff lightly with yarn scraps so the stalk keeps its cylinder.
Fasten off. Leave a 15 cm tail.
Tulip Leaves (Make 4)
Yarn: sage green — Source: Standard amigurumi math + photo reference
R1: 6 sc in MR (6)
R2: (sc, inc) x3 (9)
R3: sc around (9)
R4: (sc, dec) x3 (6)
R5: Flatten opening and sc through both sides across (3)
Fasten off. Leave a 10 cm tail.
Tulip Petals (Make 8; 4 per flower)
Yarn: blush pink — Source: Standard amigurumi math + photo reference
R1: 6 sc in MR (6)
R2: inc x6 (12)
R3: (sc, inc) x6 (18)
R4–R5: sc around (18)
R6: (sc, dec) x6 (12)
R7: sc around (12)
R8: Flatten opening and sc through both sides across (6)
Fasten off. Leave a 15 cm tail.
Assembly
- Sew the ears to the head, slightly above eye level and angled outward.
- Sew the body to the bottom of the head, centering the neck directly under the muzzle area.
- Sew the snout to the face, lightly stuff it, then embroider nostrils, a short curved smile, lashes, and thin brows.
- Sew the cheek patches below and slightly outside the eyes.
- Sew the front legs to the lower front of the body so the inner edges almost touch.
- Sew the back legs to the lower side/back of the body and angle them outward so the plush sits without rocking.
- Sew the tail to the back center, low on the body.
- Pin and sew the spots across the forehead, cheeks, chest, sides, and legs, using larger spots on the head and torso.
- Sew the tulip stalks to the top of the head, then attach two leaves at the base of each stalk.
- Overlap four petals around each stalk tip to form two closed tulip buds, then weave in all tails and test the seated balance on a flat surface.
The completed plush should sit upright with the tulips reading as a crown rather than loose appliqués.
7 Technical Tips
- Track the head plateau with a hard marker. Lose your place at R6–R11 and one eye will drift by a stitch, which is obvious on a wide baby-style muzzle.
- Stuff the neck harder than the upper body. A soft neck lets the head tilt backward once the tulip stalks are attached.
- Use invisible decreases on every visible taper. Standard decreases leave open slits on chenille yarn, especially at the head closure and front-leg narrowing.
- Set the eyes only after the snout is pinned in place. If you install them before checking muzzle width, the cheeks can crowd the eyes and flatten the face.
- Test chenille tension with a 12-stitch tube. If stuffing shows when you squeeze it, drop the hook by 0.5 mm before starting the actual toy.
- Pin both front legs with less than 5 mm between them. A wider gap changes the chest line and the giraffe stops reading as tucked and seated.
- Bury every sewing tail through at least 5 cm of interior path. Short hidden tails slip faster in velvet yarn because the pile reduces friction.
Conclusion
Start by making one head, one snout, and one tulip before committing to the full set. Photograph the side view after assembly, because the line from ear tip to tulip tip shows immediately whether the stalk angle is correct. Use that image for your listing photo, then pin it to Pinterest and post the finished toy on Instagram with #TulipGiraffe. Add the hook size, yarn brand, and final sitting height in the caption so later repeats stay consistent. That record matters more than the exact pink tone, because the silhouette shifts fast when the flowers lean. Did you keep the tulip stalks vertical or splay them slightly to widen the giraffe amigurumi crochet pattern?









