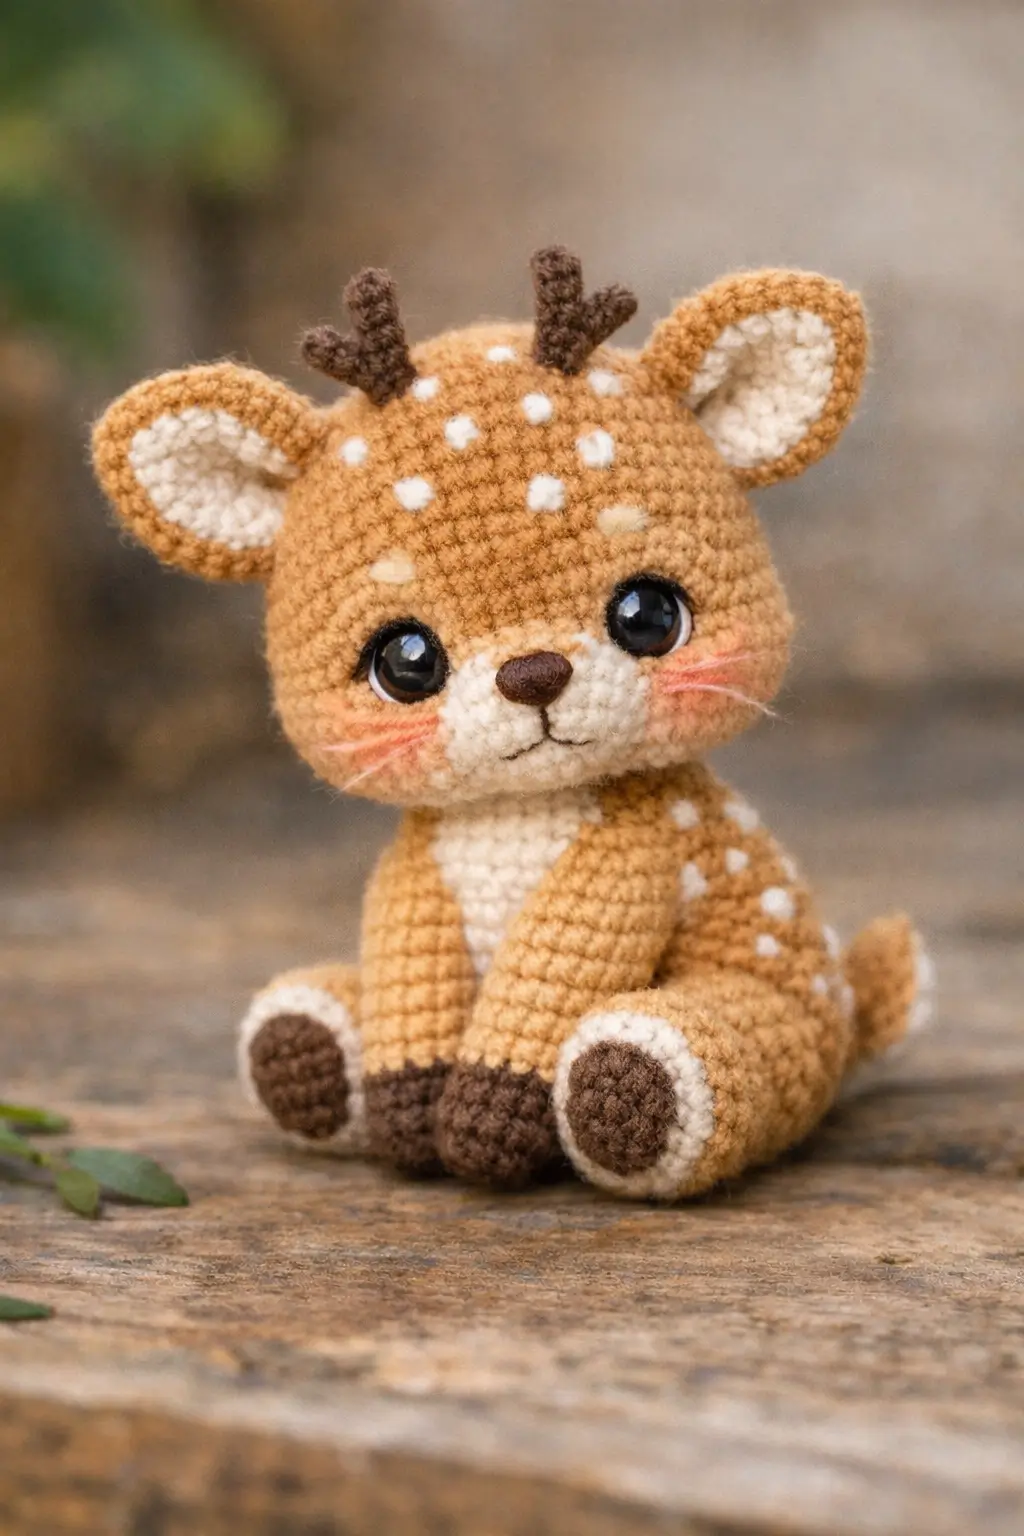
A fawn stops reading as a fawn when the white spots slide below the brow line. This deer amigurumi crochet pattern keeps them high, then builds a sitting body with DK yarn, a 2.5 mm hook, and 8–9 mm eyes. You work one compact woodland toy at intermediate level and about 14 cm tall; the finished piece sits neatly on a nursery shelf or bag charm strap.
The Design: What Makes This Fawn Different
The reference toy uses three structural choices that separate it from a generic deer. First, the forehead spots stay high and small, which keeps the face reading as a spotted fawn instead of an adult buck. Second, the antlers are short, forked, and planted near the crown; longer branches would overpower the oversized head and pull a seated toy backward. Third, the hind legs work as rounded side supports rather than straight tubes, so the body rests without a stand. A common mistake in a sitting deer amigurumi is dropping the muzzle too low and spacing the eyes too wide. That stretches the face. This version keeps the muzzle high, the chest narrow, and the tail short for balance, which fits a spotted fawn crochet pattern much better.
Project Info at a Glance
| Skill Level | Time | Finished Size | Hook | Best For |
|---|---|---|---|---|
| Intermediate | 6–8 hrs | 14 cm sitting | 2.5 mm | shelf decor, nursery gift, woodland display |
Materials and Tools
Yarn
- Light tan / caramel — DK — 55 g — DROPS Lima or YarnArt Jeans
- Dark brown — DK — 10 g — same base yarn for antlers, hooves, nose
- Cream / white — DK — 5 g — same base yarn for muzzle, chest, ears, spots
- Soft peach or pink embroidery floss — scrap amount — cheek blush lines
Tools
- Hook 2.5 mm
- Safety eyes 8–9 mm
- Polyester stuffing
- Tapestry needle
- Stitch markers
- Sewing pins
- Brown embroidery thread
- Soft pastel or colored pencil for cheek tinting (optional)
Abbreviations
MR / sc / inc / dec / sl st / ch / BLO / FLO
Invisible decrease: insert the hook through the front loops of the next two stitches, yarn over, pull through both, yarn over, pull through two.
Pattern — Step by Step
Continuous spiral unless noted.
Head
Yarn: light tan
R1: 6 sc in MR (6)
R2: inc x6 (12)
R3: (sc 1, inc) x6 (18)
R4: (sc 2, inc) x6 (24)
R5: (sc 3, inc) x6 (30)
R6: (sc 4, inc) x6 (36)
R7: sc around (36)
R8: sc around (36)
R9: sc around (36)
R10: sc around (36)
R11: sc around (36)
R12: sc around (36)
R13: sc around (36)
Insert 8–9 mm eyes between R10 and R11 with 7 visible stitches between the inner edges.
R14: (sc 4, dec) x6 (30)
R15: (sc 3, dec) x6 (24)
R16: (sc 2, dec) x6 (18)
Stuff firmly.
R17: (sc 1, dec) x6 (12)
R18: dec x6 (6)
Fasten off. Leave a 20 cm tail.
Muzzle Panel
Yarn: cream
R1: 6 sc in MR (6)
R2: inc x6 (12)
R3: (sc 1, inc) x6 (18)
Fasten off. Leave a 25 cm tail. Flatten lightly into a low oval when sewing.
Chest Panel
Yarn: cream
Row 1: ch 5, sc in 2nd ch from hook and across (4)
Row 2: ch 1, turn, sc across (4)
Row 3: ch 1, turn, sc across (4)
Row 4: ch 1, turn, sc across (4)
Row 5: ch 1, turn, sc across (4)
Row 6: ch 1, turn, sc across (4)
Row 7: ch 1, turn, sc across (4)
Fasten off. Leave a 20 cm tail.
Cheek Patches (Make 2)
Yarn: pale peach or blush-tinted cream
R1: 6 sc in MR (6)
R2: inc x6 (12)
Fasten off. Leave a 12 cm tail. These sit low and lateral under the eyes; they should not cover the muzzle panel.
Body
Yarn: light tan
R1: 6 sc in MR (6)
R2: inc x6 (12)
R3: (sc 1, inc) x6 (18)
R4: (sc 2, inc) x6 (24)
R5: (sc 3, inc) x6 (30)
R6: (sc 4, inc) x6 (36)
R7: sc around (36)
R8: sc around (36)
R9: sc around (36)
R10: (sc 4, dec) x6 (30)
R11: sc around (30)
R12: (sc 3, dec) x6 (24)
R13: sc around (24)
R14: BLO sc around (24)
R15: (sc 2, dec) x6 (18)
R16: sc around (18)
R17: sc around (18)
R18: sc around (18)
R19: (sc 1, dec) x6 (12)
R20: sc around (12)
R21: sc around (12)
Stuff with more filling in the lower back than in the neck so the toy sits.
Fasten off. Leave a 25 cm tail.
Front Legs (Make 2)
Yarn: dark brown, then light tan
R1: 6 sc in MR in dark brown (6)
R2: inc x6 (12)
R3: sc around (12)
R4: sc around (12)
R5: change to light tan, sc around (12)
R6: sc around (12)
R7: sc around (12)
R8: sc around (12)
R9: sc around (12)
R10: sc around (12)
Lightly stuff the lower half only.
Close: flatten and sc through both layers across (6)
Fasten off. Leave a 20 cm tail.
Back Legs (Make 2)
Yarn: cream, then light tan
R1: 6 sc in MR in cream (6)
R2: inc x6 (12)
R3: (sc 1, inc) x6 (18)
R4: sc around (18)
R5: change to light tan, sc around (18)
R6: sc around (18)
R7: sc around (18)
R8: sc around (18)
Stuff the front half only so the leg stays squat and angled.
Close: flatten and sc through both layers across (9)
Fasten off. Leave a 20 cm tail.
Hind Hoof Pads (Make 2)
Yarn: dark brown
R1: 6 sc in MR (6)
R2: inc x6 (12)
R3: sc around (12)
Fasten off. Leave a 15 cm tail. These sew to the center front of each cream hind hoof.
Ears (Make 2)
Yarn: light tan outer, cream inner
Outer ear
R1: 6 sc in MR in light tan (6)
R2: inc x6 (12)
R3: (sc 1, inc) x6 (18)
R4: sc around (18)
Fasten off. Leave a 20 cm tail.
Inner ear
R1: 6 sc in MR in cream (6)
R2: inc x6 (12)
R3: sc around (12)
Fasten off. Leave a 15 cm tail.
Pin the cream inner ear to the lower center of the tan outer ear. Sew in place, then pinch the base before attaching to the head.
Antlers (Make 2)
Yarn: dark brown — not worked in spiral
Main stem: ch 6
Row 1: starting in 2nd ch from hook, sl st 5 (5)
Branch 1: join yarn into the 3rd chain from the base, ch 4, starting in 2nd ch from hook sl st 3 back (3)
Branch 2: join yarn into the 4th chain from the base, ch 3, starting in 2nd ch from hook sl st 2 back (2)
Fasten off. Leave a 12 cm tail. Make both antlers mirror each other.
Tail
Yarn: light tan
R1: 6 sc in MR (6)
R2: inc x6 (12)
R3: sc around (12)
R4: dec x6 (6)
Stuff very lightly or leave unstuffed for a flatter tail.
Fasten off. Leave a 15 cm tail. Add 2–3 cream stitches at the tail tip after sewing if you want the white underside visible.
Spot Appliqués (Make 7)
Yarn: white
R1: 6 sc in MR (6)
Fasten off. Leave a 10 cm tail. Make five for the forehead and two for the upper back. Pull the ring tight so each spot stays dense and round.
Assembly
- Sew the chest panel to the front center of the body, starting just below the neck and ending above the lower belly crease.
- Sew the muzzle panel to the lower half of the head so its top edge sits below the eyes and its lower edge reaches the chin line.
- Embroider the nose in dark brown across the upper center of the muzzle panel, then add a short vertical stitch and two shallow mouth curves.
- Attach the cheek patches low on the face, one under each eye and one stitch outside the muzzle edge. Add three soft pink whisker-blush lines on each side.
- Sew the head to the body with a slight forward tilt. The chin should sit just above the top of the chest panel.
- Sew the front legs to the body front, aligned with the lower edge of the chest panel so both hooves angle slightly inward.
- Sew the back legs low on the body sides. Attach the hind hoof pads to the cream fronts before fixing the legs to the body if that is easier for your handling style.
- Sew the ears on the crown with the bases angled outward. Place the antlers between the ears and slightly forward of center.
- Sew the tail to the lower back so it props the toy without lifting the seat line.
- Sew the spot appliqués onto the forehead and upper back, keeping all forehead spots above the eye line and below the antler bases.
The seated fawn should rest on its back legs and tail with the head centered over the chest.
7 Technical Tips
- Stitch marker drift: Move the marker after every round, not every two rounds. A one-stitch drift by the end of the 36-stitch head plateau shifts the muzzle seam and throws the antlers off center.
- Stuffing firmness: Pack the head until it springs back when pressed with a thumb, but keep the neck firmer than the lower body. An underfilled crown lets 8–9 mm eyes tilt inward after the head is sewn on.
- Invisible decreases: Work every head and body decrease through the front loops only. Full-loop decreases leave six visible ridges across the cheek line and flatten the fawn face.
- Eye placement timing: Install the eyes before R14 of the head. Place them between R10 and R11 with 7 visible stitches between the inner edges; wider spacing makes the muzzle look too narrow.
- Velvet substitution: If you switch from DK cotton to baby velvet, drop at least one hook size from the yarn label and test a 12-stitch hoof round first. Loose plush tension opens gaps around the muzzle panel and neck join.
- Pinning layout: Pin ears first, then antlers, then the head. Keep the ear bases about 4 stitches apart and the antler stems one round behind the forehead spots so the crown does not look crowded.
- Tail weaving: Leave a minimum 12 cm sewing tail on the body, ears, and tail. Weave each tail through three direction changes inside the stuffing so repeated handling does not spit the ends back out.
Conclusion
Check the symmetry from the front before you photograph, gift, or list the toy. First confirm that the five forehead spots stay above the eyes, the antlers match in height, and both hind hoof pads point forward. Then pin this deer amigurumi crochet pattern to Pinterest and post the finished fawn on Instagram with #SpottedFawnDeer. A second version in darker tan works well without changing the stitch math. The next step is practical: swatch one 12-stitch hoof round, then start the head so the eye line is locked early. For this deer amigurumi crochet pattern, would you keep the short antlers or turn the same face into an antler-free fawn?









