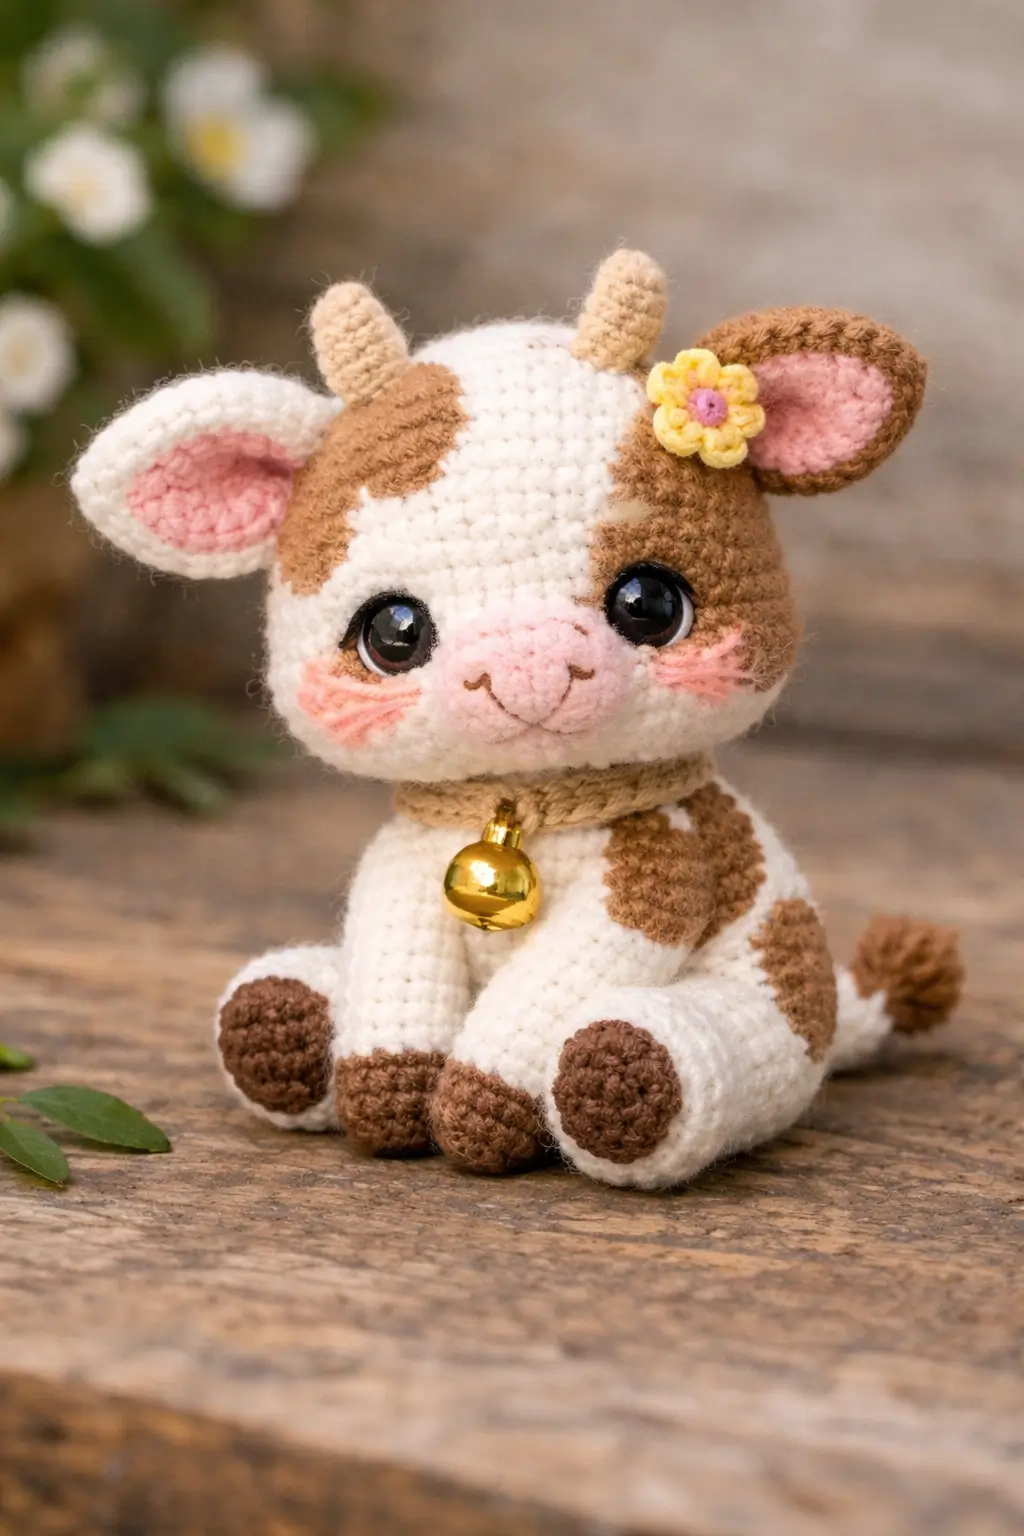
A seated calf needs the muzzle wider than each hoof cap. That proportion shapes this cow amigurumi crochet pattern from the first increase round. You will use worsted yarn, a 3.5 mm hook, and 12 mm safety eyes to make an intermediate calf that lands close to 20 cm tall. It works well as a shelf plush because the broad back legs hold the body upright.
The Design: What Makes This Calf Different
You will notice three structural choices here. First, the head stays wider than the body because a calf carries the muzzle low and the cheeks forward; narrow that too soon and the toy starts reading as a lamb. Second, the back legs are bulkier than the front legs so the sitting pose throws weight to the rear instead of pitching forward. Third, the snout is built as a shallow cup, not a flat oval, which gives room for nostrils, blush, and the smile line. Published cow patterns often favor one-piece minis or much taller standing forms; this sitting cow crochet pattern adapts that family of shapes into a compact mini cow amigurumi with a photographed seated profile. A common error is sewing the ears too high, which visually hides the horns from the front.
Project Info at a Glance
| Skill Level | Time | Finished Size | Hook | Best For |
|---|---|---|---|---|
| Easy/Intermediate | 6–8 hours | Approx. 20 cm | 3.5 mm | Shelf plush, nursery decor, farm gift topper |
Materials and Tools
Yarn
- Cream/white — worsted #4 — 25 g — Lion Brand Feels Like Butta or similar
- Light brown — worsted #4 — 25 g — Lion Brand Jeans Khaki or similar
- Pink — worsted #4 — 5 g — snout and cheeks
- Beige — worsted #4 — 5 g — horns
- Yellow — scrap amount — flower petals
- Lavender — scrap amount — flower center
Tools
- Hook 3.5 mm
- 12 mm safety eyes
- Polyester stuffing
- Tapestry needle
- Stitch markers
- Black embroidery thread
- Pink embroidery thread
- 10–12 mm jingle bell or gold bead
Abbreviations
MR / sc / inc / dec / sl st / ch / BLO
Use invisible decrease through the front loops only; a regular decrease leaves a harder ridge across rounded head sections.
Pattern — Step by Step
Continuous spiral unless noted.
Published mini cow references often keep the legs, body, and head in one piece. This draft separates the parts so the calf can sit deeper on the back legs, take a collar cleanly at the neck, and hold the flower placement without pulling the head off-center.
Head (Make 1)
Yarn: cream
- R1: 6 sc in MR (6)
- R2: inc x6 (12)
- R3: (sc, inc) x6 (18)
- R4: (2 sc, inc) x6 (24)
- R5: (3 sc, inc) x6 (30)
- R6: (4 sc, inc) x6 (36)
- R7: (5 sc, inc) x6 (42)
- R8: sc around (42)
- R9: sc around (42)
- R10: sc around (42)
- R11: sc around (42)
- R12: sc around (42)
- R13: sc around (42)
- R14: sc around (42)
- R15: (5 sc, dec) x6 (36)
- R16: (4 sc, dec) x6 (30)
- R17: (3 sc, dec) x6 (24)
- R18: (2 sc, dec) x6 (18)
Insert safety eyes between R11 and R12, 8 stitches apart. Add stuffing before R19.
- R19: (sc, dec) x6 (12)
- R20: dec x6 (6)
Fasten off. Leave a 20 cm tail.
Body (Make 1)
Yarn: cream
- R1: 6 sc in MR (6)
- R2: inc x6 (12)
- R3: (sc, inc) x6 (18)
- R4: (2 sc, inc) x6 (24)
- R5: (3 sc, inc) x6 (30)
- R6: (4 sc, inc) x6 (36)
- R7: sc around (36)
- R8: sc around (36)
- R9: sc around (36)
- R10: sc around (36)
- R11: (4 sc, dec) x6 (30)
- R12: sc around (30)
- R13: sc around (30)
- R14: (3 sc, dec) x6 (24)
- R15: sc around (24)
- R16: sc around (24)
- R17: (2 sc, dec) x6 (18)
- R18: sc around (18)
Stuff the lower half firmly and the upper half a little lighter so the neck can curve.
Fasten off. Leave a 25 cm tail.
Arms / Front Legs (Make 2)
Yarn: brown then cream
- R1: 6 sc in MR (6)
- R2: inc x6 (12)
- R3: (sc, inc) x6 (18)
- R4: BLO sc around (18)
- R5: sc around (18)
Change to cream.
- R6: (sc, dec) x6 (12)
- R7: sc around (12)
- R8: sc around (12)
- R9: sc around (12)
- R10: sc around (12)
- R11: sc around (12)
- R12: sc around (12)
- R13: sc around (12)
Stuff the hoof only. Flatten.
Fasten off. Leave a 20 cm tail.
Back Legs (Make 2)
Yarn: brown then cream
- R1: 6 sc in MR (6)
- R2: inc x6 (12)
- R3: (sc, inc) x6 (18)
- R4: (2 sc, inc) x6 (24)
- R5: BLO sc around (24)
- R6: sc around (24)
Change to cream.
- R7: sc around (24)
- R8: (2 sc, dec) x6 (18)
- R9: sc around (18)
- R10: sc around (18)
- R11: sc around (18)
- R12: sc around (18)
- R13: sc around (18)
Stuff the front of the hoof firmly and the upper leg lightly. Flatten.
Fasten off. Leave a 22 cm tail.
Ears (Make 2 outer + 2 inner)
Yarn: outer ear in cream for the left ear and brown for the right ear; inner ear in pink
Outer ear
- R1: 6 sc in MR (6)
- R2: inc x6 (12)
- R3: (sc, inc) x6 (18)
- R4: (2 sc, inc) x6 (24)
- R5: sc around (24)
Flatten. Fasten off with a long tail.
Inner ear
- R1: 6 sc in MR (6)
- R2: inc x6 (12)
- R3: (sc, inc) x6 (18)
- R4: sc around (18)
Fasten off with a long tail.
Sew the pink inner ear onto the center of each outer ear, then pinch the base before attaching.
Horns (Make 2)
Yarn: beige
- R1: 6 sc in MR (6)
- R2: sc around (6)
- R3: inc x6 (12)
- R4: sc around (12)
- R5: sc around (12)
Stuff lightly so the horn keeps a rounded tip.
Fasten off. Leave a 15 cm tail.
Snout (Make 1)
Yarn: pink
- R1: 6 sc in MR (6)
- R2: inc x6 (12)
- R3: (sc, inc) x6 (18)
- R4: (2 sc, inc) x6 (24)
- R5: sc around (24)
- R6: sc around (24)
Leave open. Light stuffing only during sewing.
Fasten off. Leave a 25 cm tail.
Cheek Patches (Make 2)
Yarn: pale pink
- R1: 6 sc in MR (6)
- R2: inc x6 (12)
- Sl st to close.
Fasten off. Leave a 10 cm tail.
Spots and Face Patches (Make 4)
Yarn: light brown
Large shoulder spot
- R1: 6 sc in MR (6)
- R2: inc x6 (12)
- R3: (sc, inc) x6 (18)
Fasten off.
Medium body spot x2
- R1: 6 sc in MR (6)
- R2: inc x6 (12)
Fasten off.
Small forehead patch
- R1: 6 sc in MR (6)
Fasten off.
Stretch the edges slightly when pinning so the spots look less circular.
Tail (Make 1)
Yarn: cream and brown
- R1: 6 sc in MR (6)
- R2: sc around (6)
- R3: sc around (6)
- R4: sc around (6)
Fasten off. Leave a 15 cm tail.
Tie 6 brown strands, each about 8 cm long, through the end round. Knot and trim into a puff.
Flower Accessory (Make 1)
Yarn: lavender center, yellow petals
With lavender:
- R1: 5 sc in MR (5)
- Sl st to first sc. Change to yellow.
Petals: (sl st, ch 2, 2 dc, ch 2, sl st) in same stitch x5.
Fasten off. Leave a 12 cm tail.
Collar and Bell (Make 1)
Yarn: brown
Ch 24. Join with sl st, taking care not to twist.
- Round 1: sc around (24)
Fasten off. Leave a 20 cm tail.
Attach a 10–12 mm jingle bell or gold bead at the center front.
Assembly
- Sew the head to the body, centering the chin over the front of the body opening and adding a little extra stuffing at the neck as you close.
- Position the snout so its top edge sits just below the eyes, then sew it on with light stuffing inside.
- Embroider two nostrils on the snout and a short smile line that drops slightly at center before rising at both sides.
- Sew the cheek patches one round below the eyes, then add three short pink blush stitches on each patch.
- Attach the horns between rounds 4 and 6 from the top of the head, spacing them about 6 stitches apart.
- Sew the ears slightly lower than the horns, with the pinched edge angled outward so the inner pink remains visible from the front.
- Fix the front legs to the lower front body so the brown hoof caps line up evenly when viewed head-on.
- Sew the back legs at the side seams, angled forward enough that the hoof circles peek out in front while the calf remains seated.
- Add the spots and face patches, placing one medium patch over the right face side, one small patch over the left forehead, and the remaining spots on shoulder and flank; then sew on the tail at the back center.
- Wrap on the collar, stitch the bell at center front, and secure the flower at the base of the brown ear.
The finished calf should sit without external support once both back legs are pitched slightly forward.
7 Technical Tips
- Mark the last stitch of every increase round. Miss one increase on the head and the eye gap shifts by two stitches by the time you reach R11.
- Pack the head firmer than the body. A useful target is about 20% more stuffing in the head so the snout does not drag the face downward after assembly.
- Work invisible decreases on all visible curves. Standard decreases leave a harder seam line across R15–R19 of the head and make the cheeks look segmented.
- Install the eyes before the first decrease round. On this calf, set them between R11 and R12 with 8 visible stitches between eyes or the snout will crowd the lower face.
- If you swap to velvet or chenille, reduce the eye size by about 2 mm. Bulkier fibers visually enlarge the eye socket and can make a 12 mm eye look oversized.
- Pin the back legs before sewing and check the forward reach. The front edge of each back hoof should sit roughly 1 to 1.5 cm ahead of the body’s side seam for a stable seated pose.
- Weave the collar tail through the neck in two directions. A single straight pass lets the bell drift to one side after handling or display moves.
Conclusion
Start with the head and one front leg first, then check that your tension still gives a balanced look against 12 mm eyes before making the full set. Once the calf is assembled, take one front photo and one side photo so the horn spacing, muzzle width, and seated angle read clearly. Save those images for Pinterest and post the finished toy on Instagram with #BellCollarCalf. This cow amigurumi crochet pattern is built around a stable seated shape, a visible flower ear, and a centered bell line under the chin. Did you keep the flower on the brown ear, or did you move it to the cream ear to balance the face patch placement?









