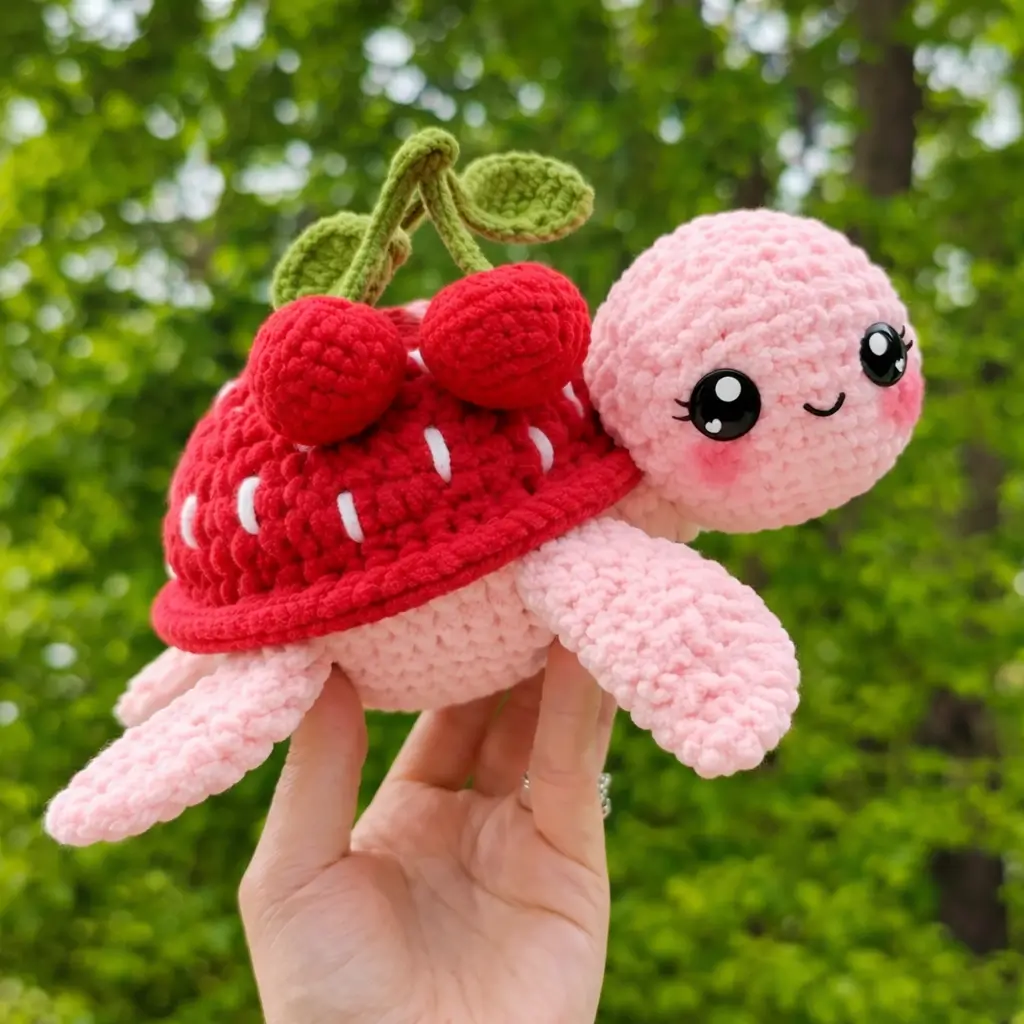
A turtle shell only reads as strawberry once the rim flares wider than the body and the seed marks stay on the dome, not the brim. This strawberry turtle crochet pattern uses size 6 plush yarn, a 5 mm hook, and a large-format build for a 23–25 cm display plush suited to beginner-intermediate makers. The cherry topper gives the piece a stronger shelf silhouette and makes it more distinct for market tables.
The Design: What Makes Strawberry Turtle Different
You need three shape decisions here. First, the shell has to project past the body with a late flare round, otherwise the plush reads as a standard sea turtle wearing fruit colors. Second, the head needs a longer front profile than a round mini turtle, because the photographed piece pushes the face beyond the shell rim and keeps the eyes fully visible. Third, the topper has to sit high enough to clear the head but low enough that the toy still balances on the belly. In a typical fruit turtle crochet pattern, sellers often stop at a leaf accent. This version goes further by adding paired cherries and a three-leaf crown. The common mistake with a chenille turtle amigurumi is placing the seed embroidery on the brim round, which flattens the berry effect. Public strawberry turtle patterns also show how size shifts sharply with yarn choice, from tiny mini builds to larger chenille plush versions.
Project Info at a Glance
| Skill Level | Time | Finished Size | Hook | Best For |
|---|---|---|---|---|
| Beginner / Intermediate | Not publicly stated | 22.9–25.4 cm | 5.0 mm | Market plush, themed gifts |
Public listings for comparable strawberry turtles place the larger chenille build at about 9 in wide by 10 in long with a 5.0 mm hook and 12 mm eyes. Smaller public versions drop to about 6 cm or 10–12 cm depending on yarn and hook.
Materials and Tools
Yarn
For the photographed scale, work in plush chenille or blanket-style size 6 yarn. Public strawberry turtle listings most often use size 6 for the larger plush format, while smaller free versions use weight 5 or lighter cotton options.
- Pale pink — super bulky / size 6 — about 120–140 g — Bernat Blanket Baby, Sweet Snuggles Lite, or a similar chenille
- Red — super bulky / size 6 — about 80–100 g — same yarn line as the body
- Green — super bulky / size 6 — about 15–20 g — for stems and leaves
- White — super bulky / size 6 or medium cotton — small amount — for shell seeds
- Black — medium cotton — small amount — for smile embroidery
- Dusty pink — small amount — for cheek patches if you prefer sewn circles over brushed blush
Tools
- Hook 5.0 mm
- Safety eyes 12 mm
- Polyfill stuffing
- Tapestry needle
- Stitch markers
- Scissors
- Pins or clips for assembly
Abbreviations
MR / sc / inc / dec / sl st / ch / BLO / FLO
Invisible decrease keeps the decrease line tighter, which matters on chenille because open gaps show more clearly than they do on cotton.
Pattern — Step by Step
Continuous spiral unless noted. The stitch plan below is a photo-based original adaptation built with standard amigurumi math and scaled to the larger public chenille size range.
Head (Make 1)
Yarn: pale pink chenille — Source: photo-based adaptation using standard amigurumi math
R1: 6 sc in MR (6)
R2: inc ×6 (12)
R3: (1 sc, inc) ×6 (18)
R4: (2 sc, inc) ×6 (24)
R5: (3 sc, inc) ×6 (30)
R6: (4 sc, inc) ×6 (36)
R7: (5 sc, inc) ×6 (42)
R8: sc around (42)
R9: sc around (42)
R10: sc around (42)
R11: sc around (42)
R12: sc around (42)
R13: (5 sc, dec) ×6 (36)
R14: sc around (36)
R15: (4 sc, dec) ×6 (30)
R16: sc around (30)
R17: (3 sc, dec) ×6 (24)
R18: (2 sc, dec) ×6 (18)
R19: (1 sc, dec) ×6 (12)
R20: dec ×6 (6)
Place 12 mm eyes between R10 and R11, about 10 sts apart. Embroider the smile after stuffing, not before. Stuff firmly from R17 onward.
Fasten off. Leave a 30 cm tail.
Body (Make 1)
Yarn: pale pink chenille — Source: photo-based adaptation using standard amigurumi math
R1: 6 sc in MR (6)
R2: inc ×6 (12)
R3: (1 sc, inc) ×6 (18)
R4: (2 sc, inc) ×6 (24)
R5: (3 sc, inc) ×6 (30)
R6: (4 sc, inc) ×6 (36)
R7: (5 sc, inc) ×6 (42)
R8: sc around (42)
R9: sc around (42)
R10: sc around (42)
R11: (5 sc, dec) ×6 (36)
R12: sc around (36)
R13: sc around (36)
R14: (4 sc, dec) ×6 (30)
R15: sc around (30)
R16: (3 sc, dec) ×6 (24)
R17: (2 sc, dec) ×6 (18)
R18: (1 sc, dec) ×6 (12)
R19: dec ×6 (6)
Stuff to medium firmness. The body should compress slightly under the shell.
Fasten off. Leave a 25 cm tail.
Front Flippers (Make 2)
Yarn: pale pink chenille — Source: photo-based adaptation using standard amigurumi math
R1: 6 sc in MR (6)
R2: inc ×6 (12)
R3: (1 sc, inc) ×6 (18)
R4: sc around (18)
R5: sc around (18)
R6: sc around (18)
R7: sc around (18)
R8: (1 sc, dec) ×6 (12)
R9: sc around (12)
R10: sc around (12)
R11: sc around (12)
R12: sc around (12)
R13: sc around (12)
Do not overstuff. Add a pinch of stuffing only at the shoulder end so the flipper can drape forward.
Fasten off. Leave a 20 cm tail.
Rear Flippers (Make 2)
Yarn: pale pink chenille — Source: photo-based adaptation using standard amigurumi math
R1: 6 sc in MR (6)
R2: inc ×6 (12)
R3: (1 sc, inc) ×6 (18)
R4: sc around (18)
R5: sc around (18)
R6: (1 sc, dec) ×6 (12)
R7: sc around (12)
R8: sc around (12)
R9: sc around (12)
Keep these shorter than the front pair. Light stuffing at the base is enough.
Fasten off. Leave a 20 cm tail.
Tail (Make 1)
Yarn: pale pink chenille — Source: photo-based adaptation
Ch 4.
Row 1: starting in second ch from hook, sl st, sc, sl st.
This tail is intentionally flat and short so it does not lift the back edge of the plush.
Fasten off. Leave a 12 cm tail.
Strawberry Shell (Make 1)
Yarn: red chenille — Source: photo-based adaptation using standard amigurumi math
R1: 6 sc in MR (6)
R2: inc ×6 (12)
R3: (1 sc, inc) ×6 (18)
R4: (2 sc, inc) ×6 (24)
R5: (3 sc, inc) ×6 (30)
R6: (4 sc, inc) ×6 (36)
R7: (5 sc, inc) ×6 (42)
R8: sc around (42)
R9: sc around (42)
R10: sc around (42)
R11: BLO sc around (42)
R12: (6 sc, inc) ×6 (48)
R13: sc around (48)
The BLO round creates the break line between dome and brim. Embroider short white seed dashes after assembly so you can keep them off the brim.
Fasten off. Leave a 35 cm tail.
Cheek Patches (Make 2)
Yarn: dusty pink or blush pink — Source: standard amigurumi math
R1: 6 sc in MR (6)
R2: inc ×6 (12)
Flatten each circle lightly. Skip these if you prefer powder blush instead.
Fasten off. Leave a 10 cm tail.
Cherries (Make 2)
Yarn: red chenille — Source: standard amigurumi math
R1: 6 sc in MR (6)
R2: inc ×6 (12)
R3: (1 sc, inc) ×6 (18)
R4: sc around (18)
R5: sc around (18)
R6: (1 sc, dec) ×6 (12)
R7: dec ×6 (6)
Stuff each cherry before R7. Pull the closing tail slightly inward to make a shallow top dimple.
Fasten off. Leave a 20 cm tail.
Cherry Stems (Make 2)
Yarn: green chenille or firm cotton — Source: photo-based adaptation
Ch 16.
Row 1: sl st in second ch from hook and in each ch across.
Make one stem 1–2 cm longer than the other for the staggered topper seen in the photo.
Fasten off. Leave a 15 cm tail on each.
Leaves (Make 3)
Yarn: green chenille — Source: photo-based adaptation
Ch 6.
Round 1: starting in second ch from hook, sc, hdc, dc, hdc, 3 sc in last ch, working along opposite side hdc, dc, hdc, sc (10)
Shape the leaf with your fingers before sewing. A slight cup reads better than a flat oval on chenille.
Fasten off. Leave a 15 cm tail.
Assembly
- Pin the head to the front of the body so the lower half of the face sits slightly below the future shell line.
- Sew the head to the body with small whip stitches and add extra stuffing through the last opening before closing the seam.
- Attach the front flippers at the body sides, roughly spanning R8 to R12, angled about 35–45 degrees downward.
- Attach the rear flippers farther back, centered around R13 to R16, with the tips extending past the shell edge only slightly.
- Sew the tail to the back center, low on the body, so it stays visible from side view but does not touch the table first.
- Place the shell over the top half of the body and pin the brim so it projects about 0.8–1 cm past the body on each side.
- Sew the shell down around its lower dome edge, not all the way through the outer brim, so the rim keeps its flare.
- Embroider white strawberry seeds as short vertical dashes across R6 to R10 of the shell dome, spacing them irregularly rather than in strict rows.
- Sew or glue the cheek patches below the eyes, embroider the smile, then stitch each cherry to a stem and anchor the stems at the shell crown.
- Add the three leaves around the stem base, one centered and two angled outward, then check the plush from the side and tighten any topper stitches that pull the shell backward.
When worked in size 6 chenille with a 5 mm hook, the assembled plush lands close to the larger public strawberry turtle size range.
7 Technical Tips
- Marker drift on the shell: The first stitch after the BLO break round is the one most likely to shift. Mark R11 and R12 separately so the brim increase stays centered.
- Head firmness: Pack the head about 25% firmer than the body. A soft head will tip downward once the shell and cherries are attached.
- Invisible decrease quality: Chenille hides the front loops but exposes broken fibers. Work dec rounds slowly and do not yank the yarn through both loops at once.
- Eye placement timing: Install the eyes before the head drops below 24 sts. After that point, the opening is wide enough for stuffing but awkward for eye washers.
- Brim ripple control: If R12 and R13 wave too hard, your tension is loose for the yarn. Drop the hook by 0.5 mm or remove one plain shell round before the BLO break.
- Pinning angle: Front flippers that sit straight out make the toy look flat. Pin them downward first, then rotate one or two stitches until the nose line lifts.
- Tail weaving: Leave at least 5 cm of tail on all topper pieces and weave in three directions. Short buried tails can slip back out under the weight of the cherries.
Conclusion
The photographed plush works because the shell flare, forward head placement, and cherry crown are all doing separate jobs at once. Copy only the colors and the piece turns generic. Build the shell rim correctly, keep the face ahead of the brim, and mount the topper after the balance check. Your next step is simple: make the shell first, test the brim projection on the stuffed body, then commit to seed placement. When you post the result on Pinterest and Instagram, use #StrawberryTurtleCherryTopper and show one side profile and one top view. Did you center both cherries, or offset one stem for a cleaner silhouette on this strawberry turtle crochet pattern?









