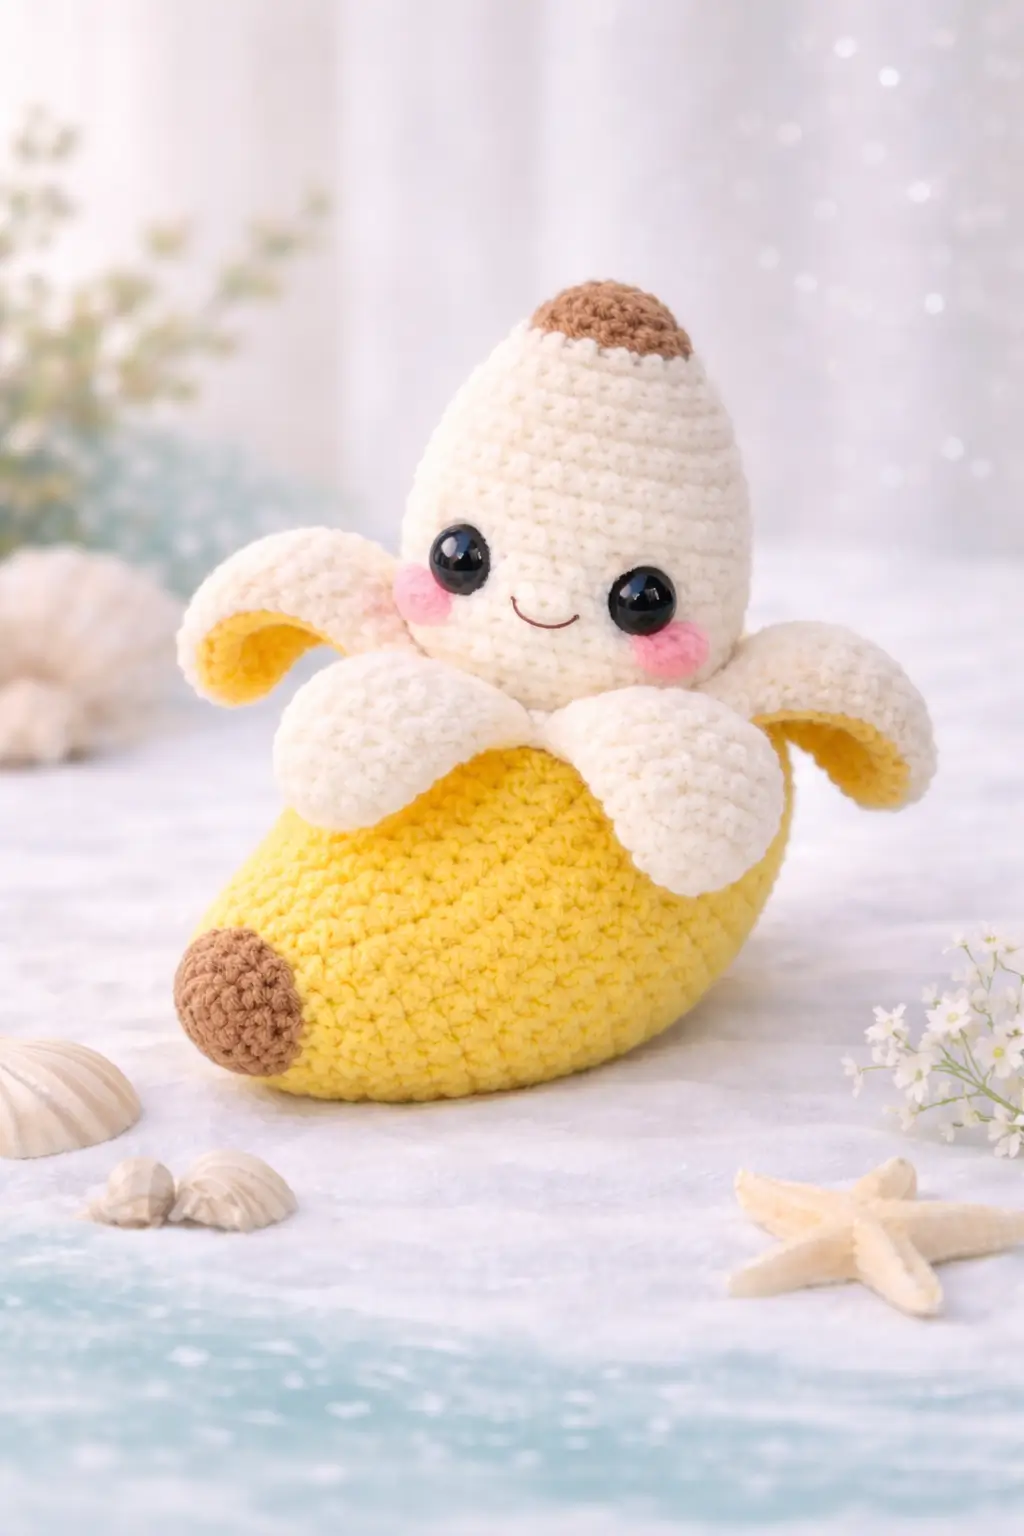
A peeled banana only reads correctly when the peel flaps fall wide and the fruit section stays upright. This banana amigurumi crochet pattern builds that balance with worsted yarn, a 3.5 mm hook, four peel lobes, and a medium-size 17 cm finish aimed at intermediate makers. It works well as desk decor because the curved base and low face placement keep the character visible from the front.
The Design: What Makes Banana Different
The first structural choice is the head-to-body proportion. This version uses an egg-shaped cream fruit section that reaches a 36-stitch plateau, because the photo shows a tall fruit core rather than a narrow realistic banana. A smaller plateau would sharpen the silhouette too much. Second, the peel flaps are made as separate rounded pieces and sewn slightly lifted at the base. That keeps them from collapsing across the face, which is the main failure point in many peeled banana amigurumi builds. Third, the yellow body is slightly curved and broader than the fruit section. The curve gives the toy a seated stance instead of a straight fruit profile. Many crochet banana pattern tutorials focus on realism first; this one follows kawaii banana crochet proportions from the photo instead. Published banana patterns also show that peeled constructions usually split the peel into sections rather than forcing the shape from one tube, which supports this approach.
Project Info at a Glance
| Skill Level | Time | Finished Size | Hook | Best For |
|---|---|---|---|---|
| Intermediate | 5–7 hours | 17 cm photo-style version; 25 cm in a published plush reference | 3.5 mm for this sample; published references range from 3.0 mm DK to 6.0 mm chenille | Display plush, gift, fruit-theme decor |
Published banana references place similar projects at about 7 inches with DK yarn or 25 cm with chenille, which brackets the photo-style version well.
Materials and Tools
Yarn
- Banana yellow — worsted cotton or cotton-acrylic — 45 g — Paintbox Cotton Aran or similar
- Cream/ivory — worsted cotton or cotton-acrylic — 55 g — Paintbox Cotton Aran or similar
- Light brown — worsted — 8 g — any leftover for top stem and bottom tip
- Pink — worsted or embroidery floss held doubled — small amount — any leftover for blush circles
- Black embroidery floss — small amount — for smile
Published banana patterns often use DK cotton with a 3.00 mm hook or plush chenille with 6.00 mm and 10 mm eyes. This sample shifts to worsted for firmer petal edges and a cleaner seated curve.
Tools
- Hook 3.5 mm
- Safety eyes 14 mm for the photo look; published banana patterns often specify 10 mm on smaller bodies
- Polyester stuffing
- Tapestry needle
- Stitch markers
- Pins
- Scissors
Abbreviations
- MR = magic ring
- sc = single crochet
- inc = increase
- dec = invisible decrease
- sl st = slip stitch
- ch = chain
- BLO = back loop only
- FLO = front loop only
Invisible decrease reduces bulk on visible shaping rounds and keeps the front surface flatter than a standard two-stitch decrease.
Pattern — Step by Step
Continuous spiral unless noted.
Head / Fruit Core (Make 1)
Yarn: cream — Source: image-derived design using standard amigurumi math
- R1: 6 sc in MR (6)
- R2: inc x6 (12)
- R3: (sc, inc) x6 (18)
- R4: (2 sc, inc) x6 (24)
- R5: (3 sc, inc) x6 (30)
- R6: (4 sc, inc) x6 (36)
- R7-R15: sc around (36)
- R16: (4 sc, dec) x6 (30)
- R17: sc around (30)
- R18: (3 sc, dec) x6 (24)
- R19: sc around (24)
Insert 14 mm eyes between R12 and R13, 8 sts apart. Embroider smile centered one round below.
- R20: (2 sc, dec) x6 (18)
Stuff firmly at top, medium-firm at lower face.
- R21: (sc, dec) x6 (12)
- R22: dec x6 (6)
Do not fasten off if you want to stitch directly to the peel opening. Otherwise fasten off and leave a 25 cm tail.
Body / Banana Base (Make 1)
Yarn: yellow, then brown for tip — Source: image-derived design using standard amigurumi math
- R1: 6 sc in MR (6)
- R2: inc x6 (12)
- R3: (sc, inc) x6 (18)
- R4: (2 sc, inc) x6 (24)
- R5: (3 sc, inc) x6 (30)
- R6: (4 sc, inc) x6 (36)
- R7-R12: sc around (36)
- R13: (4 sc, dec) x6 (30)
- R14-R16: sc around (30)
- R17: Change to brown for first 6 sts, yellow for remaining 24 sts; sc around (30)
- R18: sc around (30)
- R19: (3 sc, dec) x6 (24)
- R20: sc around (24)
- R21: (2 sc, dec) x6 (18)
Stuff firmly, shaping a gentle banana curve by placing extra stuffing along the outer back edge.
- R22: (sc, dec) x6 (12)
- R23: dec x6 (6)
Fasten off. Leave a 20 cm tail. Pull closed.
Peel Collar / Joining Ring (Make 1)
Yarn: cream — Source: image-derived design using standard amigurumi math
- R1: 6 sc in MR (6)
- R2: inc x6 (12)
- R3: (sc, inc) x6 (18)
- R4: (2 sc, inc) x6 (24)
- R5: (3 sc, inc) x6 (30)
- R6: (4 sc, inc) x6 (36)
- R7: BLO sc around (36)
Fasten off. Leave a 30 cm tail.
Peel Flap (Make 4)
Yarn: cream outer, yellow inner optional backing — Source: image-derived design; separate-flap concept aligns with published peeled banana construction
- R1: 6 sc in MR (6)
- R2: inc x6 (12)
- R3: (sc, inc) x6 (18)
- R4: (2 sc, inc) x6 (24)
- R5-R8: sc around (24)
- R9: (2 sc, dec) x6 (18)
- R10: sc around (18)
- R11: (sc, dec) x6 (12)
- R12: dec x6 (6)
Flatten lightly.
Edging Row: ch 1, work 10 sc evenly around the edge to smooth the flap curve, sl st to finish.
Stuff only the lower half with a thin layer. Overstuffing will force the flap forward over the face.
Fasten off. Leave a 25 cm tail.
Top Stem Cap (Make 1)
Yarn: light brown — Source: image-derived design using standard amigurumi math
- R1: 6 sc in MR (6)
- R2: inc x6 (12)
- R3: sc around (12)
- R4: (sc, dec) x4 (8)
Fasten off. Leave a 15 cm tail. Lightly stuff.
Bottom Tip (Make 1)
Yarn: light brown — Source: image-derived design using standard amigurumi math
- R1: 6 sc in MR (6)
- R2: inc x6 (12)
- R3: sc around (12)
- R4: sc around (12)
- R5: (sc, dec) x4 (8)
Fasten off. Leave a 15 cm tail. Stuff lightly.
Cheek Patch (Make 2)
Yarn: pink — Source: image-derived design
- R1: 6 sc in MR (6)
- sl st to first st.
Fasten off. Leave a 12 cm tail.
Face Embroidery
Yarn: black embroidery floss — Source: image-derived design
Stitch a shallow curved smile 5 stitches wide between the eyes.
Each cheek patch sits one stitch below eye level and two stitches outward from the smile ends.
Assembly
- Pin the body so the brown bottom tip sits at the forward lower end of the curve.
- Sew the bottom tip to the body front, centered over the brown color section.
- Attach the peel collar to the top opening area of the yellow body. Keep the BLO ridge facing upward.
- Place the head into the collar opening and sew it in place so the face points forward, not upward.
- Sew the top stem cap to the top of the cream head, centered and slightly flattened.
- Pin two front peel flaps first, one on each front side of the collar, angled down at about 45 degrees.
- Add the two back peel flaps, slightly higher than the front pair so all four remain visible from the front view.
- Sew the cheek patches beneath the eyes. Keep both circles level with each other.
- Shape the toy by pressing stuffing toward the back of the yellow body until the banana holds a stable seated curve.
- Weave in every tail through internal stuffing paths and trim flush. The finished toy should stand in a reclined sitting pose with the face fully visible.
7 Technical Tips
- Mark round 1 on the head plateau. Losing one round before eye placement will drop the eyes too low and flatten the forehead line.
- Use medium-firm stuffing in the peel flaps, not full stuffing. A heavily packed flap twists outward and hides the cheeks.
- Work every decrease as an invisible dec on the head. Standard decreases leave a dotted seam that shows clearly on cream yarn.
- Insert eyes before the head drops below 24 stitches. Past that point, washers become harder to set squarely inside the narrow cavity.
- Pin all four flaps before sewing any of them. Even a 5 mm shift changes the front silhouette and breaks the petal spacing.
- Pack more stuffing along the outer back arc of the body. That asymmetry is what creates the banana curve without wires.
- Weave tails at least 4 cm through the opposite wall of the body. Short tail burying slips loose fastest on curved plush shapes that get squeezed.
Conclusion
A banana reads as a character only when the peel, face, and curve work together. This banana amigurumi crochet pattern keeps the fruit core tall, the body broad, and the four flaps separated enough to frame the face instead of covering it. Follow the assembly order exactly, then review the front view before weaving in the last tails. Share the finished piece on Pinterest and Instagram with one full front shot and one side shot so the curve is visible. Use #BananaAmigurumiCrochetPattern. One practical question remains: did your front peel flaps sit at the same height, or did one need to be raised by a round?









