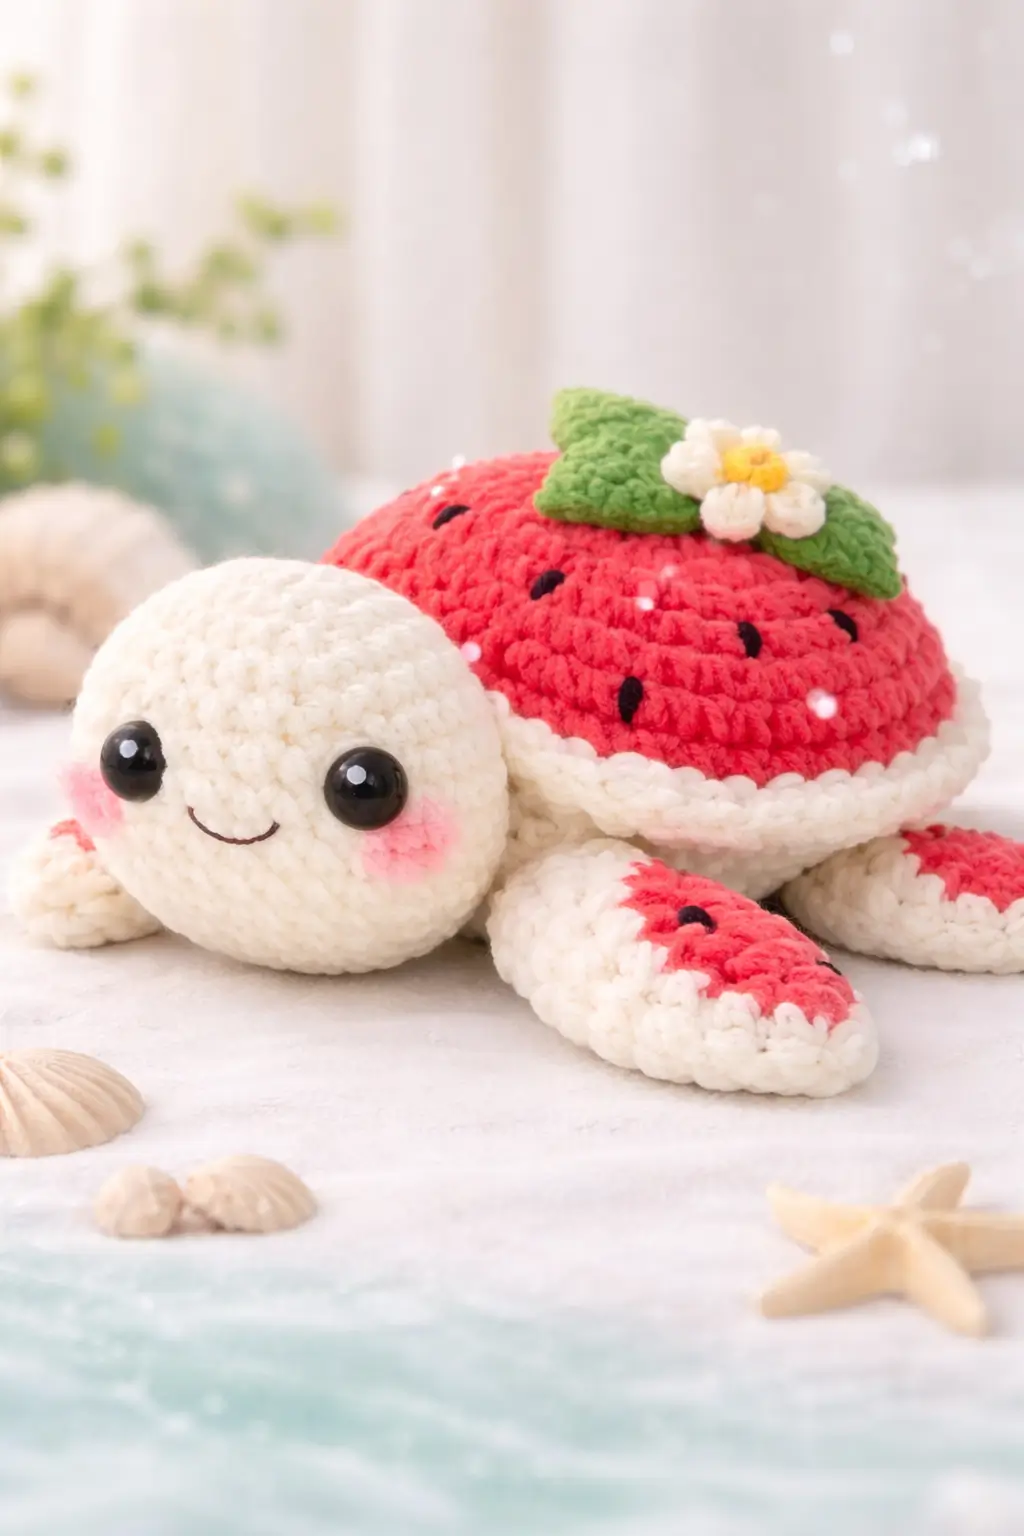
A strawberry shell cannot sit like a normal turtle shell. It has to read as fruit first, shell second.
This strawberry turtle amigurumi crochet pattern is drafted for chunky plush yarn, a 3.0 mm hook, an approximately 10 cm mini finish, and an advanced beginner to intermediate maker working from standard spiral construction. You will build a rounded head, flat fins, a berry shell cap, and a small flower topper. The result works well as a desk plush or market sample.
The Design: What Makes Strawberry Turtle Different
You are not shaping a standard sea turtle here. The shell has to flatten at the sides, rise gently through the center, and carry visual strawberry cues without becoming a dome too tall for the body. That is why this version uses a medium 36-stitch plateau for the head and a separate shell frill under the red cap: the flatter silhouette keeps the turtle grounded, while the white rim reads as the berry’s pale underside.
The second structural choice is the oversized head. In this family of plush turtle patterns, the face often carries most of the charm, so the head needs more visual mass than the body front. A third decision is the leaf topper. It stays low and wide so the shell still looks stable in profile. One frequent maker mistake with a mini strawberry turtle is placing the eyes too high, which makes the head look vertical instead of forward-facing. Market versions often feature 12–14 mm eyes and plush yarn; both choices support the rounded, compressed look visible in the photo.
Project Info at a Glance
| Skill Level | Time | Finished Size | Hook | Best For |
|---|---|---|---|---|
| Advanced beginner / intermediate | 2.5–4 hours | approx. 10.2 cm long and 10.2 cm across | 3.0 mm | desk plush, small gift, market make |
Materials and Tools
Yarn
- Cream/white plush yarn — size 6 bulky — about 10–15 g total for head, body, rim, fins, and tail — Bernat Blanket or similar
- Strawberry red plush yarn — size 6 bulky — under 10 g benchmarked in current strawberry turtle publishing — Premier Just Chenille or similar
- Green plush yarn — size 6 bulky — under 5 g for leaves — any chenille-style plush yarn
- Yellow plush or smooth yarn — tiny amount for flower center
- Pink yarn or blush powder — small amount for cheeks
- Black embroidery thread or lightweight yarn — for smile and strawberry seeds
Tools
- Hook 3.0 mm
- 12 mm safety eyes
- Stuffing
- Yarn needle
- Stitch markers
- Scissors
Abbreviations
MR = magic ring
sc = single crochet
inc = increase
dec = invisible decrease
sl st = slip stitch
ch = chain
BLO = back loop only
FO = fasten off
Invisible decrease is worked through the front loops of the next two stitches so the outer surface stays smooth.
Pattern — Step by Step
This is an original photo-matched reconstruction built with standard amigurumi math, not a transcription of any paid pattern.
Continuous spiral unless noted.
Head (Make 1)
Yarn: cream/white
R1: 6 sc in MR (6)
R2: inc x6 (12)
R3: (sc, inc) x6 (18)
R4: (2 sc, inc) x6 (24)
R5: (3 sc, inc) x6 (30)
R6: (4 sc, inc) x6 (36)
R7-R11: sc around (36)
R12: (4 sc, dec) x6 (30)
R13: (3 sc, dec) x6 (24)
Insert 12 mm eyes between R8 and R9, about 6 stitches apart. Add embroidered smile centered one round below.
R14: (2 sc, dec) x6 (18)
Stuff firmly at the muzzle and lightly at the back so the head sits forward rather than upward.
R15: (sc, dec) x6 (12)
R16: dec x6 (6)
Fasten off. Close opening. Leave a 25 cm tail.
Body Base (Make 1)
Yarn: cream/white
R1: 6 sc in MR (6)
R2: inc x6 (12)
R3: (sc, inc) x6 (18)
R4: (2 sc, inc) x6 (24)
R5: (3 sc, inc) x6 (30)
R6: (4 sc, inc) x6 (36)
R7-R9: sc around (36)
R10: BLO sc around (36)
R11: (4 sc, dec) x6 (30)
R12: (3 sc, dec) x6 (24)
Stuff the body lightly. Keep it flatter than the head.
R13: (2 sc, dec) x6 (18)
Fasten off. Leave a 20 cm tail.
Shell Cap (Make 1)
Yarn: strawberry red
R1: 6 sc in MR (6)
R2: inc x6 (12)
R3: (sc, inc) x6 (18)
R4: (2 sc, inc) x6 (24)
R5: (3 sc, inc) x6 (30)
R6: (4 sc, inc) x6 (36)
R7-R9: sc around (36)
R10: BLO sc around (36)
R11: (4 sc, dec) x6 (30)
R12: sc around (30)
Fasten off. Leave a 30 cm tail.
Shell Frill / Rim (Make 1)
Yarn: cream/white
Join yarn to the front loops left from Shell Cap R10.
R1: (sc, inc) around the full round (54)
R2: sc around (54)
Fasten off. Weave in end.
Front Flippers (Make 2)
Yarn: cream/white with red top patch
R1: 6 sc in MR (6)
R2: inc x6 (12)
R3: (sc, inc) x6 (18)
R4: (2 sc, inc) x6 (24)
R5: sc around (24)
Change to red for the visible upper patch on the final half of the round if you want the photo look.
R6: fold flat and sc through both sides across 12 stitches (12)
Fasten off. Leave a 15 cm tail.
Back Flippers (Make 2)
Yarn: cream/white with red top patch
R1: 6 sc in MR (6)
R2: inc x6 (12)
R3: (sc, inc) x6 (18)
R4: sc around (18)
R5: fold flat and sc through both sides across 9 stitches (9)
Fasten off. Leave a 15 cm tail.
Tail (Make 1)
Yarn: cream/white
R1: 6 sc in MR (6)
R2-R3: sc around (6)
Fasten off. Leave a 12 cm tail.
Leaves (Make 2)
Yarn: green
Ch 6.
Row 1: starting in second ch from hook, sc 1, hdc 1, dc 1, hdc 1, sc 1. Turn.
Row 2: ch 1, sl st in first st, sc 1, hdc 1, sc 1, sl st 1.
Work evenly around the opposite side with sc 1, hdc 1, dc 1, hdc 1, sc 1, then sl st to base.
Fasten off. Leave a 12 cm tail.
Flower Accessory (Make 1)
Yarn: white petals, yellow center
With yellow:
R1: 6 sc in MR (6)
Join white.
R2: (ch 3, sl st in next st) x6 to form 6 petals
Fasten off. Leave a 10 cm tail.
Cheek Patches (Make 2)
Yarn: pink
R1: 6 sc in MR (6)
R2: (sc, inc) x3 (9)
Fasten off. Leave a short tail or glue lightly if using felted blush instead.
Strawberry Seeds (Make as needed)
Yarn: black embroidery thread
Use 6 to 8 short vertical stitches across the shell cap and 1 to 2 on each front flipper red patch. Keep them angled slightly, not perfectly upright.
Assembly
- Sew the head to the front of the body base, centered across about 10 front stitches.
- Position the shell cap on top of the body so the frill overhang is even on both sides, then sew it down.
- Attach the front flippers just below the shell line, one on each side, angled slightly forward.
- Attach the back flippers slightly behind the body midpoint, flatter than the front pair.
- Sew the tail to the back center, tucked under the shell rim.
- Add the cheek patches or apply blush beneath the eyes.
- Embroider the shell seeds, spacing them wider at the outer shell and closer near the top center.
- Stitch the two leaves to the shell top with their bases overlapping.
- Sew the flower over the leaf join so it covers the anchor stitches.
- Check the base on a flat surface and adjust stuffing by massage before weaving in all tails.
The finished turtle should sit low, with the head projecting forward and the shell peak centered behind it.
7 Technical Tips
- Put the eyes too high and the head reads upright, almost seal-like. Place them between R8 and R9 with about 6 stitches between the inner corners.
- Overstuff the body and the shell lifts like a dome instead of a berry cap. Keep the body softer than the head so the silhouette stays flattened.
- Standard decreases on chenille yarn can leave ladders at the taper. Use invisible decreases from R12 onward on the head and body.
- On plush yarn, round starts disappear quickly. Move a stitch marker every round or the shell seed placement will look off-center later.
- Unpinned flippers often end up at different heights. Pin all four limbs first and measure from the body seam before sewing.
- A tall leaf anchor twists backward after handling. Sew the leaf bases across at least 5 shell stitches each and trap the flower over the join.
- Short chenille tails pull loose with friction. Run each tail through the body, split direction once, and trim only after tension testing.
Conclusion
This strawberry turtle amigurumi crochet pattern works because the proportions stay disciplined: round head, compressed body, berry shell, and a shell topper that stays low instead of vertical. Build the head first, check the eye line before closing, and then keep the shell flatter than instinct suggests. That sequence produces the photo-led look more reliably than chasing detail at the end. Save the finished piece for your next market prep photo, then share it to Pinterest and Instagram with #StrawberryTurtlePattern. One question remains useful during testing: did your shell read more like a berry or more like a standard turtle dome?









