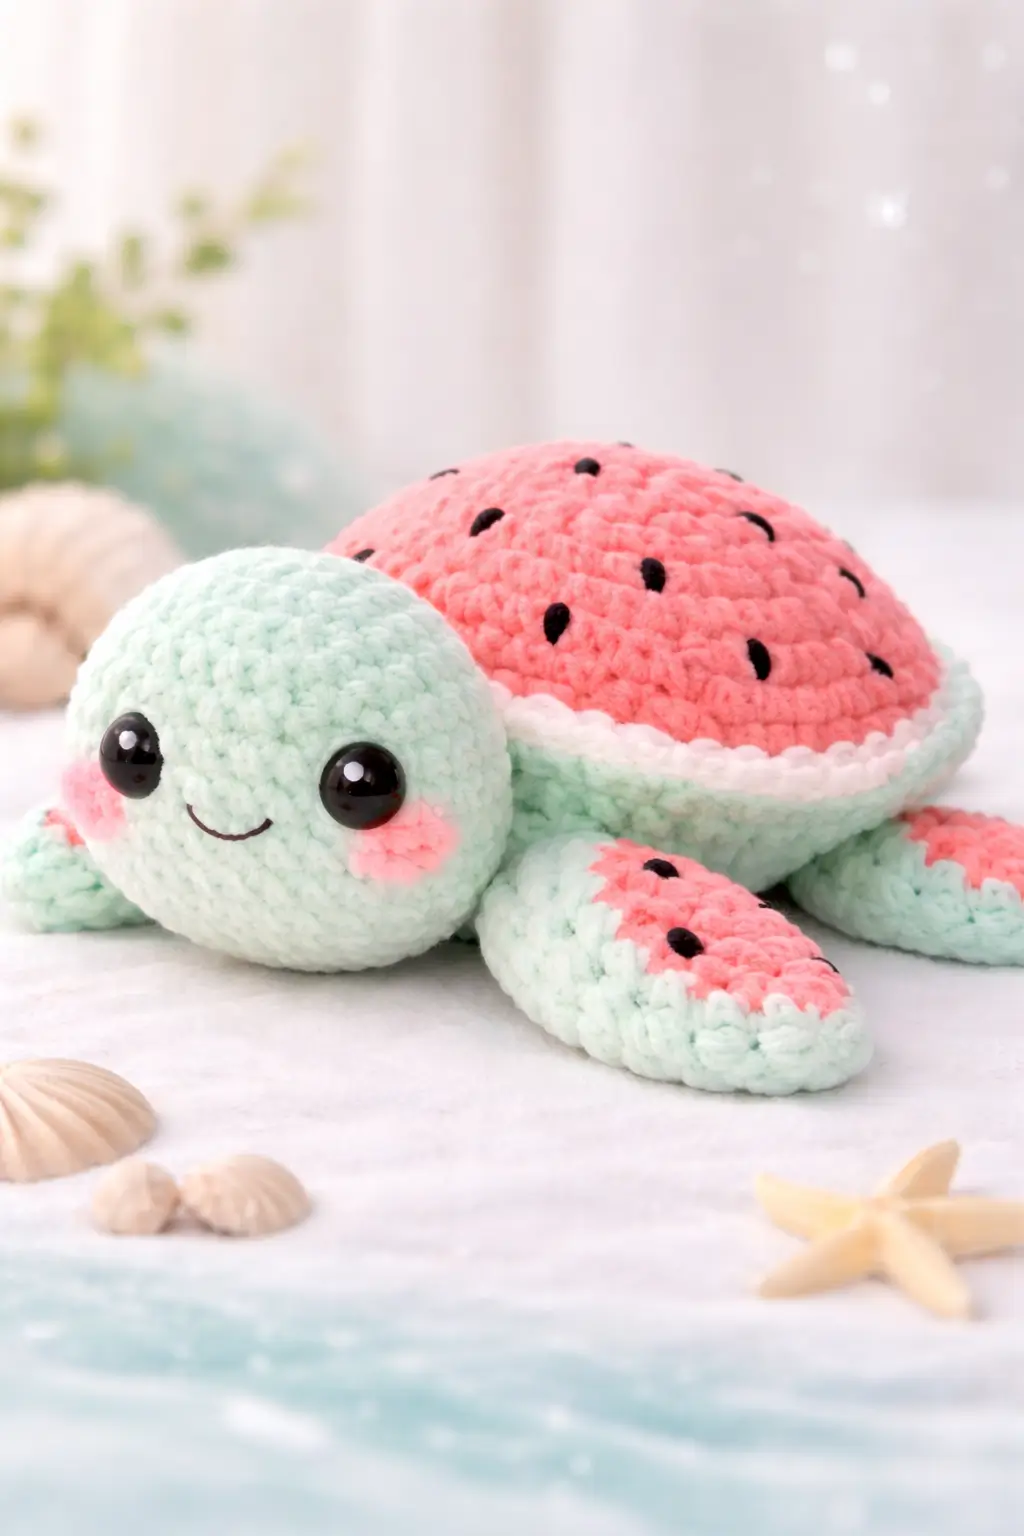
A watermelon turtle fails fast when the white rind stripe gets too wide; the shell stops reading as fruit and starts reading as trim. This watermelon turtle amigurumi crochet pattern uses plush yarn, a 5 mm hook, and medium-form stitch math to produce a soft turtle around 23 cm long for shelf display, nursery decor, or summer market stock. Skill level: easy to lower-intermediate. Verified reference size and hook come from commercial plush-pattern listings.
The Design: What Makes Watermelon Turtle Different
This turtle depends on proportion more than detail. The head has to sit oversized and low, or the shell takes visual control and the toy reads as a melon with fins. The rind stripe also matters. One narrow white round between the pink shell top and mint lower shell keeps the watermelon effect clean, which matches the color-chart logic documented in plush watermelon turtle variants.
Flippers need a broad front edge, not a tube. That choice gives the toy a resting pose instead of a crawling pose, and it matches the flattened plush style seen in current no-sew turtle designs. A common mistake is packing the shell too hard while leaving the head soft; then the face collapses forward and the turtle loses its rounded expression. In watermelon turtle crochet pattern search results, many listings show size or sales copy, but fewer explain those structural tradeoffs in plain terms.
Project Info at a Glance
| Skill Level | Time | Finished Size | Hook | Best For |
|---|---|---|---|---|
| Easy to lower-intermediate | 4–6 hours | 23 cm long / 13 cm tall | 5 mm | Plush decor, gifts, summer market makes |
Verified size and hook reflect one published plush watermelon turtle listing.
Materials and Tools
Yarn
- Mint green — plush / chenille / super bulky — 30 g — Sweet Snuggles Lite or similar plush yarn
- Watermelon pink — plush / chenille / super bulky — 20 g — matching plush yarn
- White — plush / chenille / super bulky — small amount — rind stripe
- Black — small amount — seed embroidery
- Light pink — small amount — cheek patches
Tools
- Hook 5 mm
- Safety eyes 8–10 mm
- Polyfill stuffing
- Tapestry needle
- Stitch markers
- Pins
- Black embroidery thread
Abbreviations
MR = magic ring; sc = single crochet; inc = increase; dec = decrease; sl st = slip stitch; ch = chain; BLO = back loop only; hdc = half double crochet.
Use invisible decrease on all visible shaping rounds so the plush yarn does not leave open ladders on the face and shell edge.
Pattern — Step by Step
Continuous spiral unless noted. Counts are checked each round. Construction is adapted to match the photo using standard amigurumi count progression and plush turtle sizing from current watermelon turtle references.
Head (Make 1)
Yarn: mint green — Source: Standard amigurumi math, scaled to the pictured plush proportions
R1: 6 sc in MR (6)
R2: inc x6 (12)
R3: (sc, inc) x6 (18)
R4: (2 sc, inc) x6 (24)
R5: (3 sc, inc) x6 (30)
R6: (4 sc, inc) x6 (36)
R7-R11: sc around (36)
R12: (4 sc, dec) x6 (30)
R13: (3 sc, dec) x6 (24)
Insert safety eyes between R8 and R9, about 8 sts apart. Add light stuffing as you go.
R14: (2 sc, dec) x6 (18)
R15: (sc, dec) x6 (12)
R16: dec x6 (6)
Embroider the smile centered one round below the eyes.
Fasten off. Leave a 25 cm tail.
Body Undershell (Make 1)
Yarn: mint green — Source: Plush turtle body plateau informed by published 36-st body structure.
R1: 6 sc in MR (6)
R2: inc x6 (12)
R3: (sc, inc) x6 (18)
R4: (2 sc, inc) x6 (24)
R5: (3 sc, inc) x6 (30)
R6: (4 sc, inc) x6 (36)
R7-R10: sc around (36)
Fasten off. Leave a 25 cm tail.
Shell Top (Make 1)
Yarn: pink, white, mint green — Source: Watermelon color layout based on documented plush watermelon turtle chart and the photo.
R1: 6 sc in MR with pink (6)
R2: inc x6 (12)
R3: (sc, inc) x6 (18)
R4: (2 sc, inc) x6 (24)
R5: (3 sc, inc) x6 (30)
R6: (4 sc, inc) x6 (36)
R7: sc around in pink (36)
R8: sc around in white (36)
R9-R12: sc around in mint green (36)
Embroider 9–11 black seed dashes across the pink area before assembly.
Fasten off. Leave a 30 cm tail.
Front Flippers (Make 2)
Yarn: mint green and pink — Source: Standard amigurumi math with flattened plush fin shaping inspired by broad-front turtle flippers in plush references.
With mint green:
R1: 6 sc in MR (6)
R2: inc x6 (12)
R3: (sc, inc) x6 (18)
R4: sc around (18)
Change front half stitches to pink on next round.
R5: 9 sc in mint, 9 sc in pink (18)
R6-R7: sc around following color placement (18)
Flatten.
R8: sc through both layers across 9 sts (9)
Embroider 2–3 black seed dashes on the pink panel.
Fasten off. Leave a 20 cm tail.
Back Flippers (Make 2)
Yarn: mint green and pink — Source: Standard amigurumi math
R1: 6 sc in MR (6)
R2: inc x6 (12)
R3: (sc, inc) x6 (18)
R4: sc around (18)
R5: 9 sc in mint, 9 sc in pink (18)
R6: sc around (18)
Flatten.
R7: sc through both layers across 9 sts (9)
Back flippers should be slightly shorter than front flippers.
Fasten off. Leave a 20 cm tail.
Tail (Make 1)
Yarn: mint green — Source: Tail is a documented sewn-on detail in commercial watermelon turtle patterns.
R1: 4 sc in MR (4)
R2: sc around (4)
R3: (sc, inc) x2 (6)
R4: sc around (6)
Flatten lightly.
Fasten off. Leave a 12 cm tail.
Cheek Patches (Make 2)
Yarn: light pink — Source: Photo-based detail
R1: 6 sc in MR (6)
Sl st to first st.
Fasten off. Leave a 10 cm tail.
Seed Embroidery for Shell and Flippers
Yarn: black — Source: Photo-based detail plus watermelon motif seen across indexed listings.
Cut short strands and embroider small vertical seed dashes.
Place most on the shell top.
Add one or two on each flipper panel.
No fasten-off round needed.
Assembly
- Pin the head to the front of the body undershell, centered over rounds 2–6.
- Sew the head in place with the opening facing slightly downward, not straight forward.
- Stitch one cheek patch below each eye.
- Attach the front flippers at the body sides, aligned just behind the head.
- Attach the back flippers one round farther back, angled slightly outward.
- Sew the tail to the rear center of the body.
- Place the shell top over the body undershell and pin the white rind round level all the way around.
- Stuff the shell cavity firmly but not hard; keep the front section softer than the back.
- Sew shell top to body undershell through matching 36-st rounds.
- Weave in all tails inside the shell and brush the seed embroidery flat with your fingers.
The piece is complete when the head rests low, the shell arches evenly, and all four flippers touch the surface.
7 Technical Tips
- Mark the first stitch of every round. Losing the round start by even one stitch will push the white rind stripe off-level across the shell.
- Keep shell stuffing firmer than head stuffing. A head packed harder than the shell tips the face upward and flattens the turtle pose.
- Use invisible dec on rounds 12–16 of the head. Standard decreases in plush yarn leave small gaps that show dark stuffing shadows.
- Insert eyes before the head drops below 24 stitches. Waiting until the opening narrows makes even spacing hard and can warp the face.
- Do not pull chenille yarn tight on the seed embroidery. Over-tension shortens the pink shell panel and creates surface dents around each seed.
- Pin both front flippers before sewing either one. A difference of even 5 mm becomes obvious because the head sits low and wide in this design.
- Weave tails back through at least two direction changes. Plush yarn slips more than cotton, and straight tail weaving can work loose under handling.
Conclusion
This watermelon turtle amigurumi crochet pattern works because the shell stripe is controlled, the flippers stay broad, and the head remains oversized without turning hollow. Verified plush references place the format around a 5 mm hook and roughly 23 cm finished length, which fits the scale shown here. Start with the shell first, check the rind width after the white round, then build the rest to match that ratio. Share the finished turtle on Pinterest and Instagram with #WatermelonTurtlePattern. One detail matters most on this character: did you place the shell seeds in staggered rows, or keep them evenly spaced?









