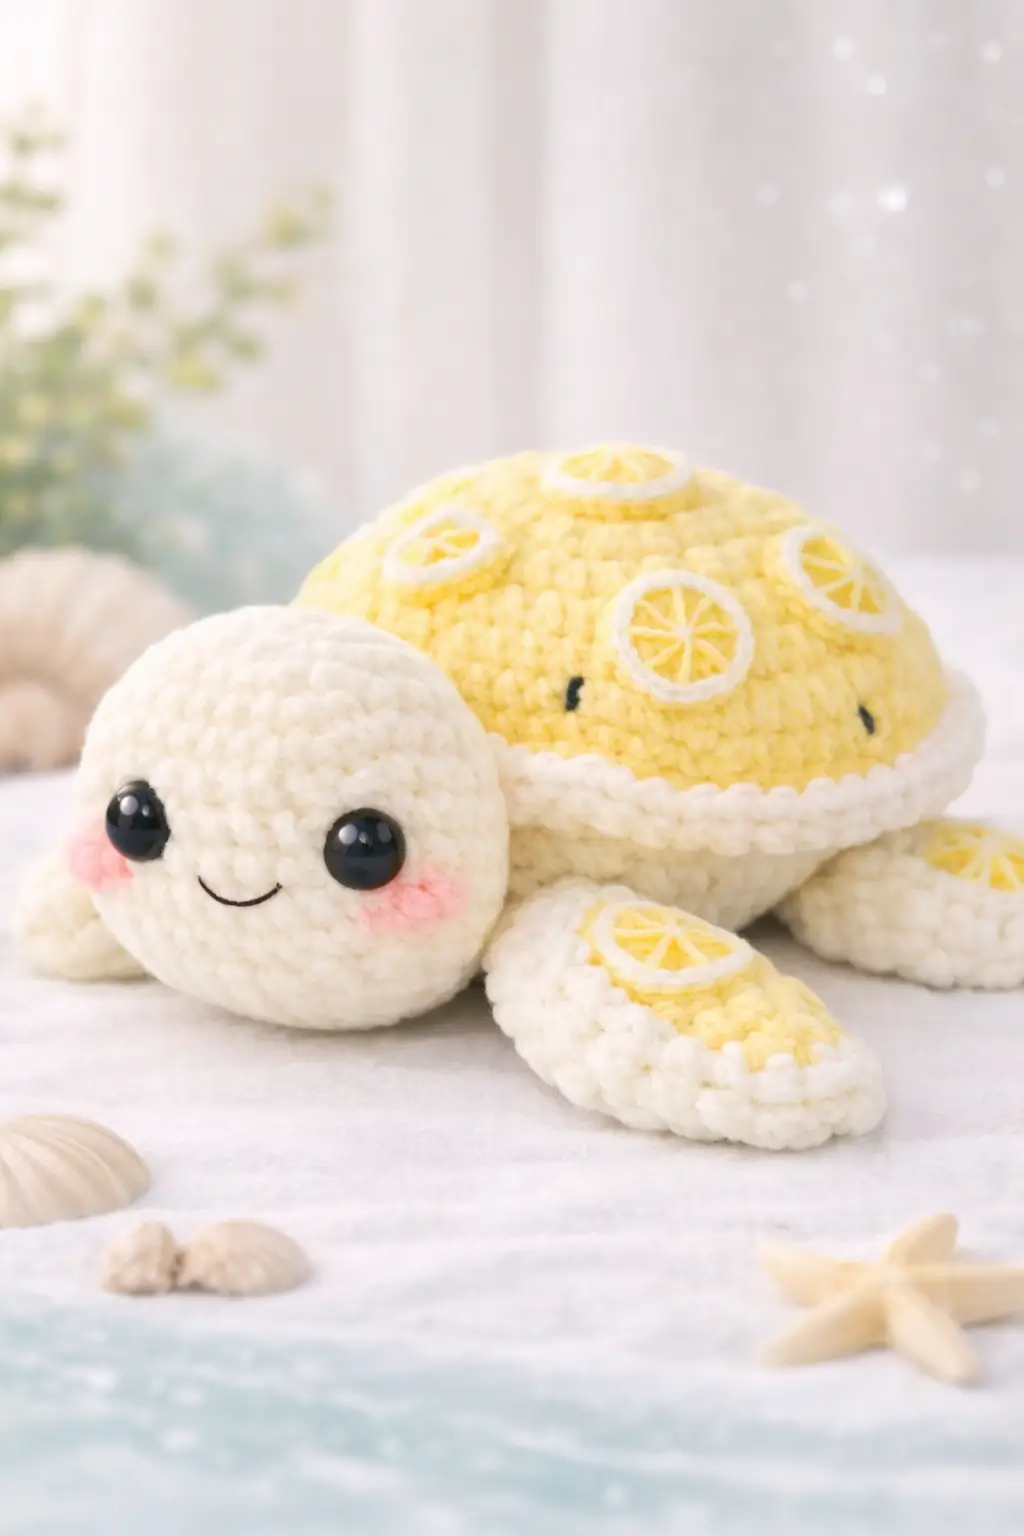
A sea turtle does not grow citrus slices on its carapace, so the shell ridge has to do two jobs at once. This lemon turtle amigurumi crochet pattern uses plush yarn, a 5 mm hook, and simple rounded shaping to build a soft turtle at about 25 cm, suited to an intermediate plush project and useful for summer market stock or nursery decor.
The Design: What Makes Lemon Turtle Different
The first structural choice is the shell profile. A lemon turtle needs a flatter sea-turtle body, not a tall tortoise dome, because the citrus appliqués read better on a broad top plane. The second choice is contrast management. You need a pale body and a brighter shell so the lemon slices remain legible from a distance; otherwise the fruit theme disappears into one yellow mass. The third choice is edge control. A white shell band separates body from shell and also gives the plush more visual width, which helps stability when it rests on four flippers. You should also watch the head ratio. Turtle plush often fail when the head is too small for the shell, making the piece look generic rather than like a fruit turtle amigurumi. In this format, the maker sees the difference immediately; the character reads as a lemon turtle crochet pattern, not just a yellow shell on a turtle.
Project Info at a Glance
| Skill Level | Time | Finished Size | Hook | Best For |
|---|---|---|---|---|
| Intermediate | 2.5–4.5 hours | about 25 cm | 5 mm | Plush gift, market table, nursery shelf |
The size and hook above match live plush fruit-turtle listings. Smaller DK and compact versions exist, but the photographed plush fits the larger chenille category more closely.
Materials and Tools
Yarn
- Cream/soft white chenille — super bulky/plush — about 120 g — Himalaya Dolphin Baby or similar
- Lemon yellow chenille — super bulky/plush — about 80 g — Himalaya Dolphin Baby or similar
- White chenille — super bulky/plush — about 20 g — for shell edging and lemon slice rings
- Light yellow DK or chenille scrap — 10 g — for slice centers if you want sharper segment lines
- Pink blush — small cosmetic amount or soft pastel
The 5 mm plush setup aligns with public lemon turtle listings using Himalaya Dolphin Baby and similar plush yarn systems. Yarn amounts here are adapted to the photographed proportions from those live references, not copied from a single paid pattern.
Tools
- Hook 5 mm
- Safety eyes 16 mm for this plush scale
- Stuffing
- Yarn needle
- Stitch markers
- Black embroidery thread for mouth
Public references show 5 mm hooks on plush lemon turtles and 10–14 mm eyes on smaller plush builds; the larger eyes here are scaled to the oversized head in the photo.
Abbreviations
MR / sc / inc / dec / sl st / ch / BLO / FLO
Use invisible decrease where noted because plush yarn enlarges ordinary decreases and leaves a visible notch line across the face and underside.
Pattern — Step by Step
Continuous spiral unless noted.
Head (Make 1)
Yarn: cream — based on standard amigurumi math and the common 30-stitch turtle head plateau found in public turtle references
R1: 6 sc in MR (6)
R2: inc x6 (12)
R3: (sc, inc) x6 (18)
R4: (2 sc, inc) x6 (24)
R5: (3 sc, inc) x6 (30)
R6–R10: sc around (30)
R11: (3 sc, dec) x6 (24)
R12: (2 sc, dec) x6 (18)
Insert safety eyes between R7 and R8, about 8 stitches apart. Embroider smile before final stuffing.
R13: (sc, dec) x6 (12)
R14: dec x6 (6)
Stuff firmly but do not overpack the lower half.
Fasten off. Leave 25 cm tail.
Body Base / Lower Shell (Make 1)
Yarn: cream — authored to match the photographed low sea-turtle silhouette, using medium plateau logic
R1: 6 sc in MR (6)
R2: inc x6 (12)
R3: (sc, inc) x6 (18)
R4: (2 sc, inc) x6 (24)
R5: (3 sc, inc) x6 (30)
R6: (4 sc, inc) x6 (36)
R7: sc around (36)
R8: sc around (36)
R9: BLO sc around (36)
Fasten off. Leave 30 cm tail.
Top Shell (Make 1)
Yarn: lemon yellow — medium plush shell with 36-stitch plateau for a broad but not oversized carapace; 36 is consistent with public turtle shell math before larger decorative expansion.
R1: 6 sc in MR (6)
R2: inc x6 (12)
R3: (sc, inc) x6 (18)
R4: (2 sc, inc) x6 (24)
R5: (3 sc, inc) x6 (30)
R6: (4 sc, inc) x6 (36)
R7–R11: sc around (36)
Fasten off. Leave 35 cm tail.
Shell Edge Band (Make 1)
Yarn: white
Ch 38.
Row 1: starting in 2nd ch from hook, sc across (37)
Row 2: ch 1, turn, sc across (37)
Wrap around the lower edge of the yellow shell. Adjust by one stitch if tension differs.
Fasten off. Leave 40 cm tail.
Front Flippers (Make 2)
Yarn: cream
R1: 6 sc in MR (6)
R2: inc x6 (12)
R3: (sc, inc) x6 (18)
R4: sc around (18)
R5: (7 sc, dec) x2 (16)
R6: sc around (16)
Fold slightly flat.
Fasten off. Leave 25 cm tail.
Back Flippers (Make 2)
Yarn: cream
R1: 6 sc in MR (6)
R2: inc x6 (12)
R3: (sc, inc) x6 (18)
R4: (4 sc, dec) x3 (15)
R5: sc around (15)
Flatten lightly.
Fasten off. Leave 25 cm tail.
Tail (Make 1)
Yarn: cream — separate turtle tails are a common structural option in sewn lemon turtle variants.
R1: 6 sc in MR (6)
R2: sc around (6)
R3: sc around (6)
Do not stuff.
Fasten off. Leave 15 cm tail.
Lemon Slice Appliqué Large (Make 5)
Yarn: white + light yellow
With light yellow:
R1: 6 sc in MR (6)
R2: inc x6 (12)
Fasten off light yellow.
Join white:
R3: BLO sc around (12)
Sl st to join.
With white or thin yellow, embroider 6 spokes from center to edge.
Fasten off. Leave 15 cm tail.
Lemon Slice Appliqué Small (Make 2)
Yarn: white + light yellow
With light yellow:
R1: 6 sc in MR (6)
R2: (sc, inc) x3 (9)
Fasten off light yellow.
Join white:
R3: sc around (9)
Sl st to join.
Embroider 5–6 spokes.
Fasten off. Leave 15 cm tail.
Cheek Patches (Make 2)
Yarn: blush pink or use cosmetic blush after assembly
R1: 6 sc in MR (6)
Sl st to close.
Fasten off. Leave 10 cm tail.
Optional Flipper Lemon Patch (Make 2)
Yarn: lemon yellow
R1: 6 sc in MR (6)
R2: inc x6 (12)
R3: sc around (12)
Sew centered near outer half of one front flipper and one back flipper, then top each with a small slice appliqué.
Fasten off.
Assembly
- Sew the head to the front of the lower shell so the chin sits slightly below the shell edge.
- Attach the top shell to the lower shell, stuffing as you close.
- Insert the white shell band between top and bottom shell edges or sew it over the seam line.
- Sew the front flippers slightly forward, level with the back third of the head.
- Sew the back flippers near the rear curve of the shell base.
- Attach the tail centered between the back flippers.
- Sew three large lemon slices across the top center of the shell.
- Add two more large slices offset toward the side curves for the scattered citrus effect.
- Attach the small slice appliqués to the decorative yellow patches on the flippers.
- Add cheek patches or blush, then weave all tails inward and close any seam gaps.
The finished plush should rest flat, with the head projecting low and the shell reading wider than tall.
7 Technical Tips
- Mark every increase round. Losing one increase in plush yarn shifts the shell from 36 to 35 stitches and the lemon slices stop sitting symmetrically.
- Stuff the head firmer than the body. A softer head collapses under the shell line and makes the smile point downward.
- Use invisible decreases on the face. Standard decreases leave a stepped ridge that shows beside 16 mm eyes.
- Install eyes before the last two decrease rounds. In plush yarn, late insertion stretches the fabric and can distort rounds 11 to 13.
- Keep shell stuffing light at the center. Overfilling the dome pushes the lemon slices outward and turns the turtle into a ball instead of a sea-turtle profile.
- Pin flippers before sewing. The front pair should angle slightly forward, while the back pair should sit flatter; mismatching the angle makes the turtle rock.
- Weave tails back through at least 4 cm of interior stitches. Chenille sheds under short tail locks, especially on appliqués and the shell band.
Conclusion
This lemon turtle amigurumi crochet pattern works because the shell, body, and appliqué system stay distinct. The turtle shape carries the structure; the citrus slices carry the theme. Keep the shell broad, the head round, and the edge band clean. Next, make one shell in the photographed lemon layout and one in a simplified three-slice version to compare sales or gift appeal. Share the finished turtle on Pinterest and Instagram with #LemonTurtlePattern. One final check matters more than any caption: did your top slice sit centered on the shell curve, or drift too far toward the back?









