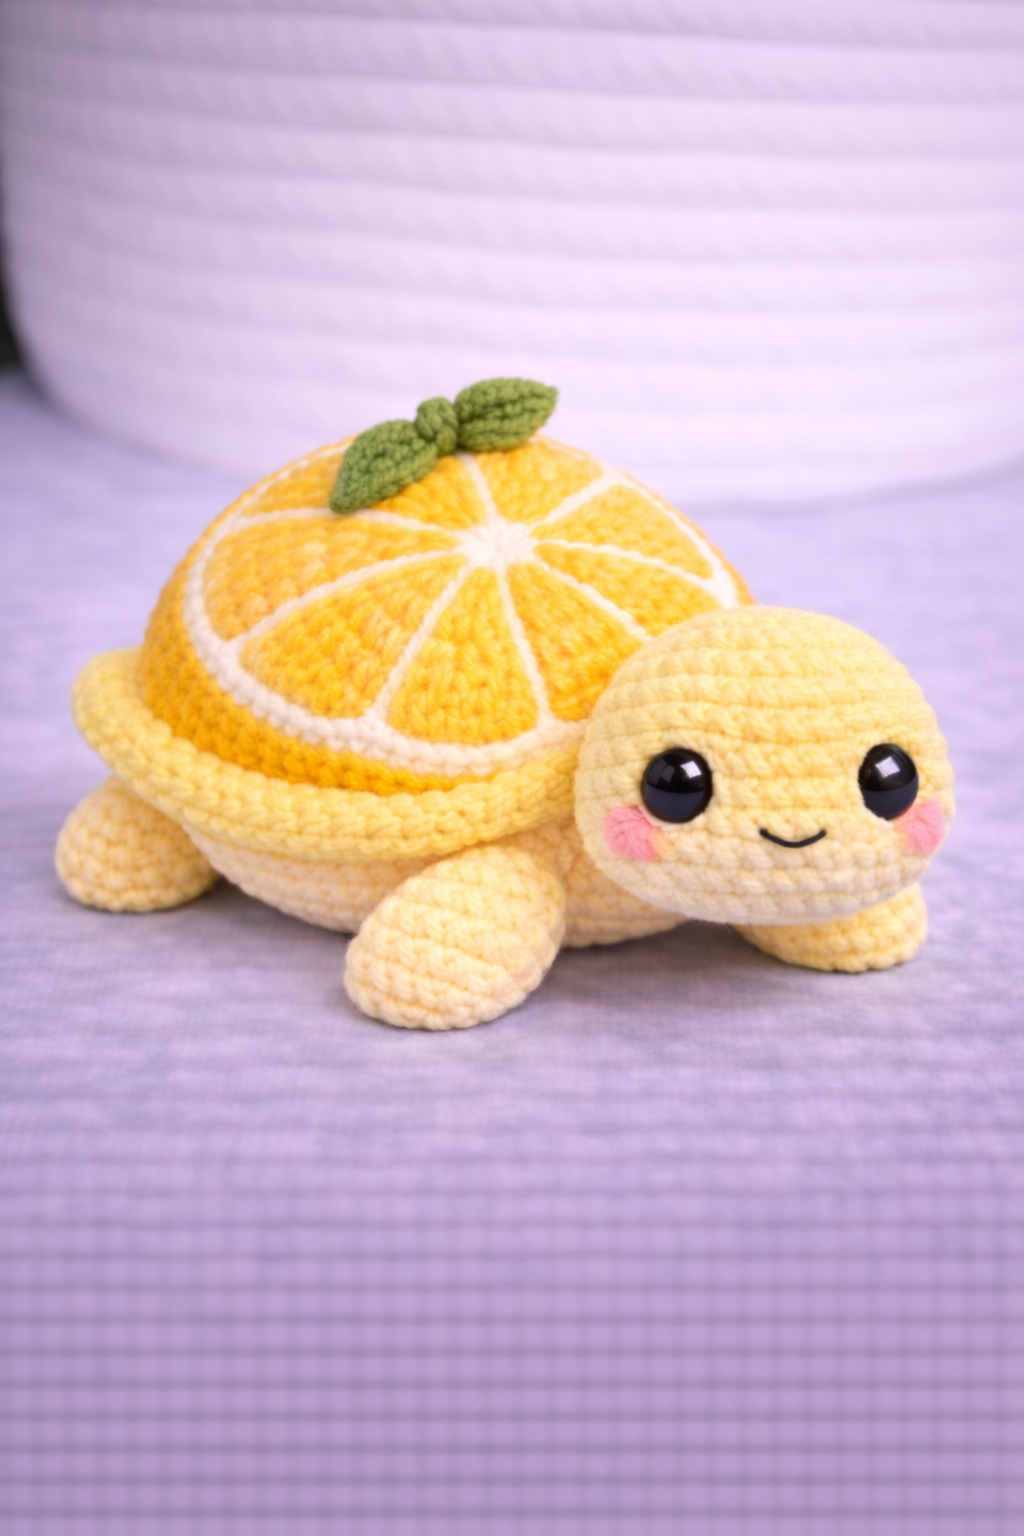
Citrus segments force the shell into eight wedges. That is the first structural decision in this orange turtle amigurumi pattern. This build uses a 3.5 mm hook, 10 mm safety eyes, and a compact finished size around 16 cm, which matches current orange-turtle references and comparable turtle listings. It suits an intermediate maker who wants a market-ready plush with a clear theme and fast shelf appeal.
The Design: What Makes Orange Turtle Different
A standard turtle shell can be any dome. A citrus turtle cannot. The shell has to read as fruit before the viewer notices the legs, so the top needs a centered star point and evenly spaced wedges. That is why this version uses a rounded shell cap, a separate rind band, and surface embroidery instead of color changes in every round.
The head stays low and broad. A taller head would compete with the shell graphic. The legs are short ovals rather than flippers because the photo shows a squat desk-plush profile, not a sea turtle silhouette. One common mistake in a fruit turtle crochet pattern is overstuffing the shell cap. Then the wedge lines bend outward and the orange slice effect disappears. For a citrus turtle amigurumi, shell geometry carries the whole concept.
Project Info at a Glance
| Skill Level | Time | Finished Size | Hook | Best For |
|---|---|---|---|---|
| Intermediate | 4–6 hours | 16 cm | 3.5 mm | Desk plush, market prep, themed gift |
Materials and Tools
Yarn
- Pale yellow body — DK or plush-style yarn — about 20 g — Stylecraft Special DK for a standard yarn equivalent, or similar plush substitute if matching the photo finish
- Orange shell — DK or plush-style yarn — about 30 g — same base brand family or similar substitute
- White detail yarn — small amount — for citrus segment embroidery
- Green yarn — small amount — leaves
- Pink yarn — small amount — cheek patches
Tools
- Hook 3.5 mm
- 10 mm safety eyes
- Stuffing
- Tapestry needle
- Stitch markers
- Black embroidery thread for smile
Abbreviations
- MR = magic ring
- sc = single crochet
- inc = increase
- dec = invisible decrease
- sl st = slip stitch
- ch = chain
- BLO = back loop only
- FLO = front loop only
Invisible decrease keeps the closing rounds flat and helps the head keep a smooth muzzle line.
Pattern — Step by Step
Continuous spiral unless noted. Counts are checked each round. This version is drafted from standard amigurumi math and shaped to match the photo.
Head (Make 1)
Yarn: pale yellow — Standard amigurumi math
R1: 6 sc in MR (6)
R2: inc x6 (12)
R3: (sc, inc) x6 (18)
R4: (2 sc, inc) x6 (24)
R5: (3 sc, inc) x6 (30)
R6: (4 sc, inc) x6 (36)
R7-R10: sc around (36)
R11: (4 sc, dec) x6 (30)
R12: (3 sc, dec) x6 (24)
Place 10 mm eyes between R7 and R8, 8 sts apart. Add the smile centered one round below.
R13: (2 sc, dec) x6 (18)
Stuff firmly at front, lighter at back.
R14: (sc, dec) x6 (12)
R15: dec x6 (6)
Fasten off. Leave a 20 cm tail.
Upper Shell Cap (Make 1)
Yarn: orange — Standard amigurumi math
R1: 6 sc in MR (6)
R2: inc x6 (12)
R3: (sc, inc) x6 (18)
R4: (2 sc, inc) x6 (24)
R5: (3 sc, inc) x6 (30)
R6: (4 sc, inc) x6 (36)
R7-R11: sc around (36)
Fasten off. Leave a 25 cm tail.
Shell Rim / Rind Band (Make 1)
Yarn: pale yellow — Standard amigurumi math
Ch 31.
R1: Starting in 2nd ch from hook, sc 30, ch 1, turn (30)
R2-R4: sc across, ch 1, turn (30)
Join short ends to form a ring with sl st seam.
Fasten off. Leave a 20 cm tail.
Lower Shell / Belly (Make 1)
Yarn: cream or very pale yellow — Standard amigurumi math
R1: 6 sc in MR (6)
R2: inc x6 (12)
R3: (sc, inc) x6 (18)
R4: (2 sc, inc) x6 (24)
R5: (3 sc, inc) x6 (30)
R6: (4 sc, inc) x6 (36)
R7-R8: sc around (36)
Fasten off. Leave a 25 cm tail.
Front Legs (Make 2)
Yarn: pale yellow — Standard amigurumi math
R1: 6 sc in MR (6)
R2: inc x6 (12)
R3: (sc, inc) x6 (18)
R4-R5: sc around (18)
R6: (sc, dec) x6 (12)
R7: sc around (12)
Light stuffing only at paw end.
Flatten and sc through both layers across 6 sts.
Fasten off. Leave a 20 cm tail.
Back Legs (Make 2)
Yarn: pale yellow — Standard amigurumi math
R1: 6 sc in MR (6)
R2: inc x6 (12)
R3-R4: sc around (12)
R5: (sc, dec) x4 (8)
Light stuffing only.
Flatten and sc through both layers across 4 sts.
Fasten off. Leave a 18 cm tail.
Tail (Make 1)
Yarn: pale yellow — Standard amigurumi math
R1: 4 sc in MR (4)
R2: sc around (4)
R3: (sc, inc) x2 (6)
R4: sc around (6)
Flatten. Fasten off. Leave a 12 cm tail.
Leaves (Make 2)
Yarn: green — Standard leaf shaping
Ch 7.
R1: Starting in 2nd ch from hook: sl st, sc, hdc, dc, hdc, sc.
Working on opposite side of chain: sc, hdc, dc, hdc, sc, sl st.
Ch 1 to lock.
Fasten off. Leave a 15 cm tail.
Cheek Patches (Make 2)
Yarn: pink — Standard flat circle math
R1: 6 sc in MR (6)
R2: inc x6 (12)
Fasten off. Leave a 10 cm tail.
Citrus Segment Guides (Surface Detail)
Yarn: white — embroidery over shell cap
Make a small straight center stitch cluster first. Then embroider 8 wedge lines radiating outward from center to edge, spaced as evenly as possible. Add one curved arc near the outer edge of each wedge so the shell reads as orange flesh rather than a starburst.
Fasten off. Weave ends on wrong side.
Assembly
- Sew the head to the front of the lower shell, slightly below center, so the chin sits low and the shell remains visually dominant.
- Sew the upper shell cap to the shell rim band. Stuff lightly before the last section closes.
- Sew the assembled top shell to the lower shell, leaving the body cavity open just enough to adjust stuffing as you go.
- Add the front legs at the lower front sides, angled slightly outward.
- Add the back legs near the rear edge, flatter than the front pair.
- Sew the tail centered at the back seam, tucked just under the shell rim.
- Stitch the cheek patches below the eyes, one to each side of the smile.
- Sew the two leaves at the top center of the shell, offset a little so they overlap naturally.
- Embroider the white citrus wedges across the shell cap, checking symmetry from the center point before knotting off.
- Shape the plush by hand: press the shell slightly flatter at the top and push stuffing forward into the muzzle if the face looks too narrow.
The finished turtle should sit low, with the shell reading first and the face reading second.
7 Technical Tips
- Use one stitch marker for round start and a second for eye line. Losing the eye line by even one row makes the head look sleepy and drags the smile too low.
- Stuff the head more firmly than the shell cap. A soft head collapses under the visual weight of the shell and throws off the turtle profile.
- Keep invisible decreases on the underside when possible. Visible front-facing decreases leave hard corners around the muzzle.
- Install eyes before the head drops below 24 stitches. On this shape, waiting too long makes the washer placement awkward and distorts the face.
- Do not overfill the shell. Too much stuffing rounds out the orange wedges and the citrus slice effect starts to blur.
- Pin all four legs before sewing. A front leg set even 5 mm farther forward than the other side will make the turtle twist when resting on a table.
- Weave tail ends across at least 3 internal stitch paths. Short anchoring inside plush yarn can work loose once the shell is squeezed or stacked in a market bin.
Conclusion
An orange turtle amigurumi pattern works only when the shell graphic stays readable from across the room. That means even wedges, a controlled dome, a low head, and a rind band that frames the fruit idea cleanly. The next step is simple: finish the shell embroidery before sewing on the leaves, then check the turtle from the top view and front view before weaving in the last ends. Share the result on Pinterest and Instagram with #OrangeTurtlePattern so other makers can compare shell layouts. One question matters here: did your citrus wedges hold their spacing once the shell was stuffed?









