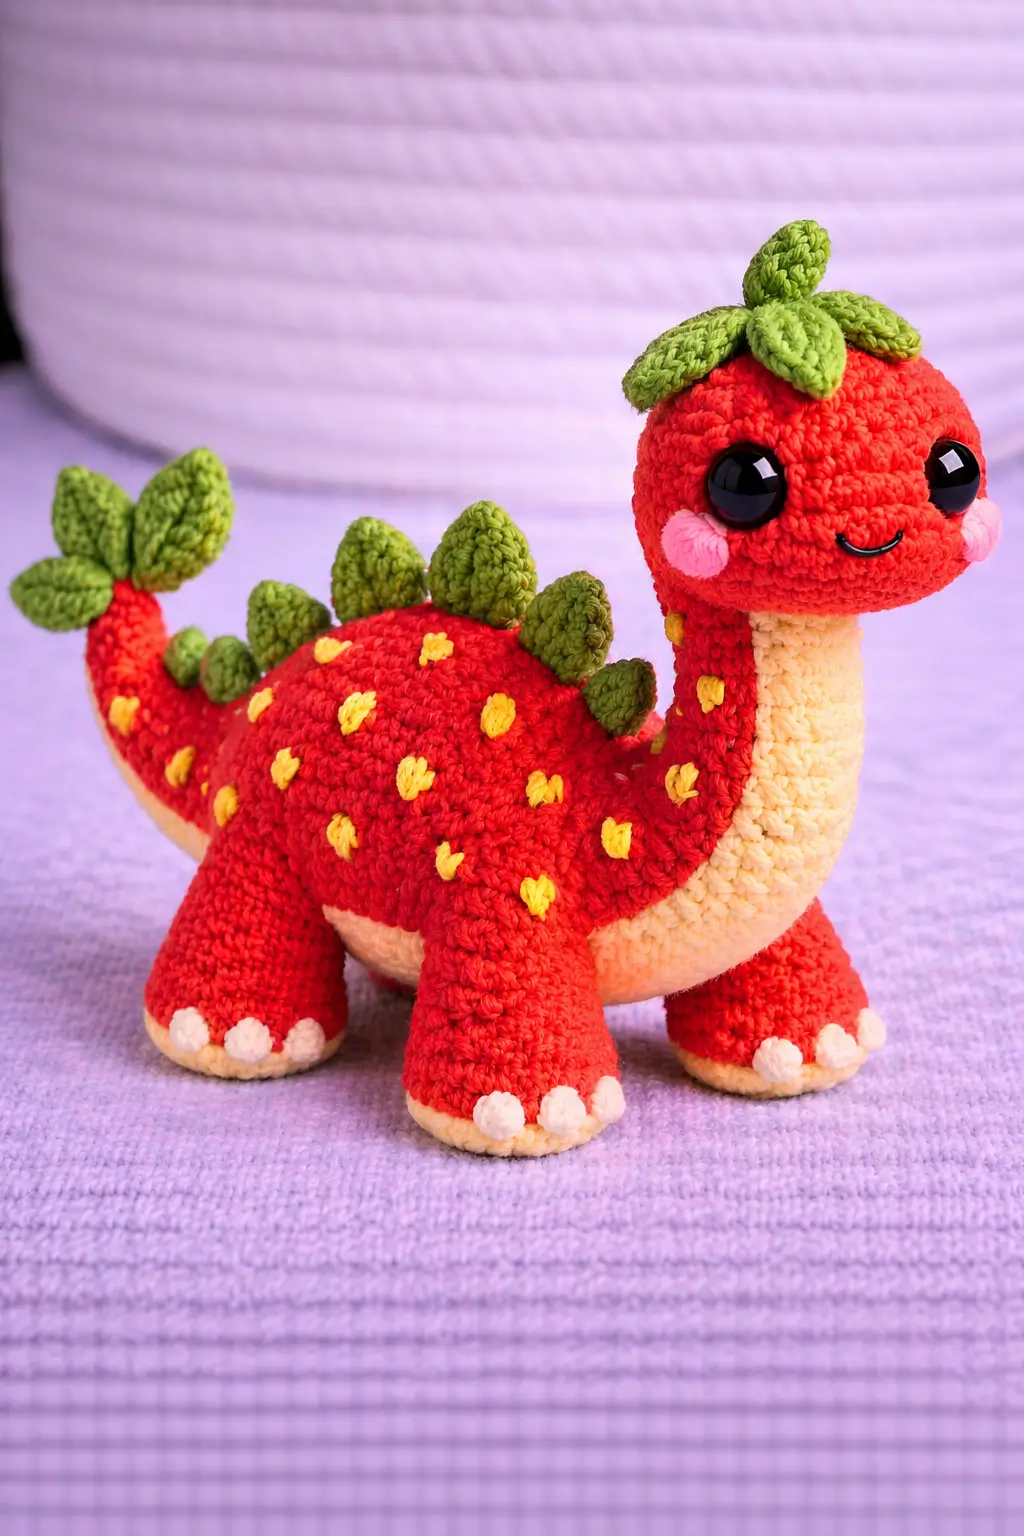
A strawberry cap on a sauropod head shifts the visual weight upward. That is the first issue this strawberry dinosaur amigurumi has to solve. This version uses medium-weight yarn logic, a 36-stitch body plateau, and advanced-beginner construction borrowed from proven dinosaur pattern benchmarks. The result is a stable display plush with a broad belly, four grounded feet, and surface seed details that read clearly in photos.
The Design: What Makes This Strawberry Dinosaur Different
Most fruit-dino patterns online cluster around triceratops heads or short-bodied plush forms. This build does not. The photo shows a long neck, a rounded back, a cream underside that runs from chin to tail, and leaf plates that replace standard spikes. That combination changes shaping priorities. Neck support matters more than horn spacing. Belly contrast matters more than frill width. Proportion becomes the whole pattern.
The first structural decision is the 36-stitch body plateau. A smaller body would tip forward once the head cap and neck are attached. The second is a separate belly panel worked as an oval insert, because a color-change stripe alone would drift visually on a curved long-neck dinosaur crochet pattern. Another adjustment is the leaf plate format: flat stuffed leaves sit cleaner than narrow cones and match the strawberry dinosaur crochet pattern trend already visible in fruit-modified dinosaur designs. A common mistake with this character type is under-stuffing the neck, which leads to head drop and pulls the front legs out of line.
Project Info at a Glance
| Skill Level | Time | Finished Size | Hook | Best For |
|---|---|---|---|---|
| Advanced beginner | 6–8 hours | Approx. 22 cm tall in this photo-based version; benchmark mini strawberry dinos range about 21.6 cm sitting | 4.0 mm for a tight medium-yarn fabric | Shelf display, market tables, gift plush |
Materials and Tools
Yarn
- Strawberry red — medium / worsted-style — approx. 120 g — paintbox cotton or similar
- Leaf green — medium / worsted-style — approx. 25 g — matching cotton
- Cream — medium / worsted-style — approx. 45 g — matching cotton
- Yellow — medium / worsted-style — approx. 8 g — for seeds
- Light pink — medium / worsted-style — approx. 6 g — for cheek patches
- White — medium / worsted-style — approx. 6 g — for toes
Tools
- Hook 4.0 mm / 12 mm safety eyes / stuffing / tapestry needle / stitch markers / black embroidery thread for smile
The verified benchmark range on comparable strawberry dinosaur patterns runs from 4.0 mm with bulky yarn to 5.0 mm with super bulky yarn; the tighter photo finish points to a smaller hook relative to yarn weight. Comparable mini strawberry dinosaur patterns also place safety eyes at 12 mm.
Abbreviations
MR / sc / inc / dec / sl st / ch / BLO / FO
Invisible decrease joins two stitches through the front loops only, which keeps the decrease line flatter than a standard sc2tog.
Pattern — Step by Step
Continuous spiral unless noted.
Counts are verified round by round.
This reconstruction follows standard amigurumi math and the visible anatomy in the reference photo.
Head (Make 1)
Yarn: strawberry red
R1: 6 sc in MR (6)
R2: inc x6 (12)
R3: (sc, inc) x6 (18)
R4: (2 sc, inc) x6 (24)
R5: (3 sc, inc) x6 (30)
R6: (4 sc, inc) x6 (36)
R7-R12: sc around (36)
Place safety eyes between R8 and R9, about 8 sts apart. Add stuffing gradually.
R13: (4 sc, dec) x6 (30)
R14: (3 sc, dec) x6 (24)
R15: (2 sc, dec) x6 (18)
R16: (sc, dec) x6 (12)
R17: dec x6 (6)
Fasten off. Leave 15 cm tail.
Body (Make 1)
Yarn: strawberry red with separate cream belly panel
R1: 6 sc in MR (6)
R2: inc x6 (12)
R3: (sc, inc) x6 (18)
R4: (2 sc, inc) x6 (24)
R5: (3 sc, inc) x6 (30)
R6: (4 sc, inc) x6 (36)
R7-R14: sc around (36)
R15: (4 sc, dec) x6 (30)
R16: sc around (30)
R17: (3 sc, dec) x6 (24)
R18: sc around (24)
Stuff firmly, especially the shoulder area.
R19: (2 sc, dec) x6 (18)
Fasten off. Leave 20 cm tail.
Belly Panel (Make 1)
Yarn: cream
Ch 7.
R1: starting in 2nd ch from hook, 5 sc, 3 sc in last ch, working on opposite side 4 sc, inc in last st (14)
R2: inc, 4 sc, 3 inc, 4 sc, 2 inc (20)
R3: sc, inc, 4 sc, (sc, inc) x3, 4 sc, (sc, inc) x2 (26)
R4: sc around (26)
Fasten off. Leave 25 cm tail.
Neck (Make 1)
Yarn: cream for underside strip, strawberry red exterior by assembly
R1: 6 sc in MR (6)
R2: (sc, inc) x3 (9)
R3: sc around (9)
R4: (2 sc, inc) x3 (12)
R5-R14: sc around (12)
Fasten off. Leave 25 cm tail.
Front Legs (Make 2)
Yarn: cream + white toes + strawberry red
With white:
R1: 6 sc in MR (6)
R2: inc x6 (12)
Switch to cream:
R3: BLO sc around (12)
Switch to red:
R4: (sc, inc) x6 (18)
R5-R9: sc around (18)
R10: (sc, dec, sc) x4, 2 sc (14)
R11-R12: sc around (14)
Stuff lower half only, then lightly to top.
R13: flatten and sc through both sides 7 sts (7)
Fasten off. Leave 20 cm tail.
Back Legs (Make 2)
Yarn: cream + white toes + strawberry red
With white:
R1: 6 sc in MR (6)
R2: inc x6 (12)
Switch to cream:
R3: BLO sc around (12)
Switch to red:
R4: (sc, inc) x6 (18)
R5: (2 sc, inc) x6 (24)
R6-R9: sc around (24)
R10: (2 sc, dec) x6 (18)
R11-R12: sc around (18)
Stuff firmly at the foot, medium at the upper leg.
R13: flatten and sc through both sides 9 sts (9)
Fasten off. Leave 20 cm tail.
Tail (Make 1)
Yarn: red
R1: 6 sc in MR (6)
R2: sc around (6)
R3: (2 sc, inc) x2 (8)
R4-R5: sc around (8)
R6: (3 sc, inc) x2 (10)
R7-R10: sc around (10)
Stuff lightly; keep the tip narrow.
Fasten off. Leave 20 cm tail.
Head Leaf Cap (Make 5)
Yarn: leaf green
R1: 6 sc in MR (6)
R2: (sc, inc) x3 (9)
R3: sc around (9)
R4: (2 sc, inc) x3 (12)
R5-R6: sc around (12)
R7: (2 sc, dec) x3 (9)
R8: sc around (9)
Flatten. Sc through both sides 4 sts (4)
Fasten off. Leave 18 cm tail.
Back Plates (Make 6)
Yarn: leaf green
R1: 6 sc in MR (6)
R2: (sc, inc) x3 (9)
R3: sc around (9)
R4: (2 sc, inc) x3 (12)
R5: sc around (12)
R6: (2 sc, dec) x3 (9)
Flatten. Sc through both sides 4 sts (4)
Fasten off. Leave 15 cm tail.
Tail Leaf Tuft (Make 3)
Yarn: leaf green
R1: 6 sc in MR (6)
R2: sc around (6)
R3: (2 sc, inc) x2 (8)
R4-R5: sc around (8)
Flatten. Sc through both sides 4 sts (4)
Fasten off. Leave 12 cm tail.
Cheek Patches (Make 2)
Yarn: light pink
R1: 6 sc in MR (6)
R2: inc x6 (12)
Sl st to finish.
Fasten off. Leave 12 cm tail.
Toe Bumps (Make 12)
Yarn: white
R1: 6 sc in MR (6)
Sl st in next st.
Fasten off. Leave 8 cm tail.
Seed Spots (Make 20–24)
Yarn: yellow
Use simple embroidered V-shapes or one detached chain with a tack stitch. Each seed should sit at a slight downward angle rather than vertical.
Smile
Yarn: black embroidery thread
Embroider a shallow curved smile centered 2 rounds below the eyes. Add one tiny anchoring stitch at each corner so the curve stays crisp.
Assembly
- Sew the cream belly panel to the lower front half of the body.
- Attach the neck to the front top of the body, centered over the belly panel.
- Sew the head to the top of the neck with extra stuffing packed into the neck joint.
- Attach the front legs slightly forward of center, aligned with the base of the neck.
- Attach the back legs near the rear third of the body so all four feet touch the surface.
- Sew the tail to the back of the body at a slight upward angle.
- Stitch the cheek patches below and slightly outside each eye, then embroider the smile.
- Attach the five head leaves in a strawberry-cap cluster across the crown.
- Sew the six back plates from upper shoulder to tail base, then add the three tail-leaf pieces at the tip.
- Add the toe bumps and embroider the yellow seeds across the red body, leaving the cream underside clear.
The toy is complete when the head stands upright without hand support and all four feet rest flat.
7 Technical Tips
- Mark the first stitch of every round on the head and body. Losing the round start by even one stitch will shift the eye line and pull the smile off center.
- Pack the neck firmer than the head. A soft neck is the main failure mode in long-neck amigurumi and causes forward droop after a few days on display.
- Use invisible decreases on the head from 36 down to 6. Regular decreases leave a ridge that shows under smooth cotton yarn.
- Insert the eyes before the head drops below 24 stitches. Trying to force washers in later can stretch the face fabric and distort the cheek area.
- Pin all four legs before sewing any one leg permanently. A 3 mm height difference at one foot is enough to make the body rock on a flat table.
- Keep the leaf plates lightly stuffed or unstuffed at the edges. Overfilled plates twist sideways and stop reading as strawberry leaves.
- Weave tails back through at least 4 cm of internal stitches. Short tail burial often works loose at the tail base and at the top leaf cluster.
Conclusion
This strawberry dinosaur amigurumi works because the shaping stays disciplined. The body carries the mass. The neck is reinforced early. The leaf details stay flat enough to read as fruit styling instead of generic spikes. Follow the assembly order exactly, then photograph the finished piece from the side to check the leg line before final knotting. Save the project to Pinterest, post the result on Instagram, and tag it with #StrawberryDinosaurPattern so the silhouette is easy to compare across versions. One question remains useful for future revisions: should the tail tuft stay as three leaves, or would five leaves match the head cap more cleanly?









