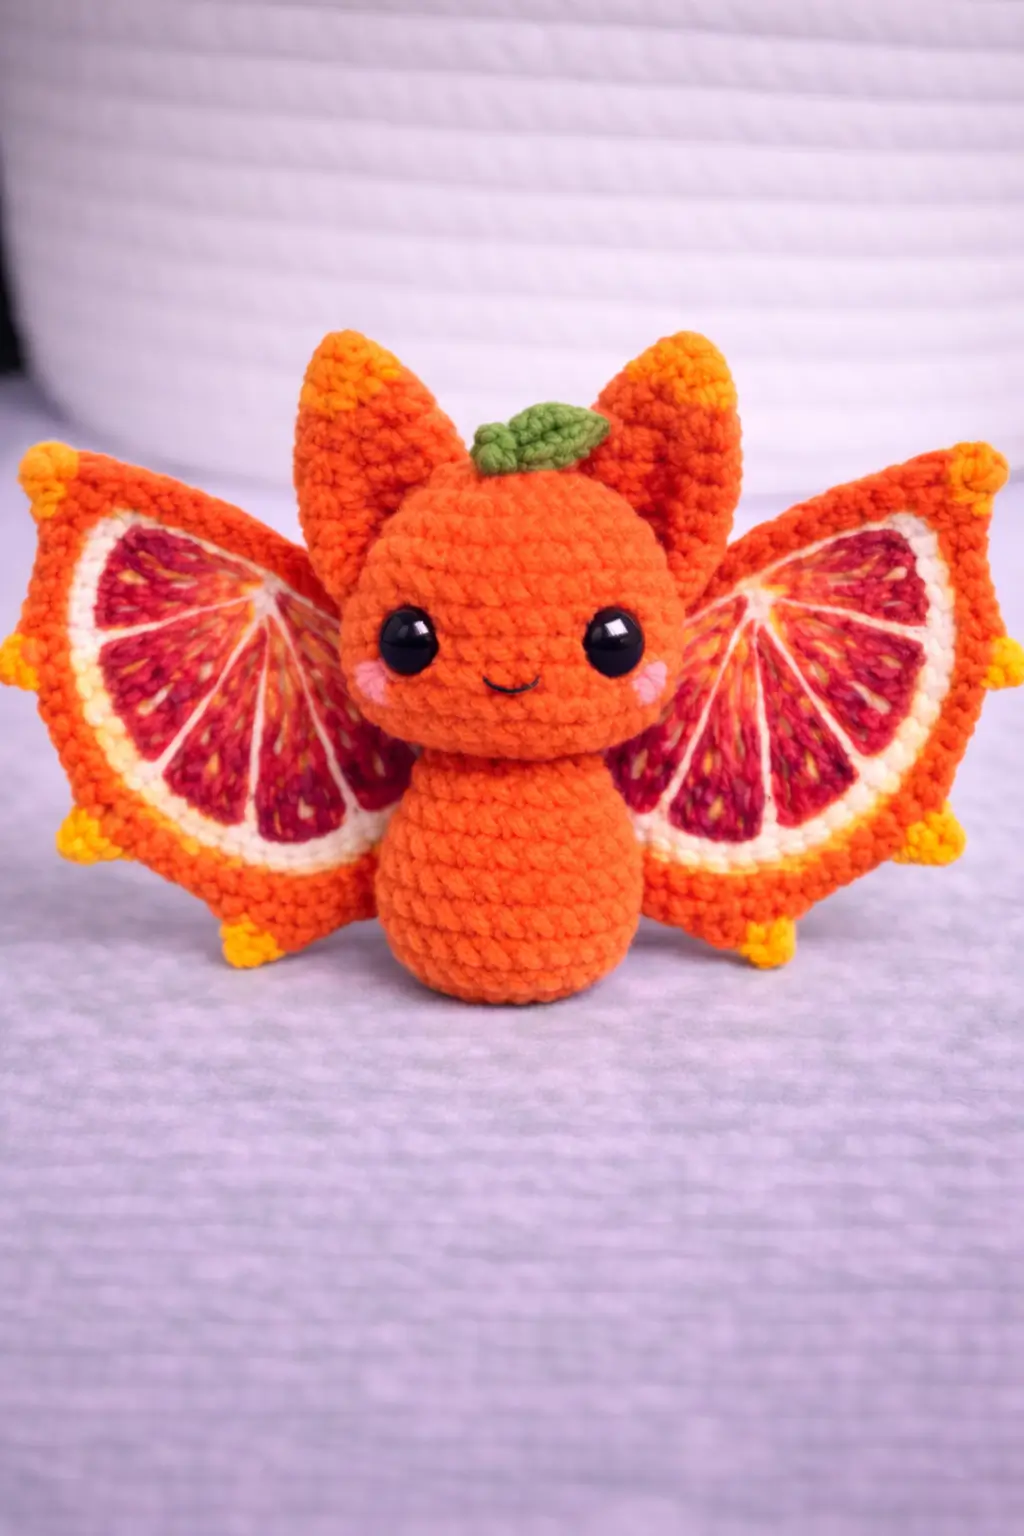
Orange slices split into wedges. Bat wings do the same thing here. This orange bat amigurumi pattern is drafted to match the photo with medium-weight yarn, a 3 to 3.25 mm hook, 12 mm eyes, and a finished height close to 17–18 cm. It suits an advanced beginner to intermediate maker and works well as seasonal shelf decor because the wings read clearly from a distance.
The Design: What Makes This Orange Bat Different
The first structural choice is the head. It is not a sphere. The photo shows a low, rounded cube with a flat face plane, so the head uses a medium 36-stitch plateau and a slightly delayed decrease to keep the cheeks broad. The second choice is the wing format. Standard bat wings use scalloped membranes, but this version needs a citrus cross-section, so each wing carries a flat half-round insert with embroidered segment lines. That changes the silhouette and the read of the project. Third, the crown leaf replaces a horn, stem, or bow. It signals fruit before the viewer reads the wings. A common mistake in a citrus bat crochet pattern is making the wings too narrow. Then the fruit motif disappears. In many fruit bat amigurumi tutorials, the head also sits too high on the body, which weakens the squat, desk-plush profile seen in the photo.
Project Info at a Glance
| Skill Level | Time | Finished Size | Hook | Best For |
|---|---|---|---|---|
| Advanced beginner / intermediate | 5–7 hours | 17–18 cm tall, about 23–25 cm wingspan | 3 mm to 3.25 mm | Fall shelf decor, market table display, themed gift |
Verified size and tool ranges come from current citrus-bat and orange-bat references, then adjusted to the photo proportions used in this custom draft.
Materials and Tools
Yarn
- Bright orange — medium/worsted acrylic — about 35 g to 45 g — Red Heart With Love Premium or Schachenmayr Bravo range
- White — medium/worsted acrylic — about 10 g — same weight family
- Burgundy or deep red — medium/worsted acrylic — about 10 g — same weight family
- Pink — medium/worsted acrylic or embroidery thread — small amount
- Green — medium/worsted acrylic — small amount
- Yellow — medium/worsted acrylic — small amount for wing tip claws
Tools
- Hook 3 mm or 3.25 mm
- 12 mm safety eyes
- Polyester stuffing
- Yarn needle
- Stitch markers
- Black embroidery thread
The hook, yarn-weight, and eye-size range above follows live bat and fruit-bat references. The orange quantity is anchored to one orange-bat source listing about 35 g for the main color; this draft allows a bit more because the citrus wing panels add width.
Abbreviations
MR / sc / inc / dec / sl st / ch / BLO / FO
Invisible decrease: work through the front loops of the next two stitches, yarn over, pull through both loops, then complete one sc.
Pattern — Step by Step
Continuous spiral unless noted.
Note: This is a photo-matched custom draft based on the pictured plush and standard amigurumi stitch math. It is not a transcription of any paid pattern.
Head (Make 1)
Yarn: bright orange medium/worsted acrylic; drafted with standard amigurumi math and scaled to the verified 3–3.25 mm hook range.
R1: 6 sc in MR (6)
R2: inc x6 (12)
R3: (1 sc, inc) x6 (18)
R4: (2 sc, inc) x6 (24)
R5: (3 sc, inc) x6 (30)
R6: (4 sc, inc) x6 (36)
R7: 36 sc (36)
R8: 36 sc (36)
R9: 36 sc (36)
R10: 36 sc (36)
R11: 36 sc (36)
R12: 36 sc (36)
Place safety eyes between R8 and R9, 8 stitches apart. Embroider the smile one round below the eyes.
R13: (4 sc, dec) x6 (30)
R14: 30 sc (30)
R15: (3 sc, dec) x6 (24)
R16: (2 sc, dec) x6 (18)
Add stuffing firmly, especially at the side corners.
R17: (1 sc, dec) x6 (12)
R18: dec x6 (6)
Fasten off. Leave a 20 cm tail.
Body (Make 1)
Yarn: bright orange medium/worsted acrylic; drafted with standard amigurumi math for the short pear body in the photo.
R1: 6 sc in MR (6)
R2: inc x6 (12)
R3: (1 sc, inc) x6 (18)
R4: (2 sc, inc) x6 (24)
R5: (3 sc, inc) x6 (30)
R6: (4 sc, inc) x6 (36)
R7: 36 sc (36)
R8: 36 sc (36)
R9: 36 sc (36)
R10: 36 sc (36)
R11: (4 sc, dec) x6 (30)
R12: 30 sc (30)
R13: 30 sc (30)
R14: 30 sc (30)
R15: (3 sc, dec) x6 (24)
R16: 24 sc (24)
R17: 24 sc (24)
R18: (2 sc, dec) x6 (18)
R19: 18 sc (18)
Stuff the lower half more densely than the neck area.
R20: (1 sc, dec) x6 (12)
R21: dec x6 (6)
Fasten off. Leave a 20 cm tail.
Ears (Make 2)
Yarn: bright orange medium/worsted acrylic; ear scale follows the broad bat-ear look visible in the photo.
R1: 6 sc in MR (6)
R2: inc x6 (12)
R3: (1 sc, inc) x6 (18)
R4: 18 sc (18)
R5: (2 sc, inc) x6 (24)
R6: 24 sc (24)
Flatten without stuffing. Fold the base slightly before sewing so the ear cups forward.
Fasten off. Leave a 15 cm tail.
Wings (Make 2)
Yarn: bright orange medium/worsted acrylic; flat wing construction is supported by live bat-wing references, then reshaped here for the citrus version.
Ch 17.
Row 1: sc in 2nd ch from hook and across (16)
Row 2: ch 1, turn, inc, 14 sc, inc (18)
Row 3: ch 1, turn, 18 sc (18)
Row 4: ch 1, turn, inc, 16 sc, inc (20)
Row 5: ch 1, turn, 20 sc (20)
Row 6: ch 1, turn, inc, 18 sc, inc (22)
Row 7: ch 1, turn, 22 sc (22)
Row 8: ch 1, turn, 22 sc (22)
Row 9: ch 1, turn, dec, 18 sc, dec (20)
Row 10: ch 1, turn, 20 sc (20)
Row 11: ch 1, turn, dec, 16 sc, dec (18)
Row 12: ch 1, turn, 18 sc (18)
Row 13: ch 1, turn, dec, 14 sc, dec (16)
Row 14: ch 1, turn, 16 sc (16)
Do not fasten off. Rotate and work an edging: sc evenly around, placing 3 sc in each outer corner.
At the bottom outer edge, add 4 small yellow claw points later as separate pieces or color-change nubs.
Fasten off. Leave a 25 cm tail.
Orange Slice Inserts (Make 2)
Yarn: burgundy/deep red for the flesh, white for rind detail; this part is custom drafted to match the photo.
With burgundy:
R1: 6 sc in MR (6)
R2: inc x6 (12)
R3: (1 sc, inc) x6 (18)
R4: (2 sc, inc) x6 (24)
R5: (3 sc, inc) x6 (30)
R6: (4 sc, inc) x6 (36)
Fasten off.
Fold into a half-circle. With white, surface crochet or embroider one curved rind line near the edge and 5 to 6 wedge divider lines from center to rim.
Fasten off. Leave a 20 cm tail.
Cheek Patches (Make 2)
Yarn: pink medium/worsted acrylic or embroidery yarn.
R1: 6 sc in MR (6)
R2: inc x6 (12)
Fasten off. Leave a 10 cm tail.
Leaf (Make 1)
Yarn: green medium/worsted acrylic; fruit-bat references commonly include leaf options, which supports this crown detail.
Ch 7.
Row 1: starting in 2nd ch from hook, sl st, sc, hdc, dc, hdc, sc (6)
Work on opposite side of foundation chain: sc, hdc, dc, hdc, sc, sl st.
Fasten off. Leave a 12 cm tail.
Stem Knot (Make 1)
Yarn: green.
R1: 6 sc in MR (6)
R2: 6 sc (6)
Fasten off. Leave a 10 cm tail.
Wing Tip Claws (Make 8)
Yarn: yellow.
For each claw: ch 3, sl st in 2nd ch from hook, sl st in next ch.
Fasten off. Leave a short tail.
Make 4 for each wing.
Assembly
- Sew the head to the top center of the body with the face aimed straight forward.
- Add extra stuffing to the neck seam before closing the last gap.
- Sew the cheek patches below and slightly outside each eye.
- Sew the ears to the top back half of the head, angled outward, with about 5 stitches between inner bases.
- Sew each orange slice insert onto the center of a wing, keeping the straight folded edge closest to the body side.
- Embroider 5 to 6 white segment lines on each insert if you did not surface-crochet them earlier.
- Attach 4 yellow claw points around each outer wing edge.
- Sew the wings to the upper back of the body so the top edge starts just behind the head seam.
- Sew the stem knot to the crown center, then stitch the leaf just behind it with a slight tilt.
- Weave all tails inward and shape the stuffing so the body sits flat.
The piece is complete when it stands upright without the head tipping forward.
7 Technical Tips
- Mark Round 1 and every increase round. Missing one increase in the head shifts the eye line, and the face stops reading as centered.
- Stuff the lower body firmer than the neck. A soft base makes a 17–18 cm bat slump backward once the wings are attached.
- Use invisible decreases on all visible shaping rounds. Standard decreases leave ridges that show clearly on bright orange yarn near the face and belly.
- Install 12 mm eyes before the final third of head closure. Waiting past R15 makes washer placement harder and can distort the square-cheek profile.
- Pin the wings before sewing. The inner top edge should start just behind the head seam on both sides, or one wing will sit lower by 5 to 8 mm.
- Keep the orange slice insert flat, not stuffed. Even light stuffing makes the wing bulge and breaks the clean fruit-cross-section effect.
- Weave green tails into the crown in two directions. A single pass lets the leaf twist after handling, especially where the stem knot pulls upward.
Conclusion
This orange bat amigurumi pattern works because the fruit idea is built into the structure, not added at the end. The broad ears, low body, and half-round citrus panels give the plush its read in a single glance. Start with the head and one wing first, then check the scale before making the second side. When you finish, post one front photo and one side photo to Pinterest and Instagram so the wing depth is visible. Use #OrangeSliceBat. One question remains useful for future variations: would you keep the orange wedge lines embroidered in white, or switch them to cream for a softer rind effect?









