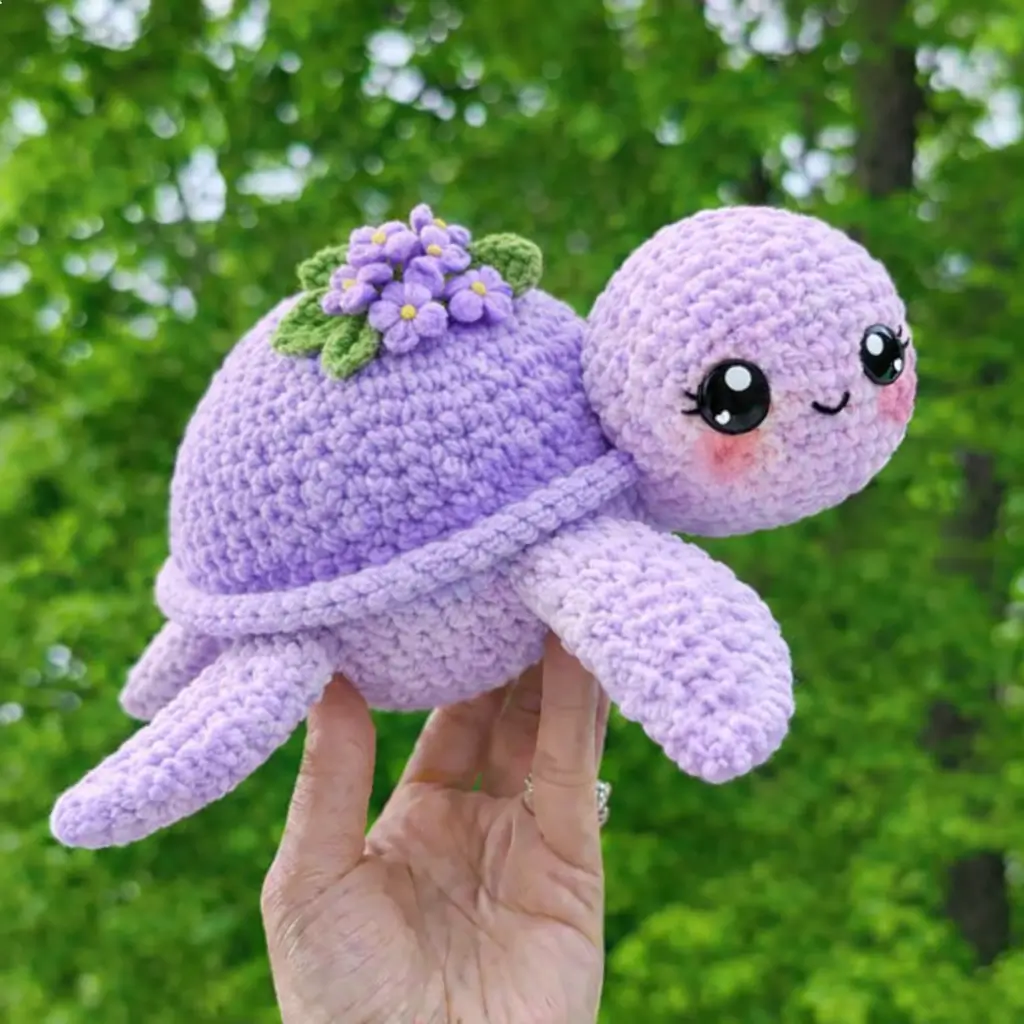
A turtle shell turns into a problem the moment you cover it with blossoms. This turtle amigurumi crochet pattern solves that by separating the floral decoration from the structural shell, so the body stays rounded while the topper stays crisp. You will need chenille yarn, a 4.0 mm hook, large safety eyes, and basic shaping control. Finished size lands around a small hand-held plush, which makes it practical for gift stock or market display.
The Design: What Makes This Turtle Different
The shell is the first design decision. A standard turtle shell can sit low and flat, but the photo shows a high dome, so the pattern below pushes the shell to a 42-stitch plateau and holds it there before closing. That keeps the silhouette rounded rather than saucer-like. You need that volume because chenille compresses under handling. The piece then holds its shape instead of collapsing at the crown.
The second decision is the head. Plush turtle patterns commonly stop around a 24-stitch head plateau, while classic worsted patterns often climb higher. This version keeps the head at 24 for balance against the shell, which matches what plush turtle amigurumi and flower turtle crochet pattern pages tend to do. A larger head would overpower the shell line.
The third decision is decorative, but structural too. The flowers are made as separate appliqués rather than crocheted into the shell fabric. Makers often bury shell definition when they attach flowers directly to an already soft chenille dome. This method avoids that mistake and keeps the turtle stable when displayed from the side.
Project Info at a Glance
| Skill Level | Time | Finished Size | Hook | Best For |
|---|---|---|---|---|
| Easy–Intermediate | 3–5 hours | 18–22 cm | 4.0 mm | Gifts, market plush, spring decor |
Materials and Tools
Yarn
- Lavender chenille / velvet — super bulky — about 65–75 g total for shell, head, body, flippers, and tail — Premier Parfait Chunky or similar plush yarn is a close fit to the searched flower-turtle builds.
- Medium purple chenille — super bulky — 10–15 g — for flower petals
- Olive or leaf green chenille — super bulky — 10–20 g — for leaves and optional shell edging
- Pink blush yarn or blush powder — trace amount — for cheeks
Tools
- Hook 4.0 mm
- Safety eyes 20–24 mm
- Polyester stuffing
- Yarn needle
- Stitch markers
- Black embroidery thread for smile and lashes
Abbreviations
- MR = magic ring
- sc = single crochet
- inc = increase
- dec = invisible decrease
- sl st = slip stitch
- ch = chain
- BLO = back loop only
- FLO = front loop only
- hdc = half double crochet
- dc = double crochet
Invisible decrease keeps the front fabric tighter than a standard decrease, which matters on chenille where open holes read immediately.
Pattern — Step by Step
Continuous spiral unless noted.
Head (Make 1)
Yarn: lavender
- R1: 6 sc in MR (6)
- R2: inc x6 (12)
- R3: (sc 1, inc) x6 (18)
- R4: (sc 2, inc) x6 (24)
- R5-R9: sc around (24)
- R10: (sc 2, dec) x6 (18)
- Insert safety eyes between R7 and R8, 7–8 sts apart. Add embroidered lashes and smile before final closing.
- R11: (sc 1, dec) x6 (12)
- Stuff firmly, especially at the cheeks and muzzle line.
- R12: dec x6 (6)
Fasten off. Leave a 20 cm tail.
Body Underside (Make 1)
Yarn: lavender
- R1: 6 sc in MR (6)
- R2: inc x6 (12)
- R3: (sc 1, inc) x6 (18)
- R4: (sc 2, inc) x6 (24)
- R5: (sc 3, inc) x6 (30)
- R6: (sc 4, inc) x6 (36)
- R7: (sc 5, inc) x6 (42)
- R8-R10: sc around (42)
Fasten off. Leave a 25 cm tail.
Top Shell (Make 1)
Yarn: lavender
- R1: 6 sc in MR (6)
- R2: inc x6 (12)
- R3: (sc 1, inc) x6 (18)
- R4: (sc 2, inc) x6 (24)
- R5: (sc 3, inc) x6 (30)
- R6: (sc 4, inc) x6 (36)
- R7: (sc 5, inc) x6 (42)
- R8-R13: sc around (42)
- R14: (sc 5, dec) x6 (36)
- R15: sc around (36)
Stuff lightly after assembly, not now. The shell should stay domed, not rigid.
Fasten off. Leave a 30 cm tail.
Front Flippers (Make 2)
Yarn: lavender
- R1: 6 sc in MR (6)
- R2: inc x6 (12)
- R3-R8: sc around (12)
- R9: (sc 4, dec) x2 (10)
- R10-R12: sc around (10)
Flatten lightly. Fasten off. Leave an 18 cm tail.
Back Flippers (Make 2)
Yarn: lavender
- R1: 6 sc in MR (6)
- R2: inc x6 (12)
- R3-R6: sc around (12)
- R7: (sc 4, dec) x2 (10)
- R8-R9: sc around (10)
Flatten lightly. Fasten off. Leave an 18 cm tail.
Tail (Make 1)
Yarn: lavender
- R1: 4 sc in MR (4)
- R2: (sc 1, inc) x2 (6)
- R3-R4: sc around (6)
- R5: (sc 2, inc) x2 (8)
- R6: sc around (8)
Do not stuff. Fasten off. Leave a 12 cm tail.
Cheek Patches (Make 2)
Yarn: blush pink or embroidery
- R1: 6 sc in MR (6)
- R2: inc x6 (12)
Fasten off. Leave a short tail if sewing, or work as a blush guide if brushing color on.
Leaves (Make 3)
Yarn: green
Ch 6.
Work back along chain: sc in 2nd ch from hook, hdc, dc, hdc, sc.
On opposite side of chain: sc, hdc, dc, hdc, sc.
Sl st to base.
Fasten off. Leave a 10 cm tail.
Flower Centers (Make 3)
Yarn: yellow
- R1: 6 sc in MR (6)
Sl st to first sc.
Fasten off. Leave a short tail.
Flower Petals (Make 3 flowers, 5 petals each)
Yarn: medium purple
- R1: 5 sc in MR (5)
Sl st to first sc.
For each petal: (ch 2, 2 dc in next st, ch 2, sl st in same st)
Repeat around 5 times.
Fasten off. Leave a 12 cm tail.
Shell Rim Cord (Make 1)
Yarn: lavender
Ch 46.
Row 1: sl st in 2nd ch from hook and in each ch across (45)
Fasten off. Leave a 20 cm tail.
Assembly
- Sew the head to the front third of the body underside, centering it on the long axis.
- Attach the front flippers on each side of the head, angled slightly forward.
- Attach the back flippers near the rear third of the body, lower than the front pair.
- Sew the tail at the center back edge.
- Place the body underside against the top shell and pin at four compass points before sewing.
- Stuff the shell gradually as the seam closes, keeping the highest volume at the center dome.
- Sew the shell rim cord around the join to create the raised seam line seen in the photo.
- Stitch the cheek patches or add blush directly below and slightly outside each eye.
- Arrange three leaves on the shell crown, then sew them flat at their bases only.
- Sew the three flowers over the leaves, then attach the yellow centers last.
The piece is complete when the shell sits domed, the head projects forward, and all four flippers touch a flat surface without twisting.
7 Technical Tips
- Mark round 1 immediately. Chenille hides the first increase round, and missing that marker usually shifts the head seam by 1–2 stitches.
- Keep head stuffing firmer than shell stuffing. A soft head collapses behind 20–24 mm eyes and creates a folded brow line.
- Place eyes before the final two decrease rounds. Waiting longer makes washer placement unreliable and can tear plush fibers around the eye posts.
- Stop the shell at a true 42-stitch plateau. If you close early at 36, the dome flattens and the flower cluster looks oversized.
- Pin the four flippers before sewing any of them. A difference of even 5 mm between left and right front flippers becomes obvious from the side profile.
- Work invisible decreases slowly. On velvet yarn, a rushed decrease often grabs only surface fluff, which opens a hole after stuffing.
- Weave tails back through at least 4 cm of internal stuffing path. Short tail burying slips loose faster on chenille than on cotton or acrylic.
Conclusion
This turtle amigurumi crochet pattern works because the shell, face, and floral topper are treated as separate engineering problems rather than one soft mass. The searched market and pattern data also point the same way: plush turtles sell well, flower shells attract clicks, and chenille builds hold a hand-sized display range when paired with a small hook. Start by making the head and one flipper, then check scale against your chosen eye size before finishing the shell. Share the finished turtle on Pinterest and Instagram with #FlowerShellTurtle. One question remains useful before you batch this design: should the flower cluster sit centered, or slightly behind the shell crown like the photo?









