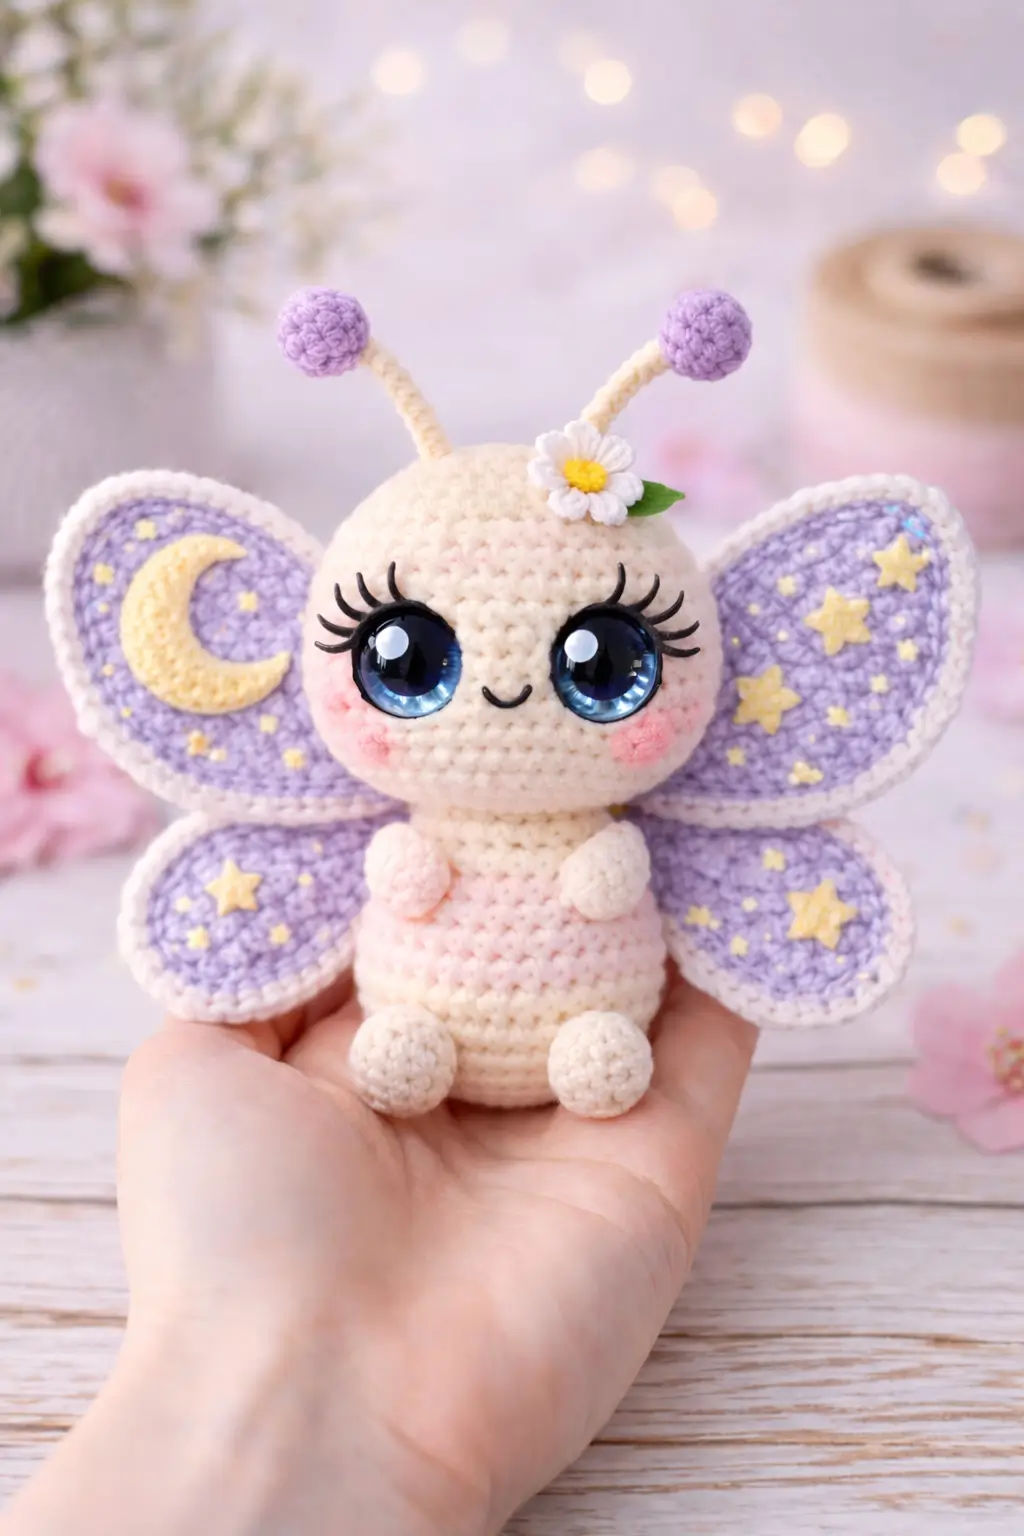
Moth wings read wrong fast; the upper pair has to sit higher than the lower pair or the whole face loses its scale. This moth amigurumi crochet pattern builds that placement first, then matches it with sport-weight yarn, and a hand-size finish around 13 cm. You get a display piece that works as nursery decor, shelf styling, or a small gift with low yarn demand.
The Design: What Makes This Moth Different
You are not shaping a generic butterfly here. A moth face in this style needs a wider head, a shorter neck, and wings that frame the cheeks instead of extending far beyond them. The design uses a medium spherical head for visual dominance, a narrower body for seated balance, and four separate wings so the upper pair can carry the moon motif while the lower pair stay secondary. That split matters. It keeps the silhouette readable from the front.
Another key choice is the antenna structure. Thin stalks with rounded tips fit the photo better than feathery antennae, which belong to a more realistic luna moth approach. A common maker mistake with a moth plush build is attaching all four wings on one horizontal line. That flattens the insect shape and makes the doll look like a butterfly face with extras added later.
Project Info at a Glance
| Skill Level | Time | Finished Size | Hook | Best For |
|---|---|---|---|---|
| Intermediate | 5–7 hours | 13 cm seated | 1.75–2.0 mm | Decor, gift, photo prop |
Materials and Tools
Yarn
- Cream — sport weight — about 50 g — YarnArt Jeans or similar cotton blend
- Pale pink — sport weight — 10 g — for lower body shading
- Lilac — sport weight — 25 g — for wing centers and antenna tips
- White — sport weight — 20 g — for wing edging and flower petals
- Soft yellow — sport weight — 10 g — for moon, stars, and flower center
- Green — sport weight — scrap amount — for leaf
- Black embroidery thread — scrap amount — for mouth and lash line
- Pink blush yarn or pastel — scrap amount — for cheeks
Tools
- Hook 1.75 mm to 2.0 mm
- 10 mm safety eyes as a baseline; larger cabochon-style eyes can be substituted to match the photo look
- Polyfill stuffing
- Tapestry needle
- Stitch markers
- Pins
- Small fabric glue for appliqués if not sewing them
Abbreviations
MR / sc / inc / dec / sl st / ch / BLO / hdc / dc / FO
Invisible decrease keeps the taper compact and reduces the ridge that appears when the face narrows under large eyes.
Pattern — Step by Step
Continuous spiral unless noted.
Head (Make 1)
Yarn: cream
- R1: 6 sc in MR (6)
- R2: inc x6 (12)
- R3: (sc, inc) x6 (18)
- R4: (2 sc, inc) x6 (24)
- R5: (3 sc, inc) x6 (30)
- R6: (4 sc, inc) x6 (36)
- R7–R11: sc around (36)
- R12: (4 sc, dec) x6 (30)
- R13: (3 sc, dec) x6 (24)
Insert eyes between R9 and R10, spaced 8 sts apart. Add stuffing firmly.
- R14: (2 sc, dec) x6 (18)
- R15: (sc, dec) x6 (12)
- R16: dec x6 (6)
Fasten off. Leave a 20 cm tail.
Body (Make 1)
Yarn: cream, switch to pale pink at lower mid-body if desired
- R1: 6 sc in MR (6)
- R2: inc x6 (12)
- R3: (sc, inc) x6 (18)
- R4: (2 sc, inc) x6 (24)
- R5: (3 sc, inc) x6 (30)
- R6–R10: sc around (30)
- R11: (3 sc, dec) x6 (24)
- R12–R13: sc around (24)
- R14: (2 sc, dec) x6 (18)
- R15–R16: sc around (18)
Stuff lower body more firmly than neck area so it will sit.
Fasten off. Leave a 25 cm tail for sewing head.
Arms / Front Legs (Make 2)
Yarn: cream
- R1: 6 sc in MR (6)
- R2: sc around (6)
- R3: (sc, dec) x2 (4)
- R4–R5: sc around (4)
Light stuffing only in the lower half.
Fasten off. Leave a 15 cm tail.
Back Legs (Make 2)
Yarn: cream
- R1: 6 sc in MR (6)
- R2: sc around (6)
- R3: sc around (6)
Fasten off. Leave a 15 cm tail.
Upper Wings (Make 2)
Yarn: lilac with white edging
- R1: 6 sc in MR (6)
- R2: inc x6 (12)
- R3: (sc, inc) x6 (18)
- R4: (2 sc, inc) x6 (24)
- R5: (3 sc, inc) x6 (30)
- R6: Join white, sc around in BLO for a neat border (30)
Fasten off. Leave an 18 cm tail.
Pinch one point at the base when sewing so the wing reads teardrop rather than circle.
Lower Wings (Make 2)
Yarn: lilac with white edging
- R1: 6 sc in MR (6)
- R2: inc x6 (12)
- R3: (sc, inc) x6 (18)
- R4: (2 sc, inc) x6 (24)
- R5: Join white, sc around in BLO (24)
Fasten off. Leave an 18 cm tail.
Antennae (Make 2)
Yarn: cream and lilac
With lilac tip:
- R1: 6 sc in MR (6)
- R2: sc around (6)
- R3: dec x3 (3)
Switch to cream.
- R4: sc around (3)
- R5: sc around (3)
- R6: sc around (3)
- R7: sc around (3)
Fasten off. Leave a 12 cm tail.
Cheek Patches (Make 2)
Yarn: blush pink
- R1: 6 sc in MR (6)
- R2: inc x6 (12)
Fasten off. Leave a short tail if sewing.
Crescent Moon Appliqué (Make 1)
Yarn: soft yellow
Ch 10.
Work around chain: 2 sc, 2 hdc, 3 dc, 3 dc in last ch, other side 3 dc, 2 hdc, 2 sc.
Fasten off.
Curve slightly while sewing. For the crescent cut-out effect, place it over lilac wing center with the inner edge pulled inward by one tack stitch.
Star Appliqués (Make 5 to 7)
Yarn: soft yellow
MR, ch 2. Repeat 5 times: sl st into ring, ch 2, sl st into ring.
Tighten ring.
Fasten off.
Daisy Flower (Make 1)
Yarn: white and yellow
With yellow:
- R1: 6 sc in MR (6)
Join white.
Petals: (ch 3, sl st in next st) repeat 6 times.
Fasten off.
Leaf (Make 1)
Yarn: green
Ch 6.
Starting in 2nd ch from hook: sl st, sc, hdc, sc, sl st.
Fasten off.
Assembly
- Sew the head to the body, centering the neck opening under the eye line.
- Attach the back legs at the lower front edge so the doll sits with a slight forward tilt.
- Sew the arms high on the body, just under the head seam.
- Pin the upper wings first, placing them slightly above the midpoint of the head-body join.
- Add the lower wings under the upper pair with a visible gap between layers.
- Sew the antennae to the top of the head, angled outward.
- Fix the cheek patches below the eyes and slightly toward the outer corners.
- Stitch the crescent moon to one upper wing and distribute the stars across all four wings.
- Sew the daisy and leaf near the right antenna base, then embroider the smile.
- Weave in all tails, steam lightly if needed, and check that the moth sits flat on its body base.
The piece should now hold a stable seated front-facing pose.
7 Technical Tips
- Wing tier drift: Upper and lower wings can collapse into one line during sewing. Pin the upper pair 4–6 mm higher than the lower pair before taking the first stitch.
- Head softness: Loose stuffing flattens the face under large eyes. Pack the center firmly, then reduce pressure near the closing rounds so the crown stays round.
- Invisible dec distortion: Standard decreases leave ladders on pale yarn. Work every visible decrease as an invisible dec, especially on head R12–R16.
- Eye placement timing: Insert eyes before the head drops below 24 stitches. Waiting longer makes the washer angle harder to control and can stretch the fabric.
- Antenna lean: Three-stitch stalks can twist if the tip ball is overstuffed. Use only a pinch of filling in the lilac tip or skip stuffing there completely.
- Pinning failure: A wing that looks even in hand can read crooked from the front. After pinning, place the doll on a table and check both wing heights at eye level before sewing.
- Tail weaving bulk: Multiple decorative appliqués create thick backs on flat wings. Split the plies of the tail and weave through only the lilac layer for a cleaner finish.
Conclusion
This celestial version turns a standard moth amigurumi crochet pattern into a portrait build. The face stays dominant, the wing layers stay readable, and the moon-and-star appliqué gives the design a fixed theme instead of a generic pastel finish. Next step: crochet one upper wing and one lower wing first, pin them behind the head, and check proportion before making the second side. Share the finished piece on Pinterest and Instagram with the tag #CelestialMothPattern so the wing layout is easy to compare across versions. Which side do you prefer for the crescent moon: left upper wing only, or mirrored on both upper wings?









