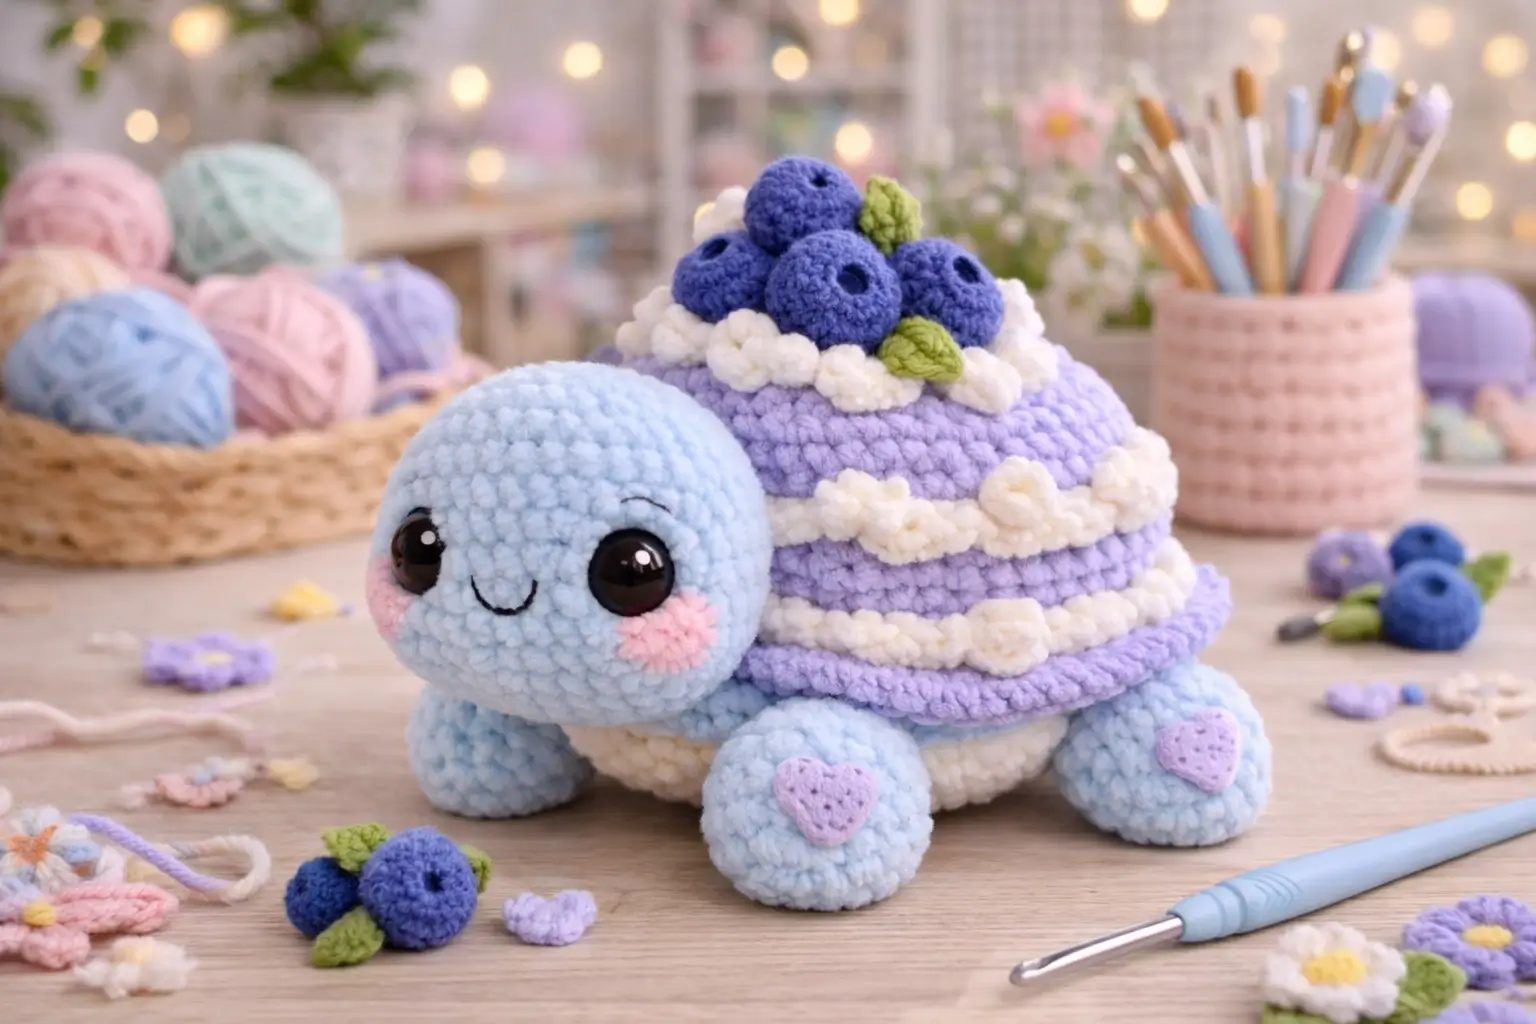
A turtle only reads as a blueberry cake when the shell keeps its dome and the frosting bands stay proud of the surface. This turtle amigurumi crochet pattern uses super bulky plush yarn, a 4.0 mm hook, 20 mm eyes, and a medium build that lands around 16–18 cm in the photographed style. That scale suits desk décor, nursery display, or market-table gift stock.
The Design: What Makes This Turtle Different
Most turtle patterns treat the shell as a flat top and the body as a separate base. This one cannot. The shell has to act like a cake dome, so the lavender section rises higher, then holds several rounds before tapering. That extra height gives room for frosting garlands and the blueberry cluster.
The head is oversized on purpose. A plush turtle amigurumi with a dessert shell can look back-heavy, so a broader head shifts the visual center forward and keeps the silhouette balanced. The legs stay short and rounded rather than flipper-like. That choice lowers the body and makes the cake shell appear heavier.
A common mistake in any turtle crochet tutorial is placing the shell too low over the shoulder line. Then the neck disappears. In this version, the front shell edge sits behind the head seam, not above it. That spacing also leaves room for blush placement and the embroidered smile.
Project Info at a Glance
| Skill Level | Time | Finished Size | Hook | Best For |
|---|---|---|---|---|
| Intermediate | 4–6 hours | 16–18 cm | 4.0 mm | Display plush, gift, market sample |
Size and material class are inferred from comparable turtle and plush flower-turtle patterns using chenille yarn and large eyes.
Materials and Tools
Yarn
- Pastel blue — super bulky chenille/velvet — about 35 g — Premier Parfait Chunky class yarn or similar
- Lavender — super bulky chenille/velvet — about 20 g — same yarn family
- White — super bulky chenille/velvet — about 15 g — same yarn family
- Blueberry blue — super bulky chenille/velvet — about 8–10 g
- Leaf green — super bulky chenille/velvet — under 5 g
- Pink — light DK or plush scrap for cheeks and heart appliqués — under 5 g
Tools
- Hook 4.0 mm
- 20 mm safety eyes
- Polyester stuffing
- Yarn needle
- Stitch markers
- Black embroidery thread for the mouth
Abbreviations
MR = magic ring
sc = single crochet
inc = increase
dec = invisible decrease
sl st = slip stitch
ch = chain
BLO = back loop only
FLO = front loop only
Invisible decrease joins the front loops of two stitches first, which keeps the surface cleaner than a standard decrease.
Pattern — Step by Step
Continuous spiral unless noted.
Head (Make 1)
Yarn: pastel blue — Original pattern using standard amigurumi math
R1: 6 sc in MR (6)
R2: inc x6 (12)
R3: (sc, inc) x6 (18)
R4: (2 sc, inc) x6 (24)
R5: (3 sc, inc) x6 (30)
R6: (4 sc, inc) x6 (36)
R7-R11: sc around (36)
R12: (4 sc, dec) x6 (30)
Insert 20 mm eyes between R8 and R9, 8 stitches apart. Begin stuffing.
R13: (3 sc, dec) x6 (24)
R14: (2 sc, dec) x6 (18)
R15: (sc, dec) x6 (12)
R16: dec x6 (6)
Fasten off. Leave a 25 cm tail.
Body / Belly (Make 1)
Yarn: white — Original pattern using standard amigurumi math
R1: 6 sc in MR (6)
R2: inc x6 (12)
R3: (sc, inc) x6 (18)
R4: (2 sc, inc) x6 (24)
R5: (3 sc, inc) x6 (30)
R6: (4 sc, inc) x6 (36)
R7-R9: sc around (36)
R10: (4 sc, dec) x6 (30)
R11: (3 sc, dec) x6 (24)
R12: (2 sc, dec) x6 (18)
Stuff firmly but keep the underside flat.
R13: (sc, dec) x6 (12)
R14: dec x6 (6)
Fasten off. Leave a 20 cm tail.
Front Legs (Make 2)
Yarn: pastel blue — Original pattern using standard amigurumi math
R1: 6 sc in MR (6)
R2: inc x6 (12)
R3-R4: sc around (12)
R5: (sc, dec) x3 (9)
Light stuffing only.
Flatten. sc through both layers for 4 stitches to close the opening.
Fasten off. Leave a 20 cm tail.
Back Legs (Make 2)
Yarn: pastel blue — Original pattern using standard amigurumi math
R1: 6 sc in MR (6)
R2: inc x6 (12)
R3-R4: sc around (12)
R5: (sc, dec) x3 (9)
Flatten. sc through both layers for 4 stitches to close.
Fasten off. Leave a 20 cm tail.
Shell Dome (Make 1)
Yarn: lavender — Original pattern using standard amigurumi math
R1: 6 sc in MR (6)
R2: inc x6 (12)
R3: (sc, inc) x6 (18)
R4: (2 sc, inc) x6 (24)
R5: (3 sc, inc) x6 (30)
R6: (4 sc, inc) x6 (36)
R7-R10: sc around (36)
R11: FLO sc around (36)
R12: sc around (36)
R13: FLO sc around (36)
R14: sc around (36)
R15: FLO sc around (36)
R16: sc around (36)
R17: (4 sc, dec) x6 (30)
R18: sc around (30)
Fasten off. Leave a 35 cm tail.
Do not stuff fully; add only enough filling to keep a cake-dome profile.
Frosting Garland Strip (Make 3)
Yarn: white — Original decorative adaptation
Ch 28.
Row 1: Starting in 2nd ch from hook, *(sl st, sc, hdc, 2 dc, hdc, sc)* in next 6 chains; repeat 4 times total.
Fasten off. Leave a 15 cm tail.
Curve each strip around a FLO ridge on the shell.
Rosettes (Make 6)
Yarn: white — Original decorative adaptation
Ch 9.
Row 1: Starting in 2nd ch from hook, 2 hdc in each chain across.
Roll into a spiral. Stitch base closed.
Fasten off. Leave a 10 cm tail.
Blueberries (Make 5)
Yarn: blueberry blue — Original pattern using standard amigurumi math
R1: 6 sc in MR (6)
R2: inc x6 (12)
R3-R4: sc around (12)
R5: (sc, dec) x3 (9)
Stuff lightly.
R6: dec x3, sc in remaining 3 sts (6)
Fasten off. Close opening. Leave a 12 cm tail.
Blueberry Leaves (Make 3)
Yarn: leaf green — Original decorative adaptation
Ch 6.
Work back along chain: sl st, sc, hdc, sc, sl st.
Fasten off. Leave a 10 cm tail.
Cheek Patches (Make 2)
Yarn: pale pink — Original flat circle
R1: 6 sc in MR (6)
R2: inc x6 (12)
Fasten off. Leave a 12 cm tail.
Heart Appliqués (Make 2)
Yarn: lavender or pale pink — Original decorative adaptation
Make MR. In ring work: 2 dc, 2 tr, 1 dc, sl st, 1 dc, 2 tr, 2 dc. Pull tight.
Fasten off. Leave a 12 cm tail.
Tail (Make 1)
Yarn: lavender — Original pattern
R1: 4 sc in MR (4)
R2: sc around (4)
R3: (sc, inc) x2 (6)
Fasten off. Leave a 12 cm tail.
Assembly
- Sew the head to the front third of the white body, angled slightly upward.
- Attach the front legs under the shoulder line, level with each other.
- Attach the back legs near the rear third of the body so the plush sits flat.
- Sew the tail at the center back.
- Place the lavender shell dome over the body and pin it before stitching.
- Sew the shell around the body, keeping the front edge behind the head seam.
- Attach the three frosting garland strips to the shell ridges created by the FLO rounds.
- Stitch the rosettes along the garlands at even intervals.
- Build the blueberry topper by sewing the berries into a tight cluster, then add the leaves between them and secure the cluster to the shell crown.
- Sew on the cheek patches, add the heart appliqués to the front legs, then embroider the smile centered below the eyes.
The plush is complete when all seam tails are buried inside the shell or body and the turtle sits without rocking.
7 Technical Tips
- Mark every increase round on the shell. Missing one increase in R4-R6 shifts the dome and the frosting lines will sag on one side.
- Keep the head firmer than the body. A loose head fill makes 20 mm eyes pull inward and changes the face from round to pinched.
- Use invisible decreases on all visible blue and lavender pieces. Standard decreases leave ridges that show through chenille pile once the toy is photographed from the side.
- Install the eyes before the final two decrease rounds. Waiting until R14 or later on the head makes the opening too tight for safe washer placement.
- Do not overstuff the shell. The target is a soft dome, not a ball; too much filling lifts the shell edge and exposes the body seam.
- Pin the garlands before sewing. Even a 5 mm drift between left and right sides makes the cake bands read crooked across the shell.
- Weave tails back through dense areas only. Short tail burying on plush yarn can creep out after handling, especially under the front legs and shell rim.
Conclusion
This turtle amigurumi crochet pattern works because the shell is treated as structure first and decoration second. The rounded head, low body, and tall cake dome carry the whole design. Next, stitch one test shell in lavender and white before committing to the blueberry topper placement. Then photograph the finished turtle from a low side angle so the frosting bands stay visible. Share it on Pinterest and Instagram with #BlueberryCakeTurtle and compare topper layouts. One useful question remains: would you keep five blueberries on the shell crown, or reduce the cluster to three for a flatter tortoise profile?









