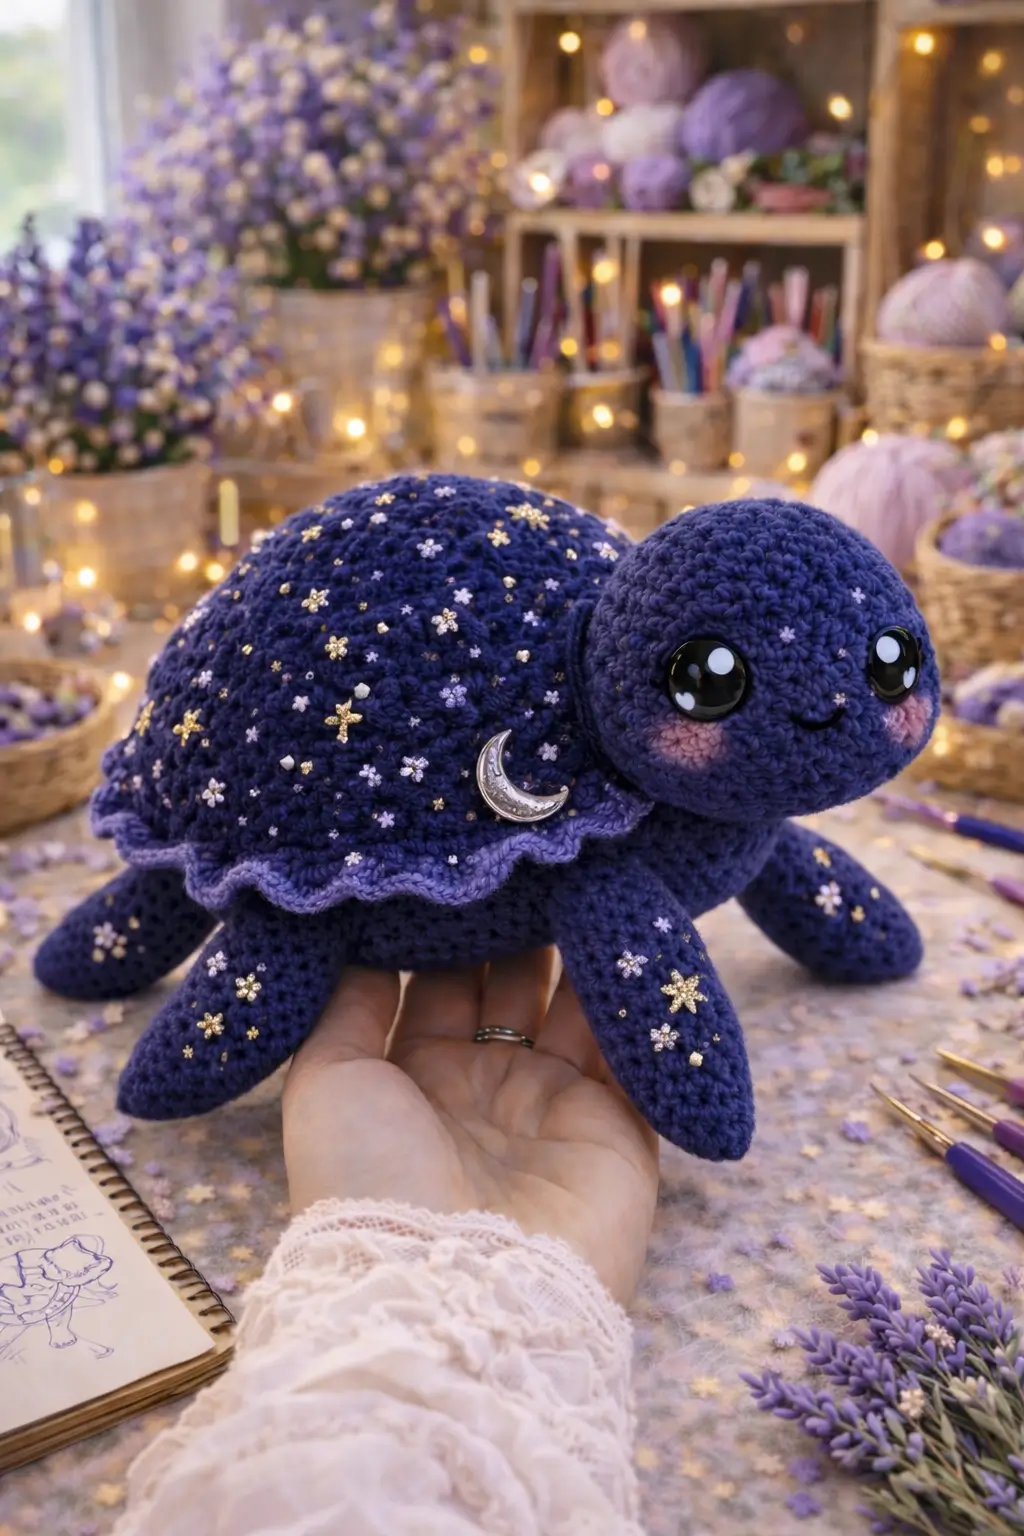
A turtle shell is not a dome first. It is a rim first. That edge decides whether this turtle amigurumi crochet pattern reads as soft sculpture or just another oval plush. This version uses velvet yarn, a 4.5 mm hook, and a medium plush scale near 20 cm, with intermediate shaping and surface details. The practical payoff is display value: it works as nursery decor, market inventory, or a photographed statement piece.
The Design: What Makes Galaxy Turtle Different
The shell carries the whole concept. A standard turtle plush can sit flat with a shallow cap, but this one needs a higher dome so the embroidered stars do not disappear into side curvature. The face also sits lower and farther forward than on a keychain turtle. That shift makes room for oversized eyes and blush placement without crowding the shell seam. A scalloped outer edge matters too. It breaks the hard line where shell meets body and gives the piece a soft lunar silhouette.
One mistake shows up often in plush turtle builds: makers place the eyes too high because the head is shaped like a ball instead of a forward-leaning oval. On a plush turtle crochet pattern, that pushes the expression upward and makes the turtle look frog-like. In a sea turtle amigurumi pattern, the front flippers also need more length than the back pair or the body loses motion. Search results and current pattern listings confirm that most popular turtle content stays simpler than this embellished approach.
Project Info at a Glance
| Skill Level | Time | Finished Size | Hook | Best For |
|---|---|---|---|---|
| Intermediate | 4–6 hrs estimated | 20 cm | 4.5 mm | Decor plush, gift, market sample |
Materials and Tools
Yarn
- Deep indigo velvet yarn — chenille/plush — 45 g — Himalayan Dolphin Baby or similar plush yarn benchmark
- Lavender velvet yarn — chenille/plush — 30 g — same yarn line for shell edge and under-shell contrast
- Pink yarn — small amount — blush cheeks
- Gold embroidery thread — small amount — star motifs
- Silver embroidery thread — small amount — star motifs
Tools
- Hook 4.5 mm
- Safety eyes
- Stuffing
- Needle
- Stitch markers
- Small pliers for eyes
- Crescent moon charm
Abbreviations
MR / sc / inc / dec / sl st / ch / BLO / FLO
Use invisible decrease rather than a standard front-facing decrease; it reduces visible gaps on plush yarn and keeps the shell curve cleaner.
Pattern — Step by Step
Continuous spiral unless noted.
Head (Make 1)
Yarn: deep indigo — Source: standard amigurumi math adapted from verified turtle head proportions
R1: 6 sc in MR (6)
R2: inc x6 (12)
R3: (sc, inc) x6 (18)
R4: (2 sc, inc) x6 (24)
R5: (3 sc, inc) x6 (30)
R6: (4 sc, inc) x6 (36)
R7–10: sc around (36)
Insert safety eyes between R8 and R9, 9 sts apart. Add blush embroidery below outer eye corners.
R11: (4 sc, dec) x6 (30)
R12: (3 sc, dec) x6 (24)
R13: (2 sc, dec) x6 (18)
Stuff firmly at front, lighter at back to keep a gentle oval.
R14: (sc, dec) x6 (12)
R15: dec x6 (6)
Fasten off. Leave 18 cm tail.
Body Base (Make 1)
Yarn: deep indigo — Source: standard amigurumi math
R1: 6 sc in MR (6)
R2: inc x6 (12)
R3: (sc, inc) x6 (18)
R4: (2 sc, inc) x6 (24)
R5: (3 sc, inc) x6 (30)
R6: (4 sc, inc) x6 (36)
R7–9: sc around (36)
R10: BLO sc around (36)
Fasten off. Leave 20 cm tail.
Shell Dome (Make 1)
Yarn: deep indigo — Source: standard amigurumi math, medium plateau selected for photo scale
R1: 6 sc in MR (6)
R2: inc x6 (12)
R3: (sc, inc) x6 (18)
R4: (2 sc, inc) x6 (24)
R5: (3 sc, inc) x6 (30)
R6: (4 sc, inc) x6 (36)
R7: (5 sc, inc) x6 (42)
R8–13: sc around (42)
R14: FLO sc around (42)
R15: (5 sc, dec) x6 (36)
Do not fasten off if joining directly. Otherwise fasten off and leave 24 cm tail.
Before assembly, embroider scattered stars and tiny blossoms across the shell. Concentrate larger motifs near the upper third.
Shell Ruffle (Worked into FLO of R14)
Yarn: lavender — Source: standard decorative edging
Join yarn in any FLO of R14.
Edging round: (sl st, hdc, 2 dc, hdc, sl st) in next 3 sts, sl st in next 1 st; repeat around evenly.
Fasten off. Weave in end.
The ruffle should sit just proud of the body edge, not flare outward like a skirt.
Front Flippers (Make 2)
Yarn: deep indigo — Source: standard amigurumi math
R1: 6 sc in MR (6)
R2: inc x6 (12)
R3: (sc, inc) x6 (18)
R4–6: sc around (18)
R7: (4 sc, dec) x3 (15)
R8–10: sc around (15)
Flatten.
R11: sc through both layers across 7 sts (7)
Fasten off. Leave 20 cm tail.
Lightly stuff only the upper half.
Back Flippers (Make 2)
Yarn: deep indigo — Source: standard amigurumi math
R1: 6 sc in MR (6)
R2: inc x6 (12)
R3–5: sc around (12)
R6: (2 sc, dec) x3 (9)
R7–8: sc around (9)
Flatten.
R9: sc through both layers across 4 sts (4)
Fasten off. Leave 18 cm tail.
Tail (Make 1)
Yarn: deep indigo — Source: standard amigurumi math
R1: 4 sc in MR (4)
R2: sc around (4)
R3: (sc, inc) x2 (6)
R4: sc around (6)
Flatten lightly.
Fasten off. Leave 12 cm tail.
Cheek Patches (Make 2)
Yarn: pink — Source: standard flat circle math
R1: 6 sc in MR (6)
Sl st to first sc.
Fasten off. Leave 10 cm tail.
Steam lightly if the circle cups.
Moon Charm Loop (Make 1)
Yarn: silver or lavender sewing thread — Source: custom accessory attachment
Ch 8.
Fasten off.
Use this loop to secure the crescent charm onto the shell side.
Optional Star Appliqué (Make 3–5)
Yarn: gold or silver embroidery thread — Source: standard simple star embellishment
In MR: (ch 2, sl st in second ch from hook, sl st in MR) x5.
Tighten ring.
Fasten off. Leave sewing tail.
Assembly
- Pin the head to the front of the body base so the lower chin sits just below the shell line.
- Sew the head in place across about 12 front stitches. Add stuffing to the neck area before closing the seam.
- Position the front flippers one round below the head seam, angled slightly forward. Sew both securely.
- Attach the back flippers two rounds behind the front pair and slightly wider apart.
- Sew the tail centered at the back between the back flippers.
- Place the shell dome over the body base. Match front and back centers first.
- Stuff the cavity firmly at center and more lightly at the outer rim so the shell keeps a smooth mound.
- Whipstitch shell to body through the back loops left from the body BLO round.
- Add the cheek patches or embroider blush where shown in the photo reference.
- Stitch the moon charm to one shell side and add any final stars. The piece is complete when the shell sits centered without rocking.
7 Technical Tips
- Missed round start on plush yarn causes shell drift. Use one fixed stitch marker and move it every round, because velvet loops hide the join line fast.
- Overstuffed head back pushes the face upward. Keep the front half firmer than the rear half so the eyes stay on the forward plane.
- Visible decrease holes show as dark pits on indigo yarn. Work invisible decreases only, especially on the head closure and shell taper.
- Late eye placement can distort the face after stuffing. Install eyes by the plateau stage, around R8–R9 on this head, before the opening narrows.
- Loose velvet tension makes the body sag under the shell. Drop tension slightly and test that stuffing does not flash through at 36 stitches.
- Unpinned flippers often end up asymmetrical by 1–2 stitches. Pin all four limbs before sewing and check from top view, not just side view.
- Short tail weaving makes embroidery or appliqués lift at the edges. Leave at least 10–12 cm tails on decorative pieces and weave through three direction changes.
Conclusion
This build works because the shell rim, not the eyes, sets the identity first. Once the dome is high enough and the ruffle stays controlled, the rest follows: longer front flippers, a low face, and restrained embellishment. That is the difference between a generic plush and a display-ready turtle amigurumi crochet pattern. The next step is practical. Make the body and shell in plain yarn first, confirm the silhouette, then add the celestial surface work only after assembly. Share the finished piece on Pinterest and Instagram with #GalaxyTurtlePattern. One question remains useful here: did you angle the front flippers enough to suggest a sea turtle, or do they still read as land-turtle legs?









