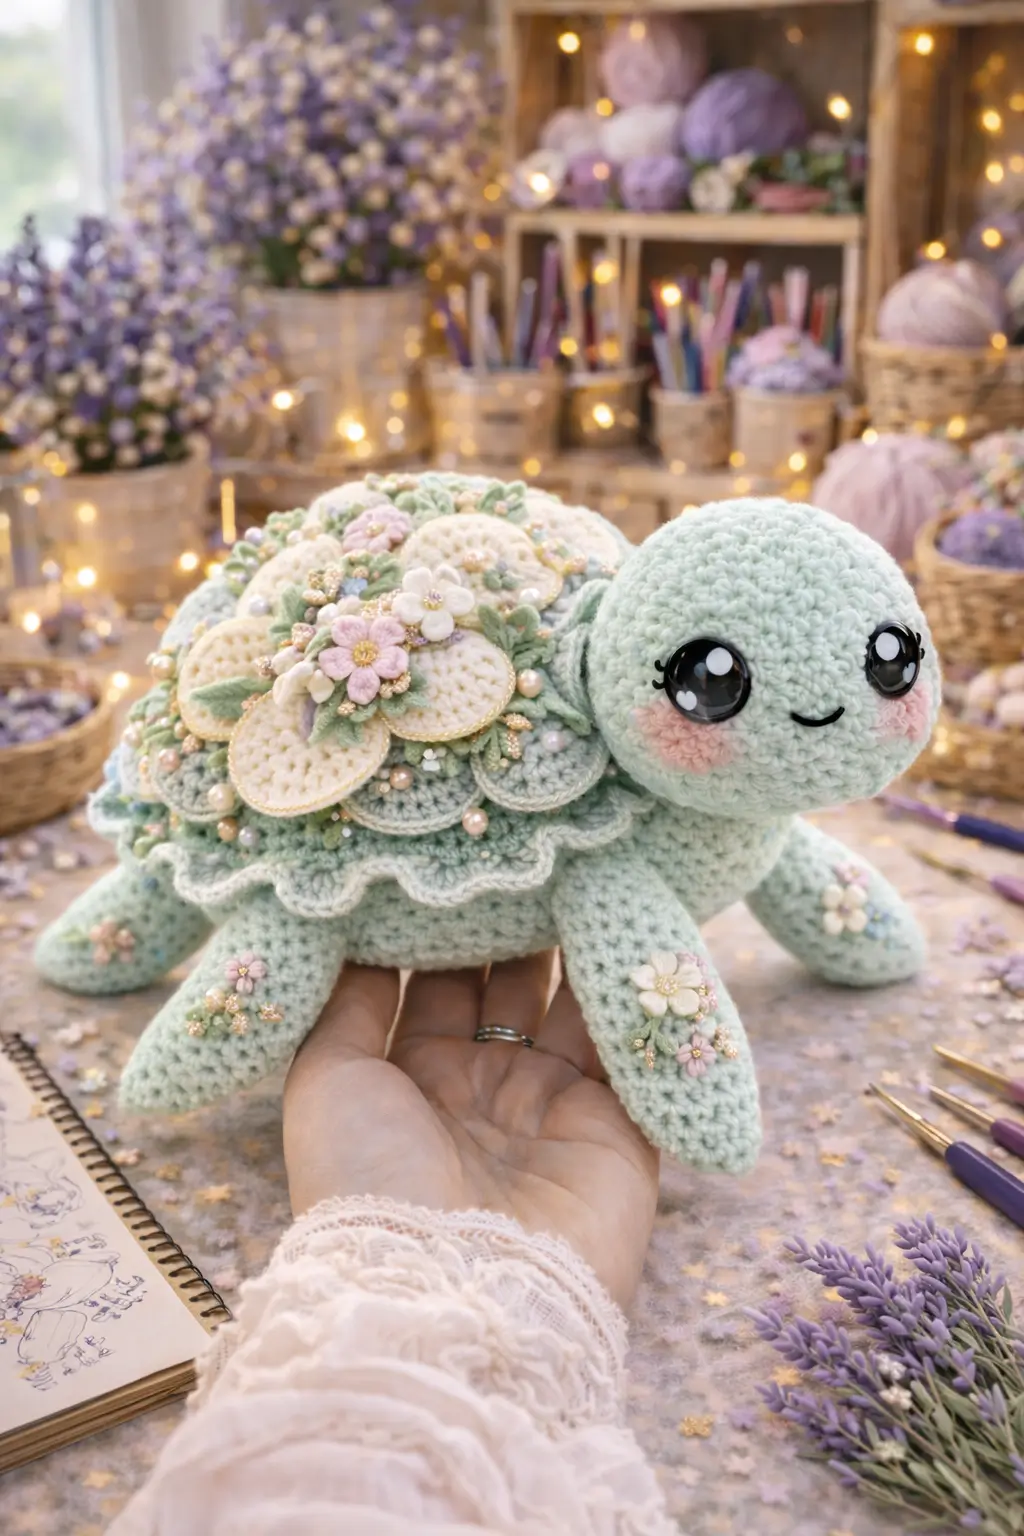
A turtle shell rises in plates, so a flower-covered shell has to keep that dome without collapsing under appliqué weight. This turtle amigurumi crochet pattern uses super bulky velvet yarn, a 4.0 mm hook, layered floral shell details, and a medium-size body suited to confident beginners or intermediate makers. The result works well as nursery decor, a shelf display, or a photography prop.
The Design: What Makes This Turtle Different
The photographed turtle is not a flat sea-turtle plush. It uses a rounded land-turtle silhouette with a forward head, four sturdy limbs, and a shell that reads as a domed bouquet. That matters. A flatter body would disappear under the flowers, while a higher shell gives the appliqués room to sit without hiding the turtle shape. The floral turtle crochet pattern also needs a wider face than a standard mini turtle, because large safety eyes and blush patches occupy more front-head area. One common mistake is placing shell decoration before checking limb spacing. The piece then loses balance and starts to tip to one side. In a flower turtle amigurumi, shell layering has to follow the structure, not fight it. Plush yarn exaggerates every proportion choice, which is why shell diameter and body depth matter more here than they do in a basic no sew turtle crochet pattern.
Project Info at a Glance
| Skill Level | Time | Finished Size | Hook | Best For |
|---|---|---|---|---|
| Confident beginner to intermediate | 5–7 hours | approx. 24–27 cm long | 4.0 mm | Display plush, nursery decor, gift make |
Finished-size benchmark and hook choice are adapted from live turtle pattern ranges and the flower-turtle chenille reference; the photographed plush is visibly larger than small DK turtles.
Materials and Tools
Yarn
- Mint green — super bulky velvet/chenille — 90–110 g — Premier Parfait Chunky or similar plush yarn
- Cream — super bulky velvet/chenille — 25–30 g — for shell petals and cheek circles
- Blush pink — super bulky velvet/chenille — 15–20 g — for flower centers and blush
- Sage green — super bulky velvet/chenille — 15–20 g — for leaves
- Pale gold embroidery thread or metallic crochet thread — small amount — optional trim
- Pearl beads — optional, 4–8 mm mixed sizes
Tools
- Hook 4.0 mm
- Safety eyes 18 mm for the pictured look, or 12 mm for a smaller face
- Polyester stuffing
- Tapestry needle
- Stitch markers
- Pins
- Small sharp scissors
Abbreviations
MR / sc / inc / dec / sl st / ch / BLO / FLO / hdc / dc
Use invisible decrease on the body and head so the plush surface stays cleaner and the closing rounds do not ridge outward.
Pattern — Step by Step
Continuous spiral unless noted.
This pattern is an original adaptation drafted from the photographed toy, using standard amigurumi math and proportion benchmarks from live turtle patterns.
Head (Make 1)
Yarn: mint green — Standard amigurumi math
R1: 6 sc in MR (6)
R2: inc x6 (12)
R3: (sc, inc) x6 (18)
R4: (2 sc, inc) x6 (24)
R5: (3 sc, inc) x6 (30)
R6: (4 sc, inc) x6 (36)
R7-R11: sc around (36)
R12: (4 sc, dec) x6 (30)
R13: (3 sc, dec) x6 (24)
R14: (2 sc, dec) x6 (18)
Insert 18 mm eyes between R8 and R9, about 10 stitches apart. Add blush after assembly for better control. Stuff firmly at the muzzle and more lightly at the crown.
Flatten opening.
R15: sc through both sides across 9 sts (9)
Fasten off. Leave a 20 cm tail.
Body Underside (Make 1)
Yarn: mint green — Standard amigurumi math
R1: 6 sc in MR (6)
R2: inc x6 (12)
R3: (sc, inc) x6 (18)
R4: (2 sc, inc) x6 (24)
R5: (3 sc, inc) x6 (30)
R6: (4 sc, inc) x6 (36)
R7-R8: sc around (36)
Fasten off. Leave a 25 cm tail.
Shell Dome (Make 1)
Yarn: mint green — Standard amigurumi math, scaled to support appliqué weight
R1: 6 sc in MR (6)
R2: inc x6 (12)
R3: (sc, inc) x6 (18)
R4: (2 sc, inc) x6 (24)
R5: (3 sc, inc) x6 (30)
R6: (4 sc, inc) x6 (36)
R7: (5 sc, inc) x6 (42)
R8-R10: sc around (42)
Do not stuff. Fasten off. Leave a 35 cm tail.
Shell Ruffle Edge (Make 1)
Yarn: mint green
Join yarn to any stitch of shell dome.
R1: (sl st, hdc, 2 dc) in next st, (2 dc, hdc, sl st) in next st repeat around to form soft scallops.
Fasten off. Weave in ends.
Front Legs (Make 2)
Yarn: mint green — Standard amigurumi math
R1: 6 sc in MR (6)
R2: inc x6 (12)
R3: (sc, inc) x6 (18)
R4-R6: sc around (18)
R7: (4 sc, dec) x3 (15)
R8-R11: sc around (15)
Stuff lightly at the foot, lightly through the shaft.
Flatten opening.
R12: sc through both sides across 7 sts (7)
Fasten off. Leave a 20 cm tail.
Back Legs (Make 2)
Yarn: mint green — Standard amigurumi math
R1: 6 sc in MR (6)
R2: inc x6 (12)
R3: (sc, inc) x6 (18)
R4-R5: sc around (18)
R6: (4 sc, dec) x3 (15)
R7-R9: sc around (15)
Stuff lightly.
Flatten opening.
R10: sc through both sides across 7 sts (7)
Fasten off. Leave a 20 cm tail.
Tail (Make 1)
Yarn: mint green — adapted from common turtle tail construction
R1: 4 sc in MR (4)
R2: sc around (4)
R3: (sc, inc) x2 (6)
Fasten off. Leave a 12 cm tail.
Cheek Patches (Make 2)
Yarn: blush pink
R1: 6 sc in MR (6)
R2: inc x6 (12)
Fasten off. Leave a 10 cm tail.
Outer Petal Discs (Make 8)
Yarn: cream — inspired by flower-turtle shell layering, but written here as original flat appliqué discs
R1: 6 sc in MR (6)
R2: inc x6 (12)
R3: (sc, inc) x6 (18)
R4: BLO sc around (18)
Fasten off. Leave a 15 cm tail.
Inner Petal Discs (Make 6)
Yarn: mint green or cream
R1: 6 sc in MR (6)
R2: inc x6 (12)
R3: (sc, inc) x6 (18)
Fasten off. Leave a 15 cm tail.
Five-Petal Flowers (Make 5)
Yarn: cream or blush
R1: 5 sc in MR (5)
Join with sl st.
Petals: (ch 2, 2 dc, ch 2, sl st) in next st x5
Fasten off. Leave a 12 cm tail.
Leaves (Make 10)
Yarn: sage green
Ch 6.
Work back along chain: sl st in 2nd ch from hook, sc, hdc, dc, sl st in last.
On opposite side of chain: dc, hdc, sc, sl st.
Fasten off. Leave a 10 cm tail.
Leg Flower Motifs (Make 4)
Yarn: cream, blush, sage green
Make 4 tiny flowers as for Five-Petal Flowers, then add 1–2 leaves behind each.
Fasten off. Leave tails for sewing.
Pearl Accents (Optional)
Use 6–10 pearl beads stitched between shell flowers after assembly.
No crochet rounds.
Assembly
- Sew the body underside to the shell dome, leaving the front third open. Add stuffing as you go, keeping the shell top firmer than the belly.
- Insert the head into the front opening and sew it in place centered across the shell-body seam.
- Sew the front legs slightly forward under the shell, angled outward so the turtle rests on four points.
- Sew the back legs flatter and wider than the front legs to stop the rear body from rocking.
- Attach the tail at the back center, slightly tucked under the shell ruffle.
- Stitch the cheek patches low on the face, one round below the eye line and one stitch outside the smile on each side.
- Arrange the outer petal discs on the shell in an overlapping ring. Sew only the upper half of each disc so the lower edge stays lifted.
- Layer the inner petal discs over the first ring, then sew the five-petal flowers and leaves into a dense cluster across the center ridge of the shell.
- Add the small flower motifs to the front legs and outer back legs. Keep them off the ground-contact area.
- Stitch pearl accents into gaps on the shell, embroider the smile, then steam nothing. Plush yarn should stay dry-shaped.
The piece is complete when it sits level, the shell remains domed, and the appliqué cluster does not pull the turtle to one side.
7 Technical Tips
- Mark the center front of the shell before attaching the head. A one-stitch drift here makes the eyes look off even when the head itself is symmetrical.
- Keep stuffing firm in the shell top and medium in the belly. An overfilled underside rounds outward and removes the flat resting plane.
- Use invisible decrease on the head from 36 down to 18. Standard decreases leave visible notches in chenille and break the face line.
- Install safety eyes before the last two head decrease rounds. Trying to force 18 mm posts through plush fabric after closure can distort the muzzle.
- Tighten tension one half step on the flower appliqués. Loose petals curl backward and expose the shell base instead of covering it.
- Pin every shell disc before sewing. On a 42-stitch dome, even 5 mm of drift between layers creates uneven overlap.
- Weave tails across at least 4 cm inside the shell, not straight down. Short vertical tail weaving can work loose under the weight of beads and layered flowers.
Conclusion
This turtle amigurumi crochet pattern works because the shell is treated as structure first and decoration second. Build the dome, place the limbs for balance, then layer the flowers where the shell can carry them. That sequence keeps the turtle readable from every angle. The next step is simple: crochet one shell disc and one flower first, then compare them against the body before committing to the full appliqué set. Share the finished turtle on Pinterest and Instagram with #FloralTurtlePattern. One detail matters most on this character: did you keep the front shell flowers clear of the turtle’s neck line?









