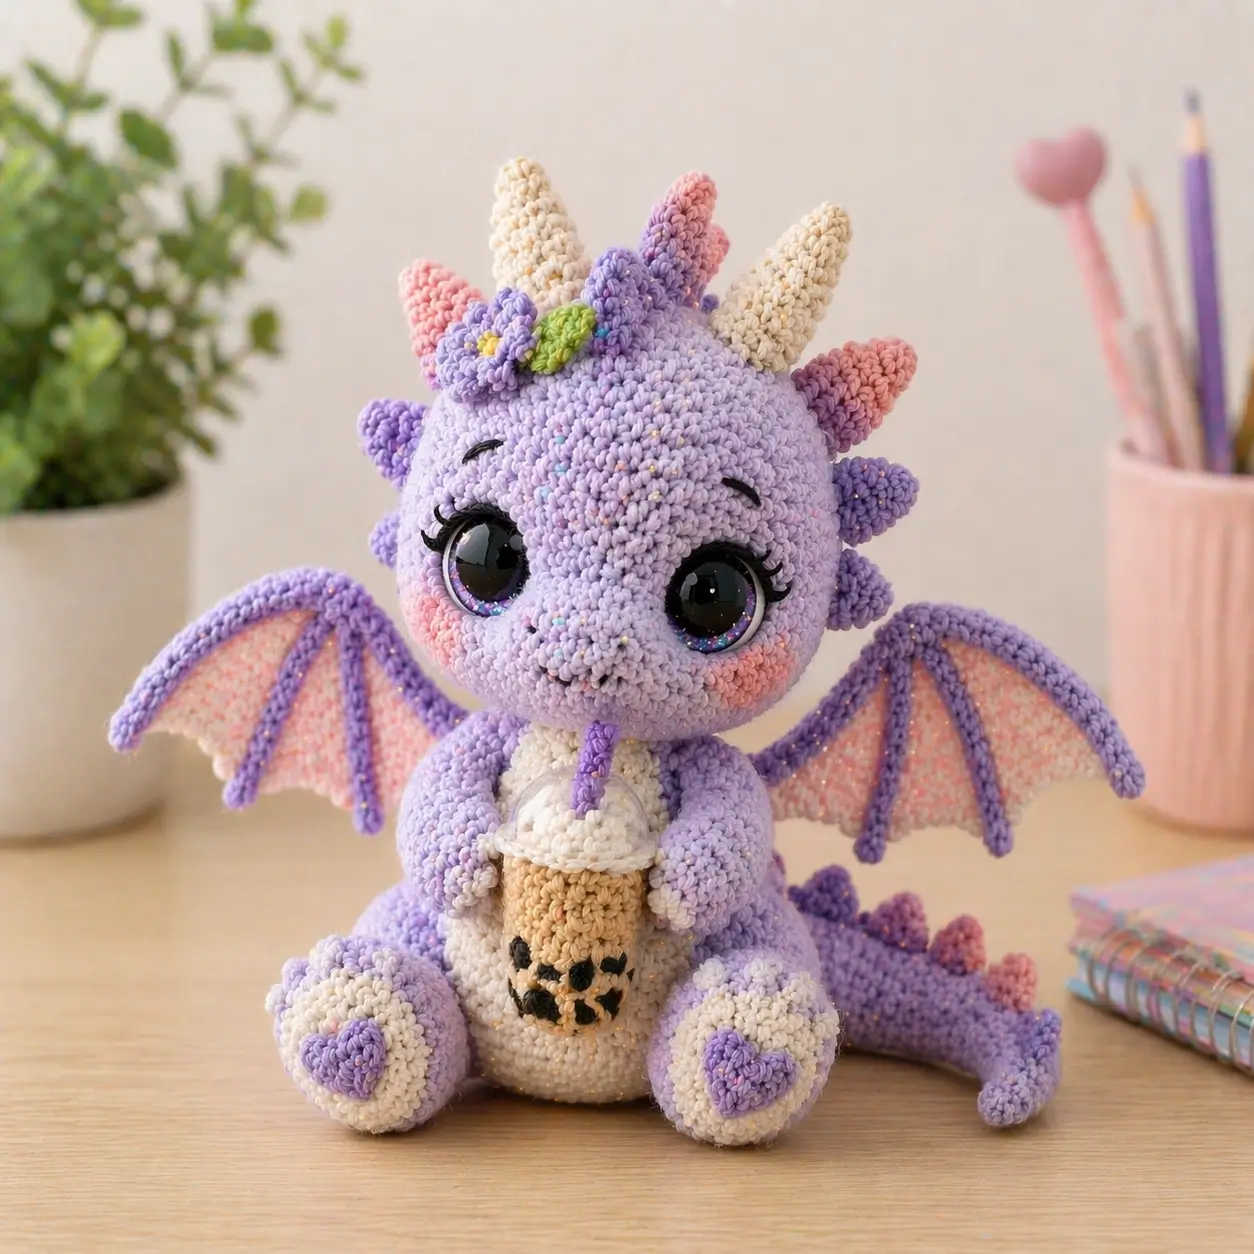
A seated dragon with side wings will tip backward unless the tail is built as a counterweight. This dragon amigurumi crochet pattern uses DK to sport cotton, a 2.5–3 mm hook, 12 mm eyes, and a medium seated size around 18–20 cm based on published dragon references and the photo proportions. It suits an intermediate maker who wants a display plush with a stable desk footprint.
The Design: What Makes This Dragon Different
This pastel dragon is not shaped like a standard chubby dinosaur. The head is oversized, the snout projects forward, and the wings sit high enough to read as dragon anatomy rather than shoulder fins. That changes the engineering. The body needs a flatter seated base, the tail must brace the back, and the horns must stay narrow so the head silhouette does not turn blunt. A common mistake with a baby dragon amigurumi is copying a generic oval body and then attaching large wings too low. The result looks heavy and falls behind the hips. Here, the crochet dragon wings are stitched on an angle, the snout is built as a separate part for cleaner face definition, and the tail spikes stay small so they do not fight the flower crown at the top line.
Project Info at a Glance
| Skill Level | Time | Finished Size | Hook | Best For |
|---|---|---|---|---|
| Intermediate | 8–12 hours | 18–20 cm seated | 2.5–3 mm | Display plush, gift, shelf decor |
Materials and Tools
Yarn
- Lavender — sport/DK cotton — about 120–140 g — Yarn and Colors Must Have or similar cotton reference
- Cream — sport/DK cotton — about 20–30 g — for horns, belly, paw pads, drink topping
- Blush pink — sport/DK cotton — about 15–20 g — for wing membrane and cheek patches
- Deep violet — sport/DK cotton — about 15 g — for spikes, flower detail, straw
- Leaf green — sport/DK cotton — scrap amount — for leaf accents
- Yellow — sport/DK cotton — scrap amount — flower center
- Beige/tan — sport/DK cotton — 10–15 g — bubble tea cup
- Black — scrap — pearls and mouth embroidery
Tools
- Hook 2.5 mm to 3 mm
- 12 mm safety eyes
- Polyfill stuffing
- Tapestry needle
- Stitch markers
- Pins
- Embroidery thread for brows and lashes
Abbreviations
MR / sc / inc / dec / sl st / ch / BLO / hdc / dc
Invisible decrease keeps the outer loops flatter than a standard decrease, which matters on a light-colored snout and on the rounded front legs.
Pattern — Step by Step
Continuous spiral unless noted.
Head (Make 1)
Yarn: lavender
R1: 6 sc in MR (6)
R2: inc x6 (12)
R3: (sc, inc) x6 (18)
R4: (2 sc, inc) x6 (24)
R5: (3 sc, inc) x6 (30)
R6: (4 sc, inc) x6 (36)
R7: (5 sc, inc) x6 (42)
R8–12: sc around (42)
R13: (5 sc, dec) x6 (36)
R14: sc around (36)
R15: (4 sc, dec) x6 (30)
R16: (3 sc, dec) x6 (24)
Insert eyes between R10 and R11, about 9–10 sts apart, before closing. Stuff firmly, especially above the snout line.
R17: (2 sc, dec) x6 (18)
R18: (sc, dec) x6 (12)
R19: dec x6 (6)
Fasten off. Leave 25 cm tail.
Snout (Make 1)
Yarn: lavender
R1: ch 5; starting in 2nd ch from hook, 3 sc, 3 sc in last ch, working opposite side 2 sc, inc (10)
R2: inc, 2 sc, inc x3, 2 sc, inc x2 (16)
R3–4: sc around (16)
Lightly stuff. Embroider nostrils after sewing.
Fasten off. Leave 20 cm tail.
Body (Make 1)
Yarn: lavender
R1: 6 sc in MR (6)
R2: inc x6 (12)
R3: (sc, inc) x6 (18)
R4: (2 sc, inc) x6 (24)
R5: (3 sc, inc) x6 (30)
R6: (4 sc, inc) x6 (36)
R7–11: sc around (36)
R12: (4 sc, dec) x6 (30)
R13–15: sc around (30)
R16: (3 sc, dec) x6 (24)
R17: sc around (24)
Stuff lower body firmly and keep the front slightly flatter for sitting balance.
Fasten off. Leave 25 cm tail.
Belly Panel (Make 1)
Yarn: cream
Row 1: ch 8, sc in 2nd ch and across (7)
Rows 2–9: ch 1, turn, sc across (7)
Row 10: dec, 3 sc, dec (5)
Fasten off. Leave 20 cm tail.
Arms / Front Legs (Make 2)
Yarn: lavender, cream paw pad
R1: 6 sc in MR (6)
R2: inc x6 (12)
R3: BLO sc around in cream (12)
Change to lavender.
R4–7: sc around (12)
R8: (2 sc, dec) x3 (9)
R9–11: sc around (9)
Stuff paw only; leave upper arm soft.
Flatten and fasten off. Leave 20 cm tail.
Back Legs (Make 2)
Yarn: lavender, cream paw pad
R1: 6 sc in MR (6)
R2: inc x6 (12)
R3: (sc, inc) x6 (18)
R4: BLO sc around in cream (18)
Change to lavender.
R5: 6 sc, dec x3, 6 sc (15)
R6: 5 sc, dec x3, 4 sc (12)
R7–11: sc around (12)
Stuff foot and lower leg only. Flatten top edge.
Fasten off. Leave 25 cm tail.
Wings (Make 2)
Yarn: lavender frame, blush membrane
In blush:
Row 1: ch 9, sc across (8)
Row 2: ch 1, turn, dec, 4 sc, dec (6)
Row 3: ch 1, turn, dec, 2 sc, dec (4)
Fasten off.
Border in lavender: sc evenly around, making 3 chain arches down one long side to suggest finger bones.
Fasten off. Leave 25 cm tail.
Horns (Make 2)
Yarn: cream
R1: 4 sc in MR (4)
R2: sc around (4)
R3: (sc, inc) x2 (6)
R4: sc around (6)
R5: (2 sc, inc) x2 (8)
Do not stuff. Fasten off. Leave 18 cm tail.
Side Head Spikes / Ear Frills (Make 6)
Yarn: alternate lavender and pink
R1: 4 sc in MR (4)
R2: sc around (4)
R3: (sc, inc) x2 (6)
R4: sc around (6)
Fasten off. Leave 12 cm tail.
Tail (Make 1)
Yarn: lavender
R1: 4 sc in MR (4)
R2: inc, 2 sc, inc (6)
R3: sc around (6)
R4: inc, 4 sc, inc (8)
R5: sc around (8)
R6: inc, 6 sc, inc (10)
R7: sc around (10)
R8: inc, 8 sc, inc (12)
R9–12: sc around (12)
Stuff gradually. Keep tip lighter than base.
Fasten off. Leave 25 cm tail.
Tail Spikes (Make 4)
Yarn: deep violet to pink mix
R1: 4 sc in MR (4)
R2: sc around (4)
R3: (sc, inc) x2 (6)
Fasten off. Leave 10 cm tail.
Cheek Patches (Make 2)
Yarn: blush pink
R1: 6 sc in MR (6)
R2: inc x6 (12)
Fasten off. Leave 12 cm tail.
Flower Crown Cluster (Make 1 set)
Yarn: lavender petals, green leaf, yellow center
Flower center: 6 sc in MR (6).
Petals: (ch 2, 2 dc in same st, ch 2, sl st in next st) repeat 5 times.
Leaf: ch 5, sl st, sc, hdc, sc back along chain.
Fasten off. Leave tails for stitching.
Bubble Tea Cup (Make 1)
Yarn: tan, cream, purple, black
Cup in tan:
R1: 6 sc in MR (6)
R2: inc x6 (12)
R3: (sc, inc) x6 (18)
R4–8: sc around (18)
Fasten off.
Lid in cream:
R1: 6 sc in MR (6)
R2: inc x6 (12)
R3: (sc, inc) x6 (18)
R4: BLO sc around (18)
Fasten off.
Straw: ch 8 in purple, fasten off.
Pearls: embroider five or six black French-knot style dots or satin knots on cup front.
Assembly
- Sew the snout centered on the lower half of the head.
- Insert and secure the safety eyes before the head is fully closed if not already done.
- Stitch the head to the body, slightly forward on the body front.
- Sew the belly panel to the body center.
- Attach the back legs low on the sides so the feet project forward for a seated base.
- Sew the arms just below the neck line and angle them inward.
- Attach the wings high on the back, with the top edges tilting slightly forward.
- Sew the tail to the back base so it touches the surface and acts as a brace.
- Add horns, side spikes, tail spikes, cheek patches, brows, lashes, and the flower cluster.
- Stitch the bubble tea between the hands and tack the hands lightly to the cup.
The finished dragon should sit on three contact zones: both feet and the lower tail.
7 Technical Tips
- Use one stitch marker for the round start and a second marker at the face centerline. Losing the centerline shifts the snout and makes the eyes look cross-set.
- Pack the lower body firmly and the upper body moderately. Soft stuffing at the base causes the dragon to slump backward after the wings are attached.
- Work invisible decreases on the head, body, and legs. Standard decreases leave a stacked ridge that shows clearly on pale lavender yarn.
- Place the eyes before R17 of the head closure. Waiting until the opening is too small leads to distorted eye washers and stretched stitches.
- Keep the wing membrane one hook tension looser than the lavender border. Tight membranes pull the outer edge inward and make both wings curl differently.
- Pin the horns, wings, and tail before sewing anything permanent. A horn spread that is wider than the eye spacing makes the head read like a bull, not a dragon.
- Weave tails through a second internal path before trimming. Single-pass tail weaving on a handled prop like the bubble tea can loosen when the toy is lifted by the cup.
Conclusion
This dragon amigurumi crochet pattern works because the shaping decisions match the anatomy shown in the photo: broad head, narrow horns, high wings, short seated body, and a tail that supports the pose instead of trailing as decoration. Follow the stitch counts, keep the body base dense, and test the balance before final sewing. Then photograph the finished dragon from the front and side, since the silhouette matters as much as the face. Share it to Pinterest and Instagram with #PastelBubbleTeaDragon. One useful comparison remains: did your tail need to touch the table at the tip, or did the feet alone hold the seated angle?









