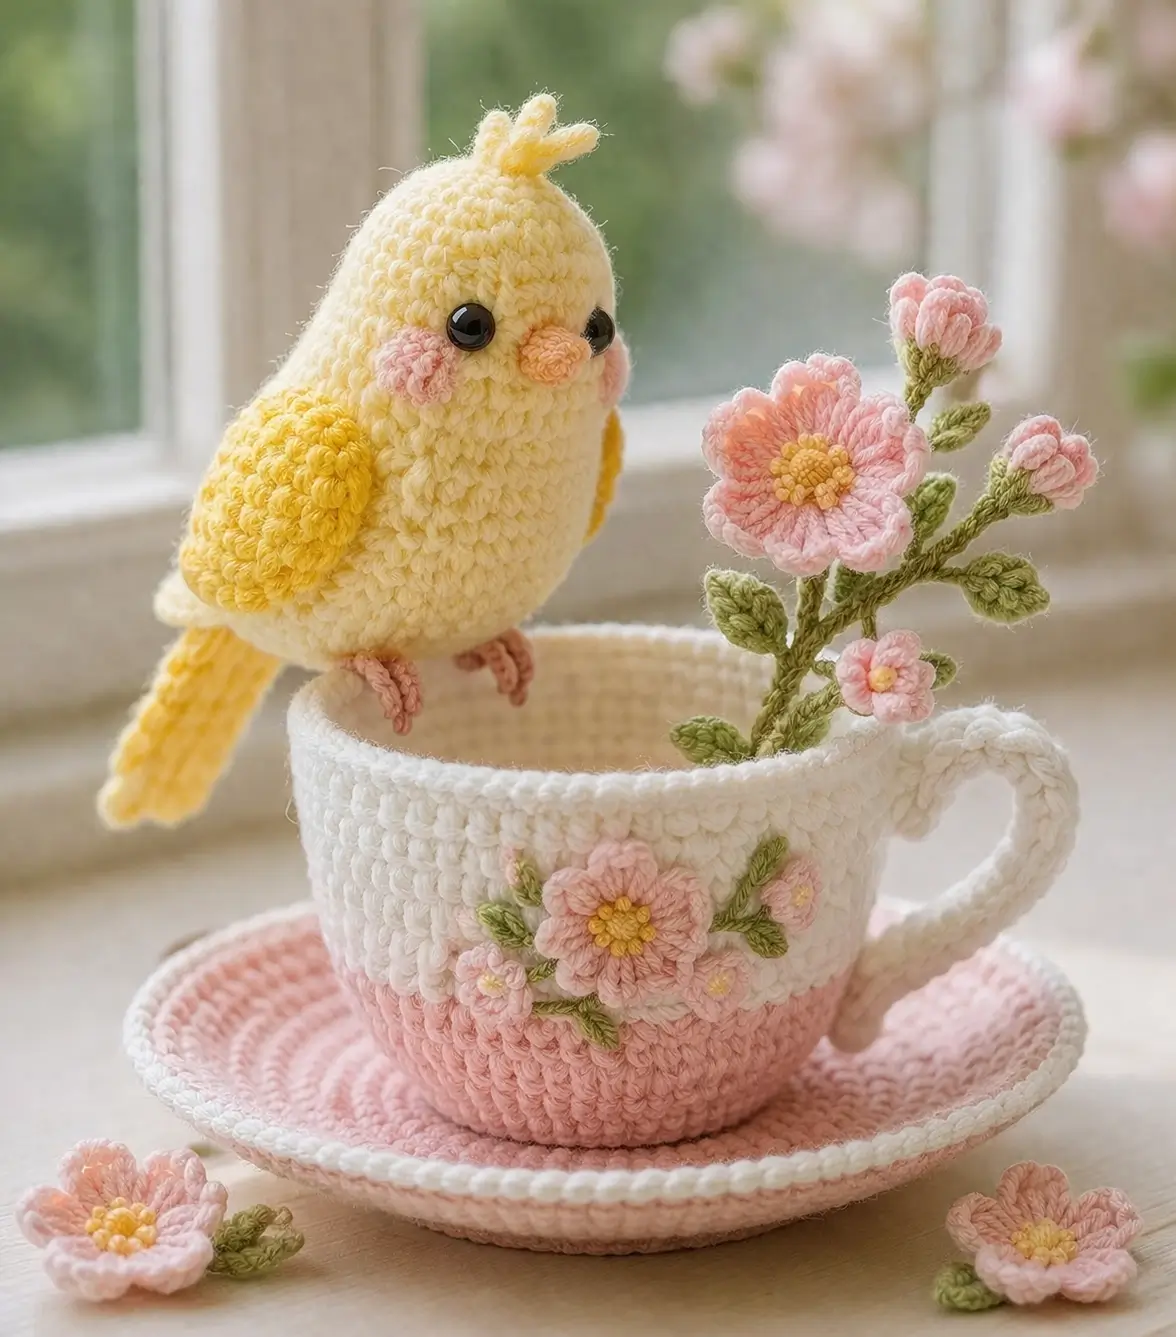
A chick reads as a chick only when the beak sits low and the head stays taller than the body. This chick amigurumi crochet pattern uses worsted yarn, a 4 mm hook, and a compact display scale based on comparable published chick sizes around 7.6 cm for the bird itself. It suits an easy-to-intermediate maker and works well as a spring shelf piece, table favor, or nursery prop.
The Design: What Makes This Chick Different
This version is built around three structural choices. First, the head is kept slightly taller than the body plateau so the face can carry oversized eyes, a low beak, and blush patches without crowding. Second, the wings are attached as rounded side pads rather than flat appliqués, which gives the chick a fuller shoulder line seen in many baby chick amigurumi references. Third, the tail is longer and flatter than a standard pom tail because the photo silhouette needs a rear counterweight when the figure perches on a cup rim. You need that balance point early. The finished figure also benefits from separate cheek circles, since a crochet chick pattern often looks washed out when blush is embroidered directly onto pale yarn. A common mistake with spring chick crochet is pushing the eyes too high; that makes the beak disappear into the lower face and the bird starts reading as a generic oval plush.
Project Info at a Glance
| Skill Level | Time | Finished Size | Hook | Best For |
|---|---|---|---|---|
| Easy / Intermediate | 5–7 hours | Chick about 7.6 cm tall; display varies with cup | 4.0 mm | shelf display, spring decor, photo prop |
Published chick references using worsted or aran yarn place the comparable bird at 7.6 cm tall and use 3.5–4.0 mm hooks with 8–9 mm safety eyes.
Materials and Tools
Yarn
- Pale yellow — worsted — about 40–46 g — Red Heart Super Saver or a similar smooth cotton/acrylic blend for the chick body
- Golden yellow — worsted — small amount — for wings and tail
- Peach orange — worsted or DK — small amount — for beak and crest
- Blush pink — worsted or DK — small amount — for cheeks, feet, blossoms, and saucer stripe
- White — worsted — small amount — for teacup and saucer edging
- Sage green — DK or worsted — small amount — for stems and leaves
- Soft yellow — DK — small amount — for flower centers
Tools
- Hook 4.0 mm
- Safety eyes 8–9 mm
- Polyfill stuffing
- Tapestry needle
- Stitch markers
- Pins
- Optional floral wire for a stiffer stem spray
Abbreviations
MR / sc / inc / dec / sl st / ch / BLO / FLO / dc
Use invisible decrease for the visible shaping rounds so the face and body keep a smoother surface than a standard two-stitch decrease.
Pattern — Step by Step
Continuous spiral unless noted. Counts are checked round by round. The chick uses a medium 36-stitch plateau.
Head (Make 1)
Yarn: pale yellow
R1: 6 sc in MR (6)
R2: inc x6 (12)
R3: (sc, inc) x6 (18)
R4: (2 sc, inc) x6 (24)
R5: (3 sc, inc) x6 (30)
R6: (4 sc, inc) x6 (36)
R7-12: sc around (36)
Insert safety eyes between R9 and R10, 7 sts apart.
R13: (4 sc, dec) x6 (30)
R14: (3 sc, dec) x6 (24)
Stuff firmly.
R15: (2 sc, dec) x6 (18)
Fasten off. Leave 20 cm tail.
Body (Make 1)
Yarn: pale yellow
R1: 6 sc in MR (6)
R2: inc x6 (12)
R3: (sc, inc) x6 (18)
R4: (2 sc, inc) x6 (24)
R5: (3 sc, inc) x6 (30)
R6: (4 sc, inc) x6 (36)
R7-11: sc around (36)
R12: (4 sc, dec) x6 (30)
R13: sc around (30)
R14: (3 sc, dec) x6 (24)
Stuff the lower body firmly, flatter at the top edge so it can sit against the head.
Fasten off. Leave 25 cm tail.
Wings (Make 2)
Yarn: golden yellow
R1: 6 sc in MR (6)
R2: inc x6 (12)
R3: (sc, inc) x6 (18)
R4-5: sc around (18)
R6: (sc, dec) x6 (12)
Fold flat and sc 6 through both layers to close.
Fasten off. Leave 18 cm tail.
Tail (Make 1)
Yarn: golden yellow
R1: 6 sc in MR (6)
R2: (sc, inc) x3 (9)
R3-7: sc around (9)
Flatten.
Row 8: sc 4 across, ch 1, turn (4)
Row 9-12: sc 4, turn (4)
Fasten off. Leave 18 cm tail.
Beak (Make 1)
Yarn: peach orange
R1: 6 sc in MR (6)
R2: (sc, inc) x3 (9)
R3: sc around (9)
Flatten lightly.
Fasten off. Leave 15 cm tail.
Crest Tuft (Make 1)
Yarn: peach orange
Ch 7.
Starting in second ch from hook: sl st, sc, hdc, sc, sl st.
Ch 5, starting in second ch from hook: sl st, sc, hdc, sl st.
Fasten off. Leave 10 cm tail.
Feet / Legs (Make 2)
Yarn: blush pink
Ch 6.
Starting in second ch from hook: sl st, sc, hdc, sc, sl st.
For ankle, ch 5, starting in second ch from hook: sl st 4.
Fasten off. Leave 15 cm tail.
Cheek Patches (Make 2)
Yarn: blush pink
R1: 6 sc in MR (6)
R2: inc x6 (12)
Fasten off. Leave 12 cm tail.
Teacup Base (Make 1)
Yarn: blush pink
R1: 6 sc in MR (6)
R2: inc x6 (12)
R3: (sc, inc) x6 (18)
R4: (2 sc, inc) x6 (24)
R5: (3 sc, inc) x6 (30)
R6: (4 sc, inc) x6 (36)
R7: BLO sc around (36)
Switch to white.
R8-13: sc around (36)
R14: FLO sl st around (36)
Fasten off. Weave in.
Teacup Handle (Make 1)
Yarn: white
Ch 16.
Row 1: sc in second ch from hook and across (15)
Row 2-3: ch 1, turn, sc across (15)
Fasten off. Leave long tails at both ends.
Saucer (Make 1)
Yarn: blush pink, then white
R1: 6 sc in MR (6)
R2: inc x6 (12)
R3: (sc, inc) x6 (18)
R4: (2 sc, inc) x6 (24)
R5: (3 sc, inc) x6 (30)
R6: (4 sc, inc) x6 (36)
R7: (5 sc, inc) x6 (42)
Switch to white.
R8: BLO sc around (42)
R9: (6 sc, inc) x6 (48)
R10: sl st around (48)
Fasten off.
Large Flower (Make 1)
Yarn: blush pink and soft yellow
Center:
R1: 6 sc in MR (6)
R2: inc x6 (12)
Change to pink.
In FLO only: (sl st, ch 2, 2 dc, ch 2, sl st) in next st x12
Fasten off.
Small Flowers (Make 4)
Yarn: blush pink and soft yellow
Center: 6 sc in MR (6)
Change to pink.
(sl st, ch 2, 2 dc, ch 2, sl st) in next st x6
Fasten off.
Leaves (Make 6)
Yarn: sage green
Ch 7.
Starting in second ch from hook: sl st, sc, hdc, dc, hdc, sc.
Work opposite side of chain: sc, hdc, dc, hdc, sc, sl st.
Fasten off. Leave tail.
Stem Spray (Make 1)
Yarn: sage green
Ch 26.
Starting in second ch from hook, sl st 25.
At stitch 10, branch: ch 10, sl st back 9.
At stitch 16, branch: ch 8, sl st back 7.
At stitch 21, branch: ch 6, sl st back 5.
Fasten off. Leave long tail.
For a stiffer arrangement, wrap crochet over floral wire before installing blossoms and leaves.
Assembly
- Sew the head to the body, angling the head slightly forward so the chick reads as perched rather than upright.
- Attach the beak centered between the eyes, spanning roughly 3 stitches wide.
- Sew the cheek patches one stitch lower than the beak line and two stitches out from each eye.
- Fix the crest tuft to the crown, slightly back from center.
- Attach the wings to the upper body sides, with the top edge aligned just below the eye line.
- Sew the tail to the back body, angled down so it acts as a visual counterbalance.
- Install the feet at the lower front body. Keep them narrow so the chick can sit on the cup rim.
- Sew the teacup handle to the cup side. Center the lower join first, then curve the upper join to match the rim height.
- Attach the large flower, small flowers, and leaves to the cup and stem spray, then anchor the stem spray inside the cup.
- Set the cup onto the saucer, then tack the chick lightly to the rim with a few hidden stitches if the display is meant to stay fixed.
The piece is complete once the bird, cup, saucer, and blossom spray hold their shape without visible support.
7 Technical Tips
- Mark round 1 of the head decrease section. Losing the first decrease round shifts the face forward and the chick starts leaning to one side.
- Stuff the head firmer than the body. A softer head collapses around 8–9 mm eyes and makes the cheek circles buckle.
- Use invisible decreases on the face half only. Standard decreases there leave small notches that show clearly on pale yellow yarn.
- Insert eyes before the final head close. On this scale, waiting even one round too long makes the washers hard to seat cleanly.
- Keep wing stuffing at zero or near zero. Overfilled wings push the body outward and the chick no longer fits the teacup silhouette.
- Pin the tail before sewing. A tail angle of about 30–40 degrees downward stabilizes the profile better than a straight horizontal join.
- Weave all blossom tails through the cup wall, not just inside appliqués. Short decorative tails work loose fast when the cup is handled by the rim.
Conclusion
This chick amigurumi crochet pattern works because the proportions stay controlled: tall head, low beak, compact wings, and a tail that balances the perch. The teacup and blossom spray turn a simple bird into a styled display instead of a basic plush. Next, test the bird by itself first, then scale the cup height only after the seated angle looks correct. Save the finished piece to Pinterest, post the result on Instagram, and tag it with #ChickTeacupPattern. One detail matters most here: did you place the beak low enough that the cheeks still read as separate round patches?









