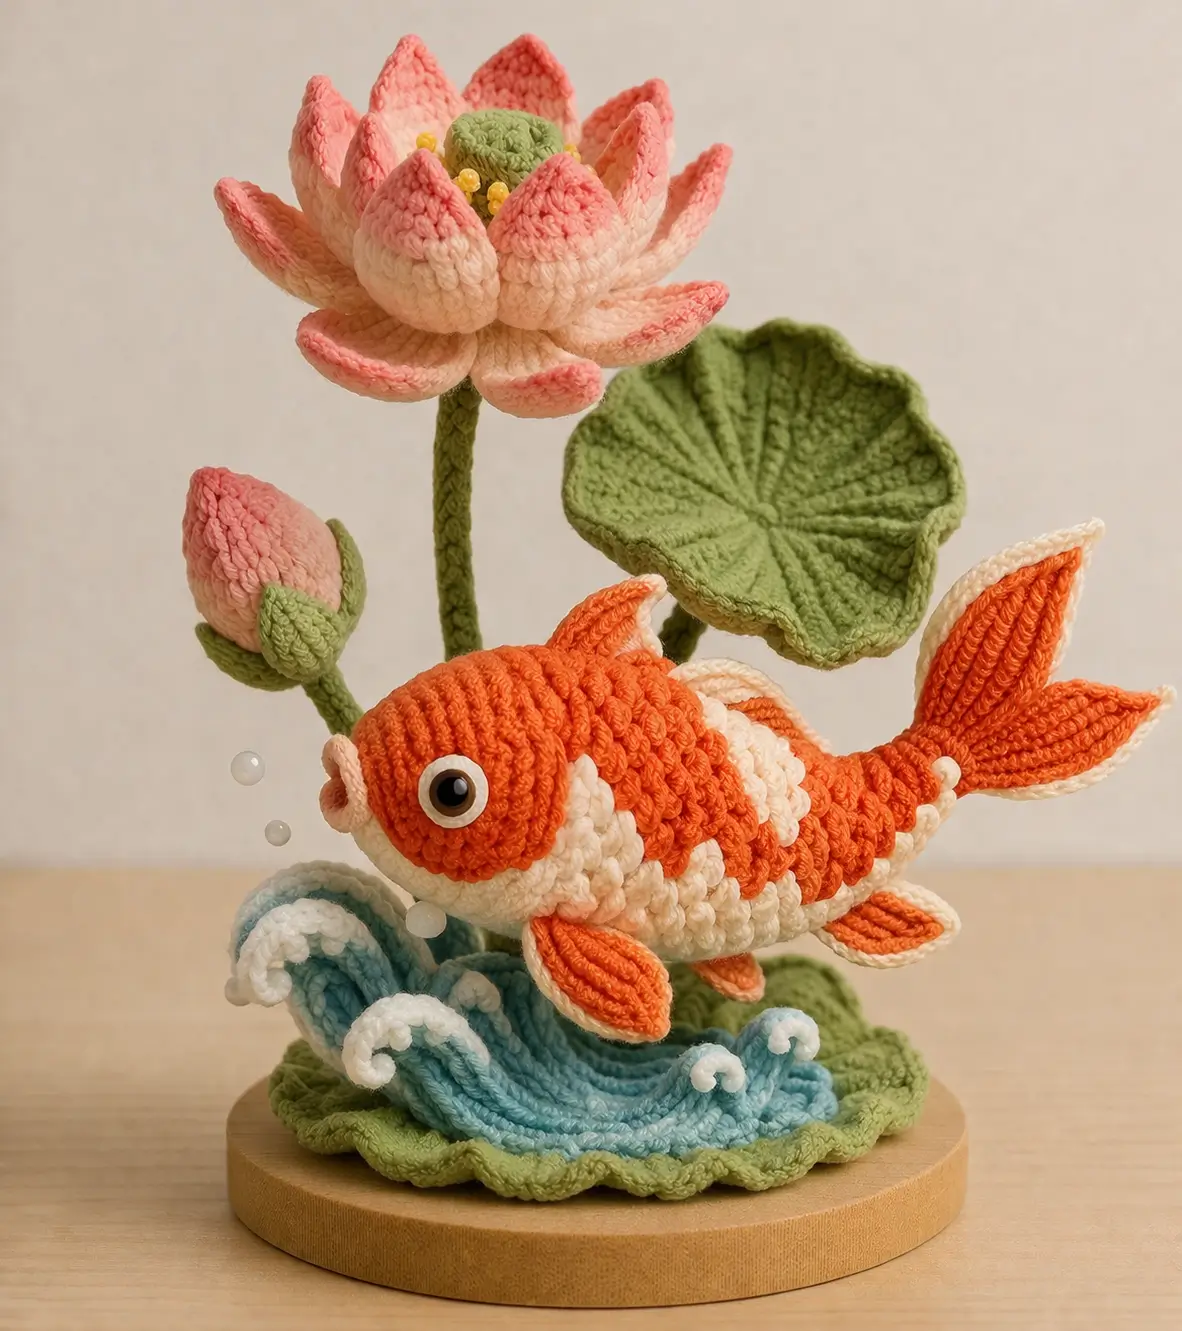
A koi needs a forked tail that reads from the side, not just from above. This koi fish amigurumi crochet pattern builds that profile first, then adds a lotus, wave base, and lily pad around a 30 cm display scale with worsted or DK yarn, a 3.5 mm hook, and 12 mm eyes. The result works as shelf decor rather than a toy-only make.
The Design: What Makes Koi Different
A koi is not shaped like a generic cartoon fish. The body thickens near the head, narrows through the tail stock, and finishes with a broad split tail. That proportion matters because a short, blunt tail makes the fish read as goldfish instead. The side fins also sit lower than many makers expect. Place them too high and the silhouette turns flat. A third decision is the color blocking. This model uses cream on the underside and orange across the crown so the koi fish amigurumi keeps a clear dorsal line. In many amigurumi koi fish projects, published examples focus on the fish only. Here, the pond elements do structural work too. The wave supports the body visually, while the lotus stem and lily pad balance the composition behind it.
Project Info at a Glance
| Skill Level | Time | Finished Size | Hook | Best For |
|---|---|---|---|---|
| Intermediate | 8–12 hours | about 30 cm display height | 3.5 mm | shelf decor, gift display, pond-themed centerpiece |
Materials and Tools
Yarn
- Bright orange — DK or worsted — amount varies by tension; published koi patterns commonly use DK/8 ply or worsted — brand suggestion: 4 Seasons Marvel 8 ply or a smooth cotton-acrylic blend
- Cream/white — same weight — for belly, fin edging, mouth, and eye surrounds
- Sage green — same weight — for lily pad, stems, pond edge, and bud sepals
- Light pink — same weight — outer lotus petals
- Blush pink — same weight — inner lotus petals
- Pale blue — same weight — wave base
- Yellow — small amount — flower center accents
Tools
- Hook 3.5 mm
- 12 mm safety eyes
- Stuffing
- Yarn needle
- Stitch markers
- Florist wire or strong craft wire for stems
- Fabric glue optional
- Round wood or cardboard base optional
Abbreviations
MR = magic ring
sc = single crochet
inc = increase
dec = invisible decrease
sl st = slip stitch
ch = chain
BLO = back loop only
FLO = front loop only
hdc = half double crochet
Invisible decrease joins the front loops of two stitches first, which reduces bulk on visible shaping rounds.
Pattern — Step by Step
Continuous spiral unless noted.
Head (Make 1)
Yarn: orange and cream
R1: 6 sc in MR (6)
R2: inc x6 (12)
R3: (sc, inc) x6 (18)
R4: (2 sc, inc) x6 (24)
R5: (3 sc, inc) x6 (30)
R6: (4 sc, inc) x6 (36)
R7-R10: sc around (36)
R11: 12 sc in orange, 24 sc in cream for lower face and jaw line (36)
R12: sc around (36)
R13: (4 sc, dec) x6 (30)
R14: sc around (30)
Insert 12 mm eyes between R8 and R9, spaced 8 stitches apart. Stuff firmly at the snout and slightly softer at the back of the head.
Fasten off. Leave 20 cm tail.
Body (Make 1)
Yarn: orange and cream
R1: 6 sc in MR (6)
R2: inc x6 (12)
R3: (sc, inc) x6 (18)
R4: (2 sc, inc) x6 (24)
R5: (3 sc, inc) x6 (30)
R6: (4 sc, inc) x6 (36)
R7-R9: sc around (36)
R10: 18 sc orange, 18 sc cream for underside (36)
R11-R13: maintain color split, sc around (36)
R14: (4 sc, dec) x6 (30)
R15-R16: sc around (30)
R17: (3 sc, dec) x6 (24)
R18-R19: sc around (24)
R20: (2 sc, dec) x6 (18)
R21-R22: sc around (18)
Stuff as you go. Keep the back rounded and the belly flatter than the crown.
Fasten off. Leave 20 cm tail.
Mouth Ring (Make 1)
Yarn: cream
Ch 6. Join to form a ring.
R1: 6 sc around chain ring (6)
R2: (sc, inc) x3 (9)
Flatten slightly before sewing to the front of the head. This creates the protruding koi mouth visible in the photo.
Fasten off. Leave 15 cm tail.
Eye Surrounds / Cheek Patches (Make 2)
Yarn: cream
R1: 6 sc in MR (6)
R2: inc x6 (12)
Sl st to close.
Sew one around each eye to copy the pale ring visible in the image.
Fasten off. Leave 12 cm tail.
Side Fins / Front Fins (Make 2)
Yarn: orange with cream edge
Ch 8.
Row 1: sc in 2nd ch from hook, sc 5, 3 sc in last ch; rotate to opposite side, sc 5 (14)
Row 2: ch 1, turn, inc, sc 5, 3 sc in next st, sc 5, inc (18)
Row 3: ch 1, turn, sc around in orange (18)
Border: switch to cream and work 1 round of sl st around.
Fold the base edge slightly before sewing so the fins angle backward.
Fasten off. Leave 18 cm tail.
Lower Fins / Back Fins (Make 2)
Yarn: orange with cream edge
Ch 6.
Row 1: sc in 2nd ch from hook, sc 3, 3 sc in last ch; rotate, sc 3 (10)
Row 2: ch 1, turn, inc, sc 3, 3 sc in next st, sc 3, inc (14)
Border: switch to cream and sl st evenly around.
Fasten off. Leave 15 cm tail.
Dorsal Fin A (Make 1)
Yarn: cream
Ch 5.
Row 1: sc in 2nd ch from hook, sc 3 (4)
Row 2: ch 1, turn, sc 4 (4)
Row 3: ch 1, turn, dec, sc 2 (3)
Row 4: ch 1, turn, sc 3 (3)
Fasten off. Leave 12 cm tail.
Dorsal Fin B (Make 1)
Yarn: cream
Ch 4.
Row 1: sc in 2nd ch from hook, sc 2 (3)
Row 2: ch 1, turn, sc 3 (3)
Row 3: ch 1, turn, dec, sc 1 (2)
Fasten off. Leave 12 cm tail.
Tail Base (Make 1)
Yarn: orange
R1: 6 sc in MR (6)
R2: (sc, inc) x3 (9)
R3: (2 sc, inc) x3 (12)
R4-R5: sc around (12)
Fasten off. Leave 15 cm tail.
Tail Fin — Outer (Make 2)
Yarn: cream
Ch 10.
Row 1: sc in 2nd ch from hook, sc 7, 3 sc in last ch; rotate, sc 7 (18)
Row 2: ch 1, turn, inc, sc 7, 3 sc in next st, sc 7, inc (22)
Row 3: ch 1, turn, inc, sc 9, 3 sc in next st, sc 9, inc (26)
Fasten off. Leave 18 cm tail.
Tail Fin — Inner (Make 2)
Yarn: orange
Ch 8.
Row 1: sc in 2nd ch from hook, sc 5, 3 sc in last ch; rotate, sc 5 (14)
Row 2: ch 1, turn, inc, sc 5, 3 sc in next st, sc 5, inc (18)
Lay one orange piece on each cream tail lobe before joining to the tail base.
Fasten off. Leave 15 cm tail.
Wave Base (Make 1)
Yarn: pale blue
Ch 26.
Row 1: sc in 2nd ch from hook and across (25)
Row 2: ch 1, turn, sc across (25)
Row 3: ch 1, turn, 2 sc in first st, sc 23, 2 sc in last st (27)
Row 4: ch 1, turn, sc across (27)
Row 5: ch 1, turn, 2 sc in first st, sc 25, 2 sc in last st (29)
Row 6: ch 1, turn, sc across (29)
Row 7: ch 1, turn, 2 sc in first st, sc 27, 2 sc in last st (31)
Now work curl ridges separately along the top edge:
Curl 1: ch 9, sl st back down the chain, sl st into next base stitch
Curl 2: ch 11, sl st back down, sl st into next base stitch
Curl 3: ch 8, sl st back down, sl st into next base stitch
Curl 4: ch 10, sl st back down, sl st into next base stitch
Continue plain sc along remaining edge.
Steam or finger-shape the curls so they lift forward.
Fasten off. Leave 25 cm tail.
Pond Edge / Green Ruffle Base (Make 1)
Yarn: sage green
Ch 36. Join.
R1: sc around (36)
R2: (5 sc, inc) x6 (42)
R3: BLO sc around (42)
R4: (6 sc, inc) x6 (48)
R5: (sc, hdc, 2 dc in next st, hdc, sc, sl st) repeat around to form a ruffle
Fasten off. Leave 25 cm tail.
Lily Pad (Make 1)
Yarn: sage green
R1: 6 sc in MR (6)
R2: inc x6 (12)
R3: (sc, inc) x6 (18)
R4: (2 sc, inc) x6 (24)
R5: (3 sc, inc) x6 (30)
R6: (4 sc, inc) x6 (36)
R7: BLO sc around (36)
R8: (5 sc, inc) x6 (42)
R9: sc around (42)
R10: work shallow ridges by alternating BLO and FLO every 6 stitches (42)
R11: (6 sc, inc) x6 (48)
R12: scallop edge: (sl st, hdc, dc, hdc, sl st in next 5 sts) around
Pinch one side and sew 2 cm inward to create the pad notch.
Fasten off. Leave 20 cm tail.
Lotus Flower Center (Make 1)
Yarn: sage green
R1: 6 sc in MR (6)
R2: inc x6 (12)
R3: BLO sc around (12)
Add small yellow French knots or bead-free bobble stitches around the base if the piece is decorative only.
Fasten off. Leave 12 cm tail.
Lotus Outer Petals (Make 8)
Yarn: light pink fading to blush if desired
Ch 8.
Row 1: sc in 2nd ch from hook, sc 5, 3 sc in last ch; rotate, sc 5 (14)
Row 2: ch 1, turn, inc, sc 5, 3 sc in next st, sc 5, inc (18)
Row 3: ch 1, turn, sc 7, dec, sc 7 (17)
Row 4: ch 1, turn, sc 6, dec, sc 7 (16)
Row 5: ch 1, turn, sc 5, dec, sc 7 (15)
Lightly stuff only the lower third if a padded petal is needed. Otherwise leave flat and shape by hand.
Fasten off. Leave 18 cm tail.
Lotus Inner Petals (Make 6)
Yarn: blush pink
Ch 7.
Row 1: sc in 2nd ch from hook, sc 4, 3 sc in last ch; rotate, sc 4 (12)
Row 2: ch 1, turn, inc, sc 4, 3 sc in next st, sc 4, inc (16)
Row 3: ch 1, turn, sc 6, dec, sc 6 (15)
Row 4: ch 1, turn, sc 5, dec, sc 6 (14)
Fasten off. Leave 16 cm tail.
Lotus Bud (Make 1)
Yarn: blush pink
R1: 6 sc in MR (6)
R2: inc x6 (12)
R3: (sc, inc) x6 (18)
R4-R6: sc around (18)
R7: (sc, dec) x6 (12)
Stuff lightly. Keep the tip pointed.
Fasten off. Leave 18 cm tail.
Bud Sepals (Make 3)
Yarn: sage green
Ch 5.
Row 1: sc in 2nd ch from hook, sc 3 (4)
Row 2: ch 1, turn, dec, sc 2 (3)
Row 3: ch 1, turn, dec, sc 1 (2)
Fasten off. Leave 12 cm tail.
Flower Stem (Make 1)
Yarn: sage green over wire
R1: 4 sc in MR (4)
R2-R18: sc around (4)
Insert wire before final closure. Bend slightly backward, matching the photo.
Fasten off. Leave 15 cm tail.
Bud Stem (Make 1)
Yarn: sage green over wire
R1: 4 sc in MR (4)
R2-R12: sc around (4)
Fasten off. Leave 12 cm tail.
Lily Pad Stem (Make 1)
Yarn: sage green over wire
R1: 5 sc in MR (5)
R2-R10: sc around (5)
Fasten off. Leave 12 cm tail.
Bubbles (Make 3, optional)
Yarn: white or clear thread substitute
R1: 6 sc in MR (6)
R2: (sc, inc) x3 (9)
Use very light stuffing or leave flat around a small plastic form for display work only.
Fasten off. Leave 10 cm tail.
Assembly
- Sew the head to the body with the cream underside aligned in one continuous belly line.
- Attach the mouth ring to the center front of the head.
- Sew the eye surrounds around the safety eyes.
- Fix the side fins to the lower third of the body, slightly behind the head seam.
- Attach the two lower fins under the belly, spaced evenly.
- Sew the dorsal fins along the back line, with the larger fin closer to the head.
- Join the orange inner tail pieces to the cream outer tail pieces, then sew both lobes to the tail base and attach the tail base to the body.
- Sew the pale blue wave to the green ruffle base, then anchor the fish so the belly sits just above the crest.
- Build the lotus flower around the green center, attach the bud with sepals, then mount the flower stem, bud stem, lily pad, and lily pad stem into the base.
- Add optional bubbles and secure the full arrangement to a wood or cardboard disc if a rigid display is needed.
The completed piece reads as a koi pond vignette rather than a standalone plush.
7 Technical Tips
- Mark the dorsal centerline before color changes. A drift of even 2 stitches will pull the orange crown off-center and the koi will look twisted from the front.
- Do not overstuff the tail stock. Once the body narrows to 18 stitches, extra filling makes the forked tail sit flat instead of flaring.
- Insert the eyes before the final head decrease. On a 36-stitch head, waiting too long compresses the face and shifts the 12 mm eyes outward.
- Use invisible decreases on all visible shaping rounds. Regular decreases leave a ladder line that shows clearly on bright orange yarn.
- Pin the side fins 1 round lower than instinct suggests. High fin placement turns the profile into a generic fish shape and weakens the koi look.
- Shape the lotus petals in two layers before sewing. If all petals are stitched from the same angle, the flower closes inward and hides the green center.
- Weave stem tails back through the tube twice. A single pass can let the wire core rotate, which tilts the lily pad and flower after a few days on display.
Conclusion
This koi fish amigurumi crochet pattern works because the fish and the display base are designed as one unit. The tail spread, lower fin placement, raised wave edge, and layered lotus all matter more than extra surface detail. Start with the fish first, test the balance on the wave, then lock the stems into place only after the full arrangement is visible. Share the finished piece to Pinterest and Instagram with one overhead shot and one side-profile shot so the silhouette reads clearly. Hashtag: #KoiPondAmigurumi. When you place your lotus bud, did you angle it toward the koi’s mouth or away from the tail?









