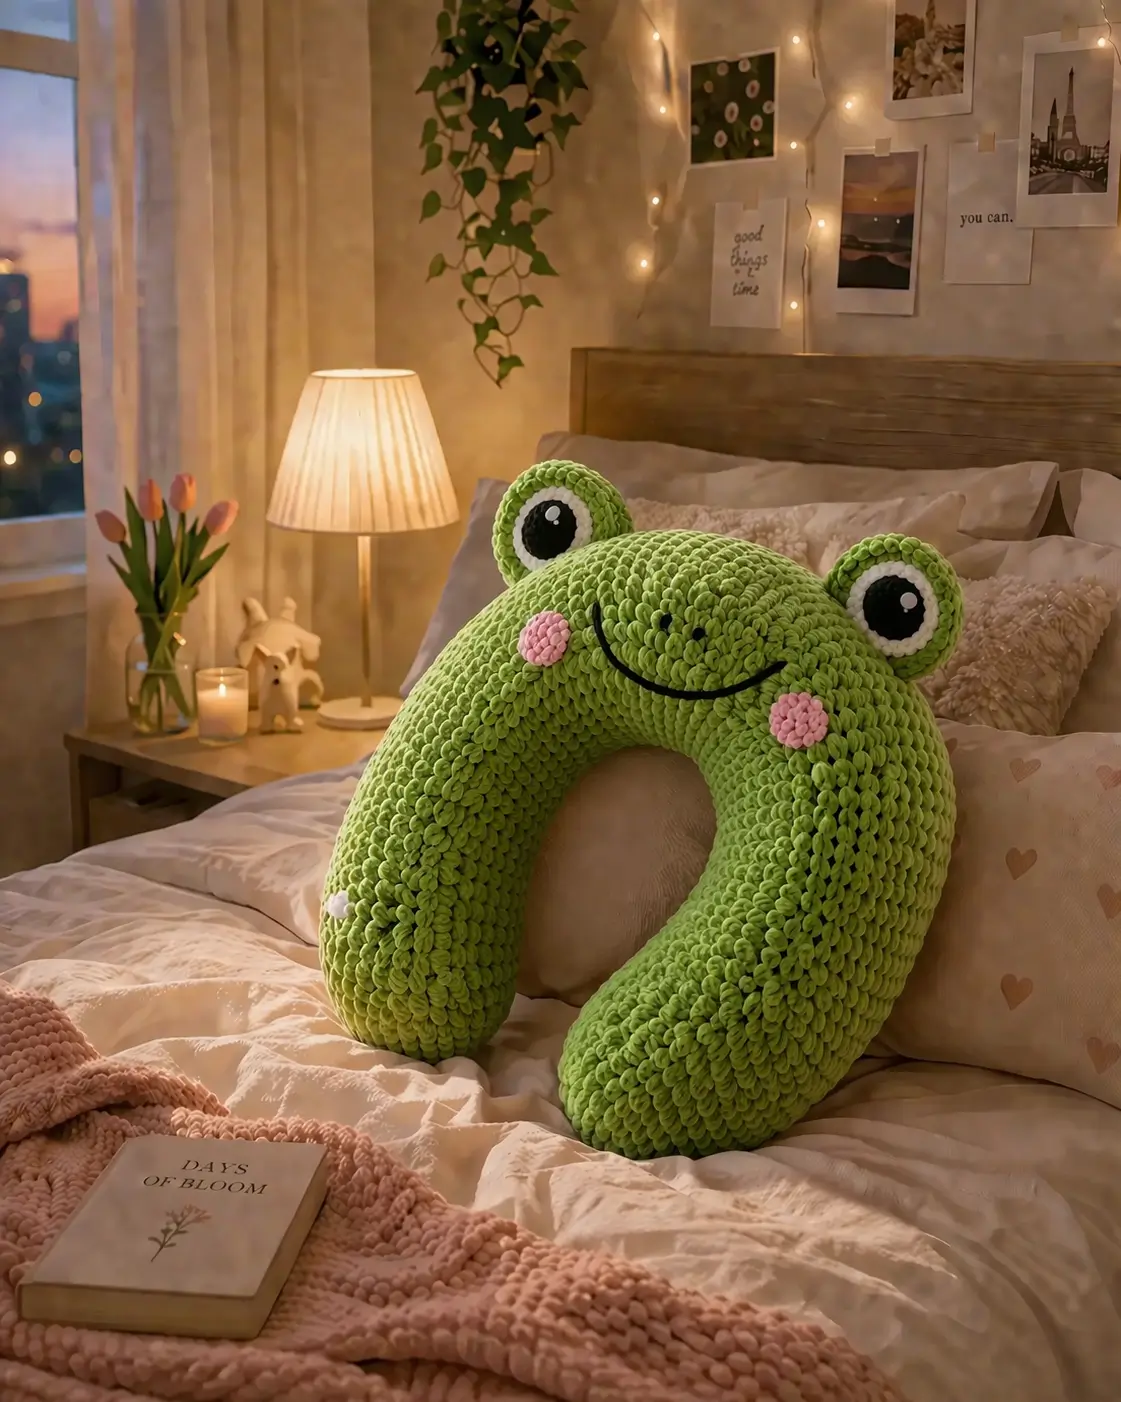
A frog face on a U-shaped pillow fails when the eye domes sit too low. This frog amigurumi crochet pattern fixes that with a high eye line, super bulky chenille-style yarn, and a pillow-scale body drafted for roughly 38 cm class sizing. The build suits an intermediate maker. It works as neck support, shelf decor, or a child’s room cushion, and the face details stay readable at distance.
The Design: What Makes This Frog Different
This version is not a standard toy frog. It is a crescent cushion with a frog face mapped onto the top bridge, so proportion matters more than limb realism. The first structural decision is a long rounded body tube instead of a sphere. That keeps the inner curve open and lets the piece function as a pillow rather than a plush. Second, the eye domes are added as separate units. Frogs rely on that raised silhouette; flat eyes weaken the species read immediately. Third, the cheeks are appliqué circles instead of embroidery because chenille swallows fine surface detail. A common maker mistake with a frog crochet pillow pattern is placing the smile before stuffing density is final. Another is centering the eyes too far apart, which makes the face read as generic rather than frog. That issue shows up across many chunky frog amigurumi variations.
Project Info at a Glance
| Skill Level | Time | Finished Size | Hook | Best For |
|---|---|---|---|---|
| Intermediate | 6–8 hours | 38 cm reference class | 8 mm reference / 5.5 mm tighter option | Travel pillow, bed cushion, nursery decor |
The 38 cm size and 8 mm hook come from the Fiona frog pillow reference. A 5.5 mm hook is a documented tighter-stitch modification for a denser cushion finish.
Materials and Tools
Yarn
- Light moss green — super bulky / blanket-style — about 300 g main color — Bernat Blanket or similar chenille-style yarn
- White — super bulky / blanket-style — small amount for eye whites
- Black — bulky or worsted scrap — small amount for pupils and smile
- Pink — bulky or worsted scrap — small amount for cheeks
Tools
- Hook 8 mm for reference sizing, or 5.5 mm for tighter stitches
- Safety eyes: not used in the photographed version; appliqué eyes match the photo better. Official frog pillow reference uses 12 mm eyes.
- Stuffing or pillow insert
- Yarn needle
- Stitch markers
- Pins
Abbreviations
MR = magic ring, sc = single crochet, inc = increase, dec = invisible decrease, sl st = slip stitch, ch = chain, BLO = back loop only.
Invisible decrease is worked through the front loops of the next two stitches to reduce bulk on the outside of amigurumi shaping.
Pattern — Step by Step
Continuous spiral unless noted. The shaping below is drafted from the photographed proportions and standard amigurumi math, using verified frog references for eye structure, body logic, and pillow-scale yarn choices.
Head Cap (Make 1)
Yarn: green — Source: standard amigurumi math adapted to photo proportions
R1: 6 sc in MR (6)
R2: inc ×6 (12)
R3: [sc, inc] ×6 (18)
R4: [sc 2, inc] ×6 (24)
R5: [sc 3, inc] ×6 (30)
R6: [sc 4, inc] ×6 (36)
R7: [sc 5, inc] ×6 (42)
R8–R12: sc around (42)
R13: [sc 5, dec] ×6 (36)
R14: sc around (36)
R15: [sc 4, dec] ×6 (30)
R16: [sc 3, dec] ×6 (24)
R17: [sc 2, dec] ×6 (18)
Stuff lightly so the cap stays domed, not rigid.
R18: [sc, dec] ×6 (12)
R19: dec ×6 (6)
Fasten off. Leave a 35 cm tail.
Body Crescent (Make 1)
Yarn: green — Source: standard amigurumi math adapted to photo proportions
R1: Ch 18. Starting in 2nd ch from hook, sc 16, 3 sc in last ch, sc 15 on opposite side, inc in final ch (36)
R2: inc, sc 15, inc ×3, sc 15, inc ×2 (42)
R3–R34: sc around (42)
Stuff firmly from round 20 onward. Bend the tube gradually into a U while filling so the inside curve stays open.
R35: [sc 5, dec] ×6 (36)
R36: sc around (36)
R37: [sc 4, dec] ×6 (30)
R38: sc around (30)
R39: [sc 3, dec] ×6 (24)
R40: [sc 2, dec] ×6 (18)
R41: [sc, dec] ×6 (12)
R42: dec ×6 (6)
Fasten off. Leave a 25 cm tail.
Front Legs / Stabilizer Tabs (Make 2)
Yarn: green — Source: Toristory arm/leg piece, enlarged one round for pillow use
R1: 6 sc in MR (6)
R2: [sc, inc] ×3 (9)
R3–R5: sc around (9)
Fasten off. Leave a 20 cm tail.
Back Legs / Stabilizer Tabs (Make 2)
Yarn: green — Source: Toristory arm/leg piece, enlarged one round for pillow use
R1: 6 sc in MR (6)
R2: [sc, inc] ×3 (9)
R3–R6: sc around (9)
Fasten off. Leave a 20 cm tail.
Eye Mounds (Make 2)
Yarn: green — Source: separate frog eye construction, adapted from Toristory
R1: 6 sc in MR (6)
R2: inc ×6 (12)
R3: [sc, inc] ×6 (18)
R4–R5: sc around (18)
R6: [sc, dec] ×6 (12)
Stuff very lightly. Keep the base flat for sewing.
Fasten off. Leave a 25 cm tail.
Eye Whites (Make 2)
Yarn: white — Source: standard flat-circle math
R1: 6 sc in MR (6)
R2: inc ×6 (12)
R3: [sc, inc] ×6 (18)
Sl st to finish. Fasten off. Leave a 20 cm tail.
Pupils (Make 2)
Yarn: black — Source: standard flat-circle math
R1: 6 sc in MR (6)
R2: inc ×6 (12)
Sl st to finish. Fasten off. Leave a 15 cm tail.
Cheek Patches (Make 2)
Yarn: pink — Source: standard flat-circle math
R1: 6 sc in MR (6)
R2: inc ×6 (12)
R3: [sc, inc] ×6 (18)
Sl st to finish. Fasten off. Leave a 15 cm tail.
Snout Bridge (Make 1)
Yarn: green — Source: standard oval panel math
R1: Ch 8. Starting in 2nd ch from hook, sc 6, 3 sc in last ch, sc 5 on opposite side, inc in final ch (16)
R2: inc, sc 5, inc ×3, sc 5, inc ×2 (22)
R3: sc around (22)
Fasten off. Leave a 25 cm tail.
Smile Embroidery (Make 1)
Yarn: black — Source: face placement adapted from frog embroidery references
Cut a 45 cm strand. Stitch a shallow upward curve centered below the snout bridge. Anchor the corners one stitch lower than the middle so the line stays visible after compression.
Optional Pillow Loop / Hanger (Make 1)
Yarn: green — Source: standard chain loop; omit for a photo match
Ch 16, sl st to first ch. Fasten off. Leave 10 cm tail.
Assembly
- Bend the stuffed body crescent into a clean U and massage the filling so both arms of the pillow match in diameter.
- Pin the head cap to the outer top curve, centered across the bridge of the U.
- Sew the head cap down with small whip stitches, keeping the lower edge smooth.
- Sew the snout bridge to the center front of the head cap.
- Sew the eye whites to the front of the eye mounds.
- Sew the pupils to the eye whites, slightly inward rather than perfectly centered.
- Attach the completed eye units to the top of the head cap, one on each side, with the inner edges closer together than the outer edges.
- Stitch the cheek patches below the smile line, one on each side, leaving at least 2 stitches of green space between cheek and mouth.
- Add the front and back stabilizer tabs underneath the crescent ends only if you want the pillow to sit more upright on a bed.
- Weave in all tails, brush the chenille lightly by hand, and check the face from front view before the final knot is buried.
The piece is complete when the body holds a U curve without twisting and the eye domes remain above the smile line.
7 Technical Tips
- Use a stitch marker at the start of every round on the body crescent. A missed round on chenille yarn shifts the face center by several stitches and becomes visible only after stuffing.
- Pack the lower half of the crescent firmer than the top bridge. Soft stuffing at the base causes the pillow arms to collapse inward instead of standing open.
- Work invisible decreases on the outer surface only. Standard decreases leave ridges that show strongly on plush yarn and flatten the curve.
- Place the eyes after the head cap is sewn, not before. The cap spreads slightly on the stuffed body, which changes the final eye spacing by about 1–2 cm.
- Keep chenille tension one fraction tighter than blanket tension. Loose stitches expose stuffing and reduce the crisp edge around the white eye circles.
- Pin all face pieces from a direct front angle before sewing. A frog face can look symmetrical from above and still read crooked when viewed at pillow height.
- Weave tails at least 5 cm in two directions inside the body. Short tail burying slips out over time because chenille fibers have low surface grip.
Conclusion
This build turns the usual plush frog into a cushion with clearer function and cleaner face placement. The verified references point to super bulky yarn, pillow-scale frog dimensions, and separate eye construction as the most reliable base for a large frog amigurumi crochet pattern. Start with the body crescent, test stuffing density before sewing the head cap, then lock the eye spacing from a straight-on view. Share the finished piece on Pinterest and Instagram with #FrogTravelPillowPattern. One question remains useful for future revisions: did you prefer the eye domes nearly touching at the center, or spaced wider to match a tree-frog look?









