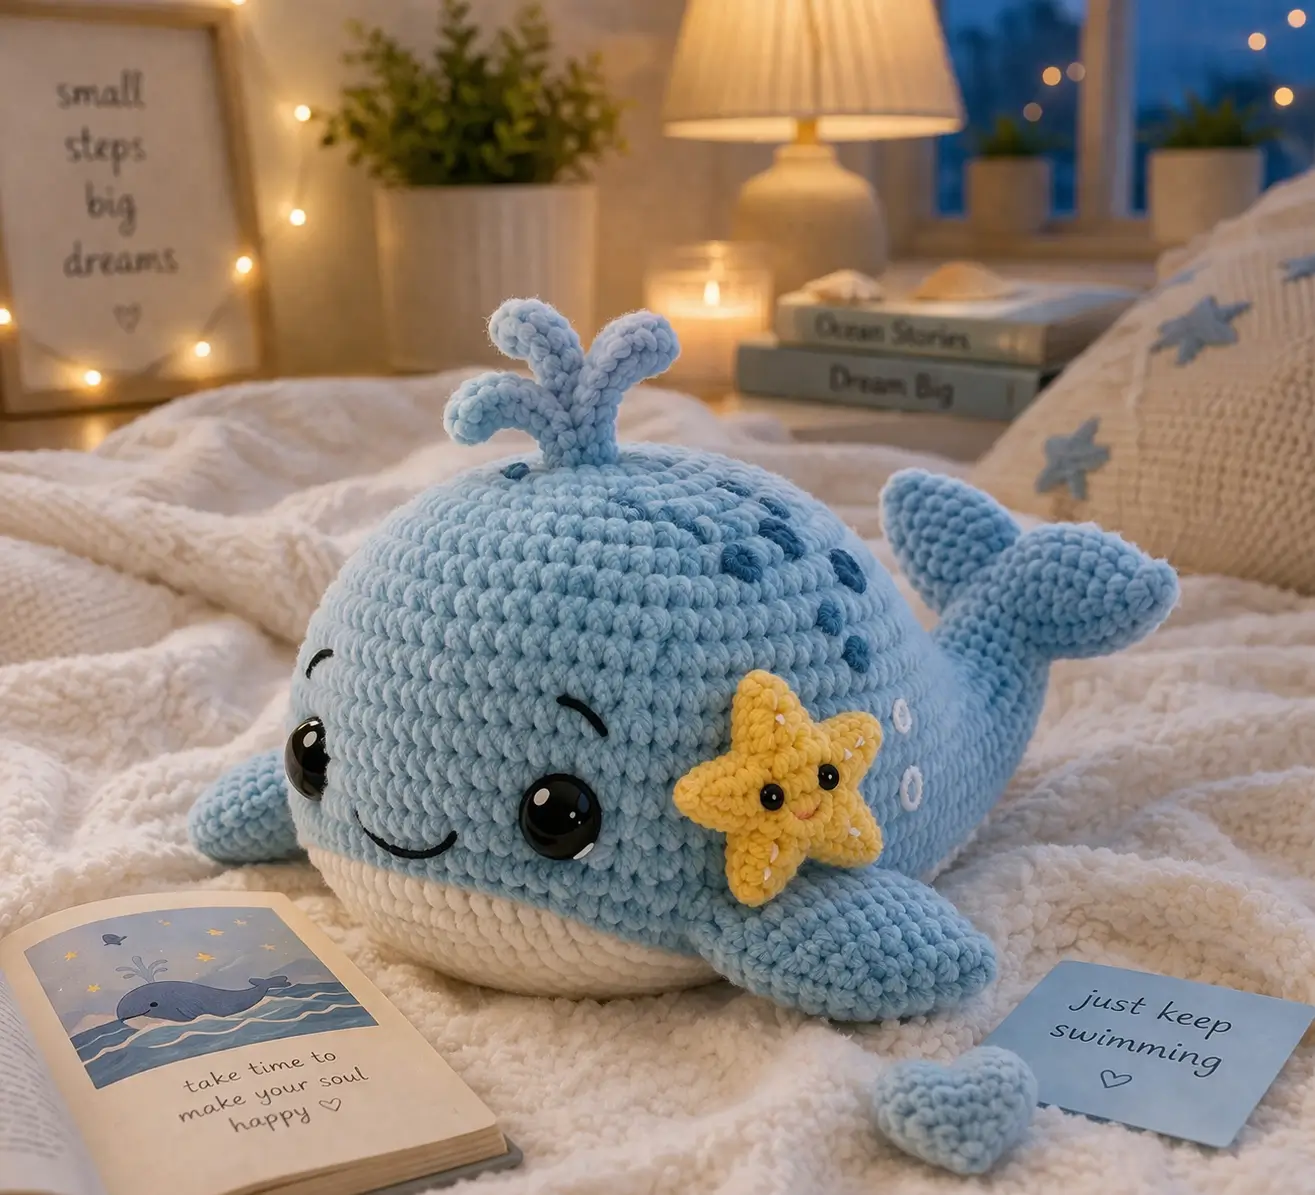
A whale only reads as a whale in plush form once the forehead stays round while the tail narrows hard. This whale amigurumi crochet pattern uses chunky yarn, a 6.5 mm hook class, and large safety eyes to build a soft display plush at about 22 cm long. Skill level sits at advanced beginner. The practical payoff is simple: it works as nursery decor without collapsing at the belly line.
The Design: What Makes This Whale Different
The uploaded whale is not a generic oval with fins. First, the body needs a high dome at the front, then a flatter underside to hold the white belly patch and keep the toy from rolling. Second, the tail must taper later than many mini patterns do; cut the diameter too soon and the whale starts reading like a fish. Third, the water spout has to be short and thick, not chain-thin, or it falls backward under chenille weight. In a plush whale amigurumi, stability matters more than realism. That is why many successful published whale patterns either widen the body longer or switch construction around the tail join. A common mistake is oversizing the fins relative to the belly width. That throws off the silhouette and makes the crochet whale plush look winged instead of marine.
Project Info at a Glance
| Skill Level | Time | Finished Size | Hook | Best For |
|---|---|---|---|---|
| Advanced beginner | 4–6 hours | ~22 cm long | 6.5 mm | Nursery decor, shelf plush, gift make |
Size and hook reference pulled from live whale-pattern benchmarks; the stitch plan below is a photo-based original adaptation.
Materials and Tools
Yarn
- Sky blue chenille / super bulky (#6) — about 120 g — suggested line: Bernat Baby Velvet or similar plush yarn
- White chenille / super bulky (#6) — about 35 g — for belly patch
- Yellow chenille / super bulky (#6) — about 12 g — for starfish
- Dark blue chenille or worsted scrap — about 8 g — for body spots
- Black worsted scrap — small amount — for brows and smile
Tools
- Hook 6.5 mm
- 18 mm safety eyes
- Polyester stuffing
- Tapestry needle
- Stitch markers
- Pins
- Fabric glue optional for eye backs only
Published whale references show #6 super bulky yarn with a 6.5 mm hook and 18 mm eyes in the plush category, while smaller cotton whales drop much lower in both hook and eye size.
Abbreviations
MR / sc / inc / dec / sl st / ch / BLO / FO / st
Invisible decrease is used on visible shaping rounds because standard decreases leave a wider seam line on plush yarn.
Pattern — Step by Step
Continuous spiral unless noted. This stitch plan is an original photo-based adaptation built with standard amigurumi math.
Head (Make 1)
Yarn: sky blue — Original adaptation based on photo and standard amigurumi math
R1: 6 sc in MR (6)
R2: inc x6 (12)
R3: (sc, inc) x6 (18)
R4: (2 sc, inc) x6 (24)
R5: (3 sc, inc) x6 (30)
R6: (4 sc, inc) x6 (36)
R7: (5 sc, inc) x6 (42)
R8–13: sc around (42)
R14: (5 sc, dec) x6 (36)
R15: sc around (36)
R16: (4 sc, dec) x6 (30)
R17: sc around (30)
Insert 18 mm eyes between R11 and R12, about 10 stitches apart. Embroider brows slightly above outer eye corners. Start stuffing firmly across the forehead.
Fasten off. Leave a 20 cm tail.
Body (Make 1)
Yarn: sky blue with white belly patch — Original adaptation based on photo and standard amigurumi math
R1: 6 sc in MR (6)
R2: inc x6 (12)
R3: (sc, inc) x6 (18)
R4: (2 sc, inc) x6 (24)
R5: (3 sc, inc) x6 (30)
R6: (4 sc, inc) x6 (36)
R7–10: sc around (36)
R11: BLO sc around (36)
R12: (4 sc, dec) x6 (30)
R13: sc around (30)
R14: (3 sc, dec) x6 (24)
R15: sc around (24)
R16: (2 sc, dec) x6 (18)
Stuff the front half harder than the tail half. The body should stay broad under the head, then narrow toward the flukes.
Fasten off. Leave a 25 cm tail.
Belly Patch (Make 1)
Yarn: white — Original adaptation
R1: 6 sc in MR (6)
R2: inc x6 (12)
R3: (sc, inc) x6 (18)
R4: (2 sc, inc) x6 (24)
R5: (3 sc, inc) x6 (30)
R6: sc around (30)
R7: (4 sc, inc) x6 (36)
R8: sc around (36)
Flatten lightly. Fasten off. Leave a 30 cm tail.
Front Fins / Side Fins (Make 2)
Yarn: sky blue — Original adaptation
R1: 6 sc in MR (6)
R2: (sc, inc) x3 (9)
R3: sc around (9)
R4: (sc, dec) x3 (6)
R5: sc around (6)
Do not stuff. Flatten. Fasten off. Leave a 20 cm tail.
Tail Flukes (Make 2)
Yarn: sky blue — Original adaptation informed by published two-piece tail structures
R1: 6 sc in MR (6)
R2: inc x6 (12)
R3: sc around (12)
R4: (2 sc, dec) x3 (9)
R5: sc around (9)
R6: (sc, dec) x3 (6)
Do not stuff. Flatten to a teardrop shape. Fasten off. Leave a 20 cm tail.
Water Spout Branch A (Make 1)
Yarn: sky blue — Original adaptation
R1: 6 sc in MR (6)
R2: sc around (6)
R3: (sc, inc) x3 (9)
R4: sc around (9)
Lightly stuff just the base. Flatten slightly. Fasten off. Leave a 15 cm tail.
Water Spout Branch B (Make 1)
Yarn: sky blue — Original adaptation
R1: 6 sc in MR (6)
R2: sc around (6)
R3: (sc, inc) x3 (9)
R4: sc around (9)
Fasten off. Leave a 15 cm tail.
Water Spout Branch C (Make 1)
Yarn: sky blue — Original adaptation
R1: 6 sc in MR (6)
R2: sc around (6)
R3: (sc, inc) x3 (9)
R4: sc around (9)
Fasten off. Leave a 15 cm tail.
Water Spout Base Join (Make 1)
Yarn: sky blue — Original adaptation
Place the three branches together. Crochet through one stitch from each branch to anchor them into a cluster.
R1: Join yarn and work 9 sc around the grouped lower edges (9)
R2: (2 sc, inc) x3 (12)
Fasten off. Leave a 20 cm tail.
Cheek Patches (Make 2, Optional)
Yarn: pale pink or light blue scrap — Original adaptation
R1: 6 sc in MR (6)
R2: inc x6 (12)
Do not stuff. Fasten off. Leave a 10 cm tail.
Body Spots (Make 4)
Yarn: dark blue — Original adaptation
R1: 6 sc in MR (6)
Pull tight and fasten off. Leave a 10 cm tail for sewing.
Starfish Accessory (Make 1)
Yarn: yellow — Original adaptation based on photo
R1: 5 sc in MR (5)
R2: *(ch 4, starting in 2nd ch from hook: sl st, sc, hdc, sl st in next base st)* x5
Optional center: embroider a tiny smile or add two 4 mm beads.
Fasten off. Leave a 25 cm tail.
Smile Detail (Make 1)
Yarn: black embroidery yarn
Embroider a shallow curved smile centered two rounds below the eyes.
White Side Bubbles (Make 3, Optional)
Yarn: white — Original adaptation
For each bubble: ch 2, 6 sc in 2nd ch from hook (6), sl st to first sc.
Fasten off. Leave a 10 cm tail.
Assembly
- Sew the head to the wide end of the body, keeping the face centered over the belly side.
- Attach the belly patch to the underside of the body along the BLO ridge from Body R11.
- Embroider the smile and secure the brows if not already stitched.
- Add the optional cheek patches slightly below and outside each eye.
- Pin the side fins at the lower side seam, about 2 rounds behind the eye line, then sew flat.
- Sew the tail flukes to the back tip of the body so they angle outward rather than upward.
- Join and attach the water spout to the crown of the head, centered and tilted slightly back.
- Stitch the dark blue spots on the upper right side of the whale, clustered from mid-head into upper body.
- Sew the starfish accessory to the right cheek-body area, partly overlapping the head and front body seam; attach the white side bubbles behind it if desired.
- Weave in all tails, compress the stuffing by hand, and shape the forehead, belly, and tail line.
The finished whale should rest on its belly with the tail lifted slightly above the surface.
7 Technical Tips
- Marker drift: A missed round marker on chenille yarn can shift the tail line by 1–2 stitches before you notice it. Move the marker every round, not every increase round.
- Stuffing firmness: Pack the forehead to about 15–20% firmer than the tail section. A soft forehead collapses the whale profile from the front view.
- Invisible decrease: Standard dec stitches leave open holes on plush yarn, especially on rounds dropping from 42 to 36 or 36 to 30. Use inv dec on all visible taper rounds.
- Eye placement timing: Insert eyes before the head closes past 30 stitches. Waiting until after R16 makes the backing hard to seat cleanly inside bulky yarn.
- Velvet tension: Chenille strands can shear if the MR is yanked shut too fast. Tighten in stages, then reinforce the center with the starting tail.
- Pinning order: Pin the belly patch first, then fins, then starfish. Sewing fins first often crowds the white panel and throws the underside off center.
- Tail weaving: Each fluke tail needs at least three direction changes when woven in. A single straight bury can slip back out under handling.
Conclusion
This whale amigurumi crochet pattern works because the shaping choices stay disciplined: a broad front dome, a stable belly, modest side fins, and a late tail taper. Those structural calls matter more than surface detail. Next, swatch one small fin in your chosen chenille before starting the full body; that single check tells you whether the hook-to-yarn ratio is tight enough. Once finished, post it to Pinterest and Instagram with #WhaleSpoutPattern so the silhouette and face placement can be compared across yarn brands. One final test remains useful: did your water spout stand upright after 24 hours, or did the center branch lean forward?









