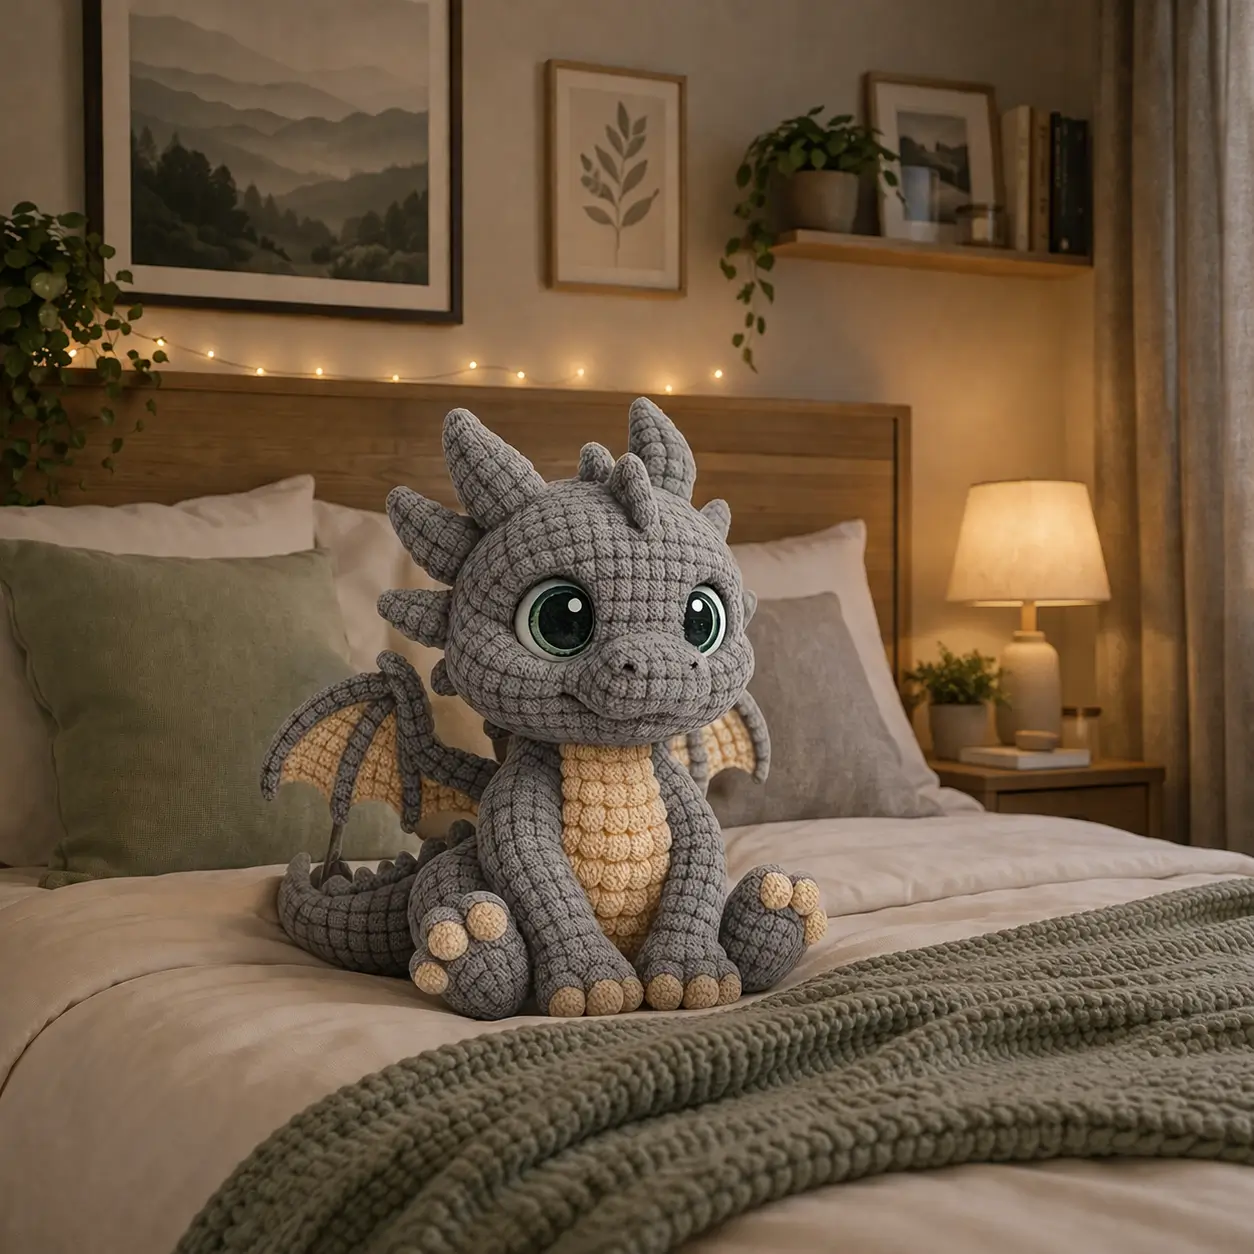
Dragons carry their silhouette in the spine line, not the belly. This dragon amigurumi crochet pattern builds that shape with velvet yarn, a 26 cm seated target, 4 mm hook, oversized eyes, and intermediate shaping that suits display pieces, nursery decor, or photo-ready market stock.
The Design: What Makes This Dragon Different
This dragon relies on three structural choices. First, the head stays large while the body tapers early. That keeps the baby-dragon proportion visible even after stuffing settles. Second, the hind legs are wider than the front legs, because a seated dragon needs rear support more than shoulder mass. Third, the wings stay shallow and slightly backward, which stops the plush from tipping.
The snout also matters more here than on many generic fantasy creatures. A long muzzle pulls the face toward reptile realism. The photo shows the opposite: a blunt front, high-set nostrils, and large eyes. That is why this version uses a separate oval snout and flat cheek patches instead of a long head tube.
One common mistake with a baby dragon amigurumi is overstuffing the neck. The head then pitches forward and hides the chest panel. Many velvet dragon amigurumi tutorials skip that stability issue.
Project Info at a Glance
| Skill Level | Time | Finished Size | Hook | Best For |
|---|---|---|---|---|
| Intermediate | 6–8 hours | 24–28 cm seated photo estimate; 4 mm is a common dragon benchmark; comparable dragon patterns often land around 15–20 cm in finer yarns. | 4 mm for plush-style dragon builds. | Plush display, nursery shelf, gift make |
Materials and Tools
Yarn
- Gray chenille/velvet — bulky plush style — about 180–220 g — Himalaya Dolphin Baby, Premier Parfait Chunky, or similar
- Cream chenille/velvet — same weight — about 40–60 g — for belly, wing membrane, toe pads
- Black embroidery thread — small amount — for nostrils if not using felt
Tools
- Hook 4 mm
- 20 mm safety eyes
- Polyester stuffing
- Tapestry needle
- Stitch markers
- Pins
- Scissors
Verified market and pattern references show 4 mm hooks and 20 mm eyes as common on larger plush dragons, while smaller cotton dragons use 2.5–4 mm hooks and smaller eyes.
Abbreviations
MR / sc / inc / dec / sl st / ch / BLO / FLO / hdc
Use invisible decrease for all shaping rounds. It reduces bulk on chenille yarn and keeps the forehead, belly, and tail line cleaner than a standard decrease.
Pattern — Step by Step
Continuous spiral unless noted.
Head
Yarn: gray — Source: Standard amigurumi math
R1: 6 sc in MR (6)
R2: inc x6 (12)
R3: (sc, inc) x6 (18)
R4: (2 sc, inc) x6 (24)
R5: (3 sc, inc) x6 (30)
R6: (4 sc, inc) x6 (36)
R7: (5 sc, inc) x6 (42)
R8–13: sc around (42)
R14: (5 sc, dec) x6 (36)
R15: sc around (36)
R16: (4 sc, dec) x6 (30)
R17–18: sc around (30)
Insert 20 mm eyes between R11 and R12, 8 sts visible between them. Stuff firmly but keep the lower back of the head slightly softer for sewing.
Fasten off. Leave 25 cm tail.
Snout
Yarn: gray — Source: Standard amigurumi math
R1: ch 5, starting in 2nd ch from hook: sc 3, 3 sc in last ch, working on opposite side sc 2, inc (10)
R2: inc, sc 2, inc x3, sc 2, inc x2 (16)
R3: sc around (16)
Lightly stuff only at the center. Embroider two nostrils after sewing.
Fasten off. Leave 20 cm tail.
Cheek Patches (Make 2)
Yarn: gray — Source: Standard amigurumi math
R1: 6 sc in MR (6)
R2: inc x6 (12)
Fasten off. Leave 12 cm tail.
Horns (Make 2)
Yarn: gray — Source: Standard amigurumi math
R1: 4 sc in MR (4)
R2: sc around (4)
R3: (sc, inc) x2 (6)
R4–6: sc around (6)
Do not stuff heavily. A trace of stuffing at the base is enough.
Fasten off. Leave 15 cm tail.
Dorsal Spikes (Make 5 small, 2 medium)
Yarn: gray — Source: Standard amigurumi math
Small spike
R1: 4 sc in MR (4)
R2: sc around (4)
R3: (sc, inc) x2 (6)
R4: sc around (6)
Medium spike
R1: 4 sc in MR (4)
R2: sc around (4)
R3: (sc, inc) x2 (6)
R4: sc around (6)
R5: (2 sc, inc) x2 (8)
R6: sc around (8)
Fasten off. Leave 12–15 cm tails.
Body
Yarn: gray — Source: Standard amigurumi math
R1: 6 sc in MR (6)
R2: inc x6 (12)
R3: (sc, inc) x6 (18)
R4: (2 sc, inc) x6 (24)
R5: (3 sc, inc) x6 (30)
R6–9: sc around (30)
R10: (3 sc, dec) x6 (24)
R11–12: sc around (24)
R13: (2 sc, dec) x6 (18)
R14–15: sc around (18)
R16: dec x6 (12)
Stuff firmly at the base and medium-firm at the chest. The upper body should stay slightly compressible so the head sits lower.
Fasten off. Leave 25 cm tail.
Belly Panel
Yarn: cream — Source: Standard amigurumi math
Row 1: ch 7, starting in 2nd ch from hook sc 6, ch 1, turn (6)
Rows 2–9: sc across, ch 1, turn (6)
Row 10: dec, sc 2, dec, ch 1, turn (4)
Row 11: sc across (4)
Fasten off. Leave 18 cm tail.
Front Legs (Make 2)
Yarn: gray — Source: Standard amigurumi math
R1: 6 sc in MR (6)
R2: inc x6 (12)
R3–10: sc around (12)
Stuff the lower half only. Flatten top opening.
Fasten off. Leave 20 cm tail.
Back Legs (Make 2)
Yarn: gray — Source: Standard amigurumi math
R1: 6 sc in MR (6)
R2: inc x6 (12)
R3: (sc, inc) x6 (18)
R4–5: sc around (18)
R6: (sc, dec) x6 (12)
R7–9: sc around (12)
Stuff front of foot firmly and heel lightly so the seated angle stays rounded.
Fasten off. Leave 20 cm tail.
Toe Pads (Make 12 small, 4 large)
Yarn: cream — Source: Standard amigurumi math
Small pad
R1: 6 sc in MR (6)
Large pad
R1: 6 sc in MR (6)
R2: inc x6 (12)
Fasten off. Leave short sewing tails.
Wings (Make 2)
Yarn: gray outer edge, cream inner edge — Source: Standard amigurumi math
Row 1: ch 8, starting in 2nd ch from hook sc 7, ch 1, turn (7)
Row 2: inc, sc 5, inc, ch 1, turn (9)
Row 3: inc, sc 7, inc, ch 1, turn (11)
Row 4: inc, sc 9, inc, ch 1, turn (13)
Row 5: inc, sc 11, inc, ch 1, turn (15)
Border: switch to gray, work 1 round of sc evenly around the wing. At three lower points, ch 2 and sl st back to shape the membrane dips.
Do not stuff. Steam is not needed on chenille; pin shape instead before sewing.
Fasten off. Leave 25 cm tail.
Tail
Yarn: gray — Source: Standard amigurumi math
R1: 6 sc in MR (6)
R2–5: sc around (6)
R6: (2 sc, inc) x2 (8)
R7–10: sc around (8)
R11: (3 sc, inc) x2 (10)
R12–15: sc around (10)
R16: (4 sc, inc) x2 (12)
R17–24: sc around (12)
Stuff the first half firmly and the tip lightly. Bend into a soft curve before attaching.
Fasten off. Leave 25 cm tail.
Assembly
- Sew the head to the body, centering the 30-stitch head opening over the upper body.
- Sew the snout to the lower center of the face, covering roughly R12–R16.
- Attach the cheek patches level with the lower outer edges of the snout.
- Sew the horns on top of the head, 6–7 stitches apart.
- Sew the dorsal spikes from forehead to tail base, using the medium spikes first and the small spikes behind them.
- Attach the belly panel to the front of the body from neck base to lower abdomen.
- Sew the front legs to the body sides just below the head join.
- Sew the back legs wider and lower than the front legs so the dragon sits without rocking.
- Attach the wings slightly behind the front legs with the top edge angled backward.
- Sew the tail to the back center, then add toe pads and embroider nostrils.
The finished dragon should sit upright with the tail acting as a rear stabilizer.
7 Technical Tips
- Mark the first stitch of every round with a locking marker. Chenille stitch definition fades fast, and a one-stitch drift at R7 on the head shifts the eyes off center by the time you reach R12.
- Stuff the head firmly, but stop before the lower rear quadrant turns rigid. A hard-packed back head pushes the chin upward and shortens the visible snout.
- Use invisible decreases only on the face, body taper, and tail widening transitions. Standard decreases create a ridge that reads clearly on velvet under side light.
- Install eyes before the final face taper. On this shape, eye placement after R14 is too late because the fabric starts cupping inward and narrows the spacing.
- Keep wing tension one half size tighter than body tension. Loose wing rows cause membrane sag, and the gray border will ripple instead of holding the arc.
- Pin both back legs before sewing either one permanently. A difference of even 4 mm in leg height is enough to make the seated base wobble.
- Weave tails through at least 5 cm of internal stuffing path before trimming. Short tail burial in chenille can back out through the fabric after repeated handling.
Conclusion
A seated dragon fails or succeeds on proportion. The head has to dominate, the hind feet have to carry the pose, and the wings must stay decorative rather than structural. That is the point of this dragon amigurumi crochet pattern: broad baby-dragon proportions translated into velvet yarn without losing stability. The next step is simple. Crochet the head first, test your eye size against the snout width, and only then commit to the body yarn amounts. Share the finished piece on Pinterest and Instagram with #SeatedBabyDragonPattern. Did you keep the back spikes short and rounded, or did you extend them all the way down the tail for a sharper silhouette?









