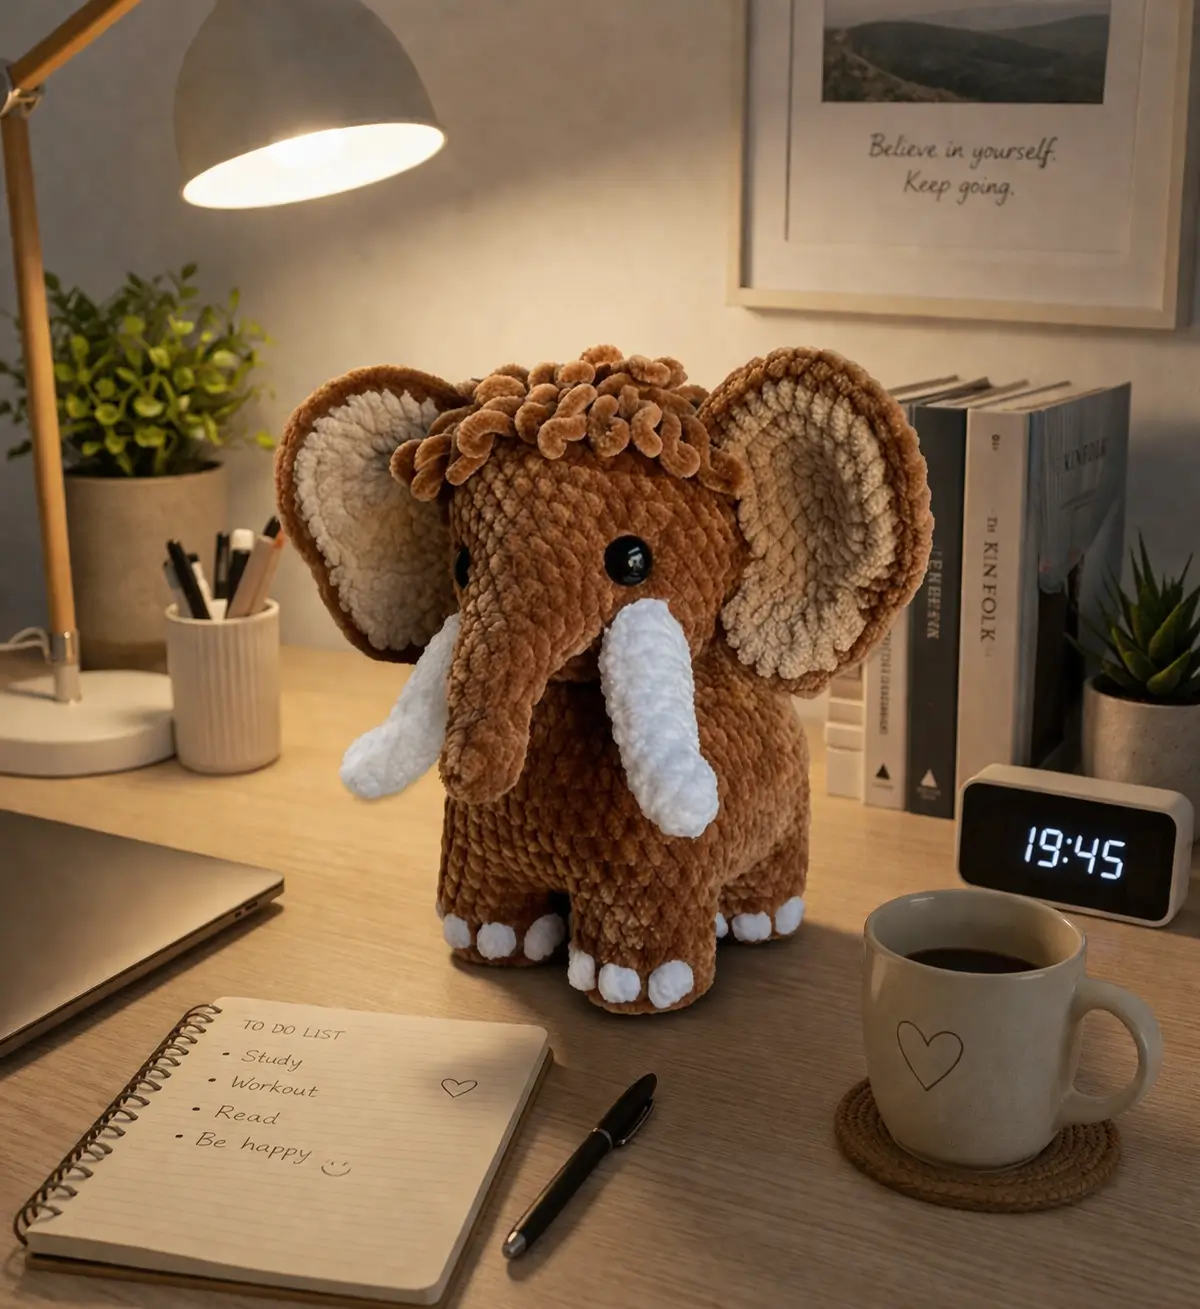
Tusks force the face to project forward, so a woolly mammoth amigurumi cannot rely on a flat elephant profile. This plush chenille version uses a 5.5 mm hook, teddy-style brown yarn, 15 mm safety eyes, and a medium finished size of roughly 22 cm. Skill level sits at intermediate because the trunk, ears, and front-heavy balance all need control. It works well as a shelf plush because the silhouette reads clearly from a distance.
The Design: What Makes Mammoth Different
A mammoth is not just an elephant with tusks added later. You need three structural choices early: a long narrow trunk that begins high on the face, ears that cup outward instead of lying flat, and enough forehead bulk to carry a shaggy tuft without collapsing the eye line. In most successful mammoth plushies, the tusks also sit lower than the eye plane, which keeps the expression open rather than crowded. That spacing matters. One common mistake in a mammoth crochet pattern is placing the eyes too low after the trunk is attached, which shortens the face visually. Another is under-sizing the ears, even though published mammoth patterns frequently use generous ear shaping or explicit ear rounds to keep the profile readable. That is why this plush mammoth crochet build uses a broad head plateau and sewn curved ears rather than flat circles.
Project Info at a Glance
| Skill Level | Time | Finished Size | Hook | Best For |
|---|---|---|---|---|
| Intermediate | 5–7 hours | approx. 22 cm tall | 5.5 mm | shelf plush, market table, nursery display |
Materials and Tools
Yarn
- Brown teddy or chenille yarn — super chunky/plush — public gram count not published — Scheepjes Sweetheart Soft style yarn is a close match for the furry look in the photo.
- Cream chenille yarn — super chunky/plush — public gram count not published — use for inner ears.
- White chenille yarn — super chunky/plush — public gram count not published — use for tusks and toe caps.
- Brown DK or worsted scrap — small amount — use for the curled hair tuft base if your teddy yarn is too bulky to knot cleanly.
Tools
- Hook 5.5 mm
- 15 mm safety eyes
- Polyfill stuffing
- Tapestry needle
- Stitch markers
- Straight pins for ear placement
- Small scissors
Abbreviations
- MR = magic ring
- sc = single crochet
- inc = 2 sc in one stitch
- dec = invisible decrease
- sl st = slip stitch
- ch = chain
- BLO = back loop only
Use invisible decrease on all closing rounds so the plush surface stays compact and the stuffing does not show through the reduction line.
Pattern — Step by Step
Continuous spiral unless noted.
Head (Make 1)
Yarn: brown — Source: standard amigurumi math, photo-matched plush build
R1: 6 sc in MR (6)
R2: inc x6 (12)
R3: (sc 1, inc) x6 (18)
R4: (sc 2, inc) x6 (24)
R5: (sc 3, inc) x6 (30)
R6: (sc 4, inc) x6 (36)
R7-R12: sc around (36)
R13: (sc 4, dec) x6 (30)
R14: (sc 3, dec) x6 (24)
Insert eyes between R8 and R9, 8 stitches apart. Start stuffing.
R15: (sc 2, dec) x6 (18)
R16: (sc 1, dec) x6 (12)
R17: dec x6 (6)
Stuff firmly before closing.
Fasten off. Leave a 20 cm tail.
Body (Make 1)
Yarn: brown — Source: standard amigurumi math, photo-matched plush build
R1: 6 sc in MR (6)
R2: inc x6 (12)
R3: (sc 1, inc) x6 (18)
R4: (sc 2, inc) x6 (24)
R5: (sc 3, inc) x6 (30)
R6: (sc 4, inc) x6 (36)
R7-R11: sc around (36)
R12: (sc 4, dec) x6 (30)
R13: (sc 3, dec) x6 (24)
R14: (sc 2, dec) x6 (18)
Stuff firmly, especially at the lower front so the mammoth does not tip forward.
R15: (sc 1, dec) x6 (12)
R16: dec x6 (6)
Fasten off. Leave a 20 cm tail.
Front Legs (Make 2)
Yarn: brown — Source: standard amigurumi math, photo-matched plush build
R1: 6 sc in MR (6)
R2: inc x6 (12)
R3-R8: sc around (12)
R9: (sc 4, dec) x2 (10)
R10-R11: sc around (10)
Lightly stuff the lower two-thirds only.
Fasten off. Leave a 18 cm tail.
Back Legs (Make 2)
Yarn: brown — Source: standard amigurumi math, photo-matched plush build
R1: 6 sc in MR (6)
R2: inc x6 (12)
R3: (sc 1, inc) x6 (18)
R4-R6: sc around (18)
R7: (sc 4, dec) x3 (15)
R8-R10: sc around (15)
Stuff the foot firmly and the top lightly so the body can sit over it.
Fasten off. Leave a 20 cm tail.
Ears (Make 2)
Yarn: cream inner + brown edging optional
R1: 6 sc in MR (6)
R2: inc x6 (12)
R3: (sc 1, inc) x6 (18)
R4: (sc 2, inc) x6 (24)
R5: (sc 3, inc) x6 (30)
R6: (sc 4, inc) x6 (36)
R7-R8: sc around (36)
Flatten.
Edging: fold slightly into a cup and sc 18 through both sides to close the base.
Do not stuff. Curve before sewing.
Fasten off. Leave a 25 cm tail.
Trunk (Make 1)
Yarn: brown — Source: custom plush shaping informed by published mammoth trunk-forward builds
R1: 6 sc in MR (6)
R2: (sc 1, inc) x3 (9)
R3-R4: sc around (9)
R5: (sc 2, inc) x3 (12)
R6-R11: sc around (12)
R12: (sc 2, dec) x3 (9)
R13-R15: sc around (9)
Stuff very lightly. Bend the trunk downward before sewing so it keeps the soft curve from the photo.
Fasten off. Leave a 30 cm tail.
Tusks (Make 2)
Yarn: white
Row 1: ch 5, starting in 2nd ch from hook sc 4, ch 1, turn (4)
Row 2-8: sc 4, ch 1, turn (4)
Roll each strip lengthwise and whipstitch the seam.
Fasten off. Leave a 20 cm tail.
Hair Tuft (Make 6 curls)
Yarn: brown DK or soft plush scrap
For each curl:
ch 11, starting in 2nd ch from hook, 2 sc in each ch across (20)
Make 6. Tie or sew them in a cluster across the forehead centerline.
Fasten off. Leave 10 cm tails.
Toe Caps (Make 12)
Yarn: white
R1: 6 sc in MR (6)
Fasten off. Leave 8 cm tails.
Cheek Patches (Make 2)
Yarn: cream
R1: 6 sc in MR (6)
R2: inc x6 (12)
These are optional on this version. Place them under the eye line only if you want more contrast around the trunk base.
Fasten off. Leave 10 cm tails.
Assembly
- Sew the head to the body with the chin angled slightly downward, not centered upright.
- Attach the trunk between the eyes, starting high enough that the top of the trunk sits just below R8.
- Sew the tusks to either side of the lower trunk base, angled down and out.
- Attach the front legs under the front third of the body so the plush stands square.
- Attach the back legs slightly wider than the front pair to increase stability.
- Pin the ears first, then sew them to the upper side of the head with a forward cup.
- Stitch the toe caps to the front of each foot: three on each back foot and three on the visible face of the two front feet, matching the photo view.
- Add the hair curls in a dense row across the forehead crown. Keep the cluster short so it does not cover the eyes.
- Sew on the cheek patches only if the face needs more separation between trunk and tusks.
- Weave in every tail through the interior body path, then shape the trunk and ears by hand.
The piece is complete when it can stand unsupported with the trunk hanging forward and the ears holding a shallow cup.
7 Technical Tips
- Mark the first stitch of every round. On plush yarn, the failure mode is silent stitch loss, and one missed increase will flatten the head dome.
- Pack the body base firmer than the neck. A mammoth falls forward when the lower front quadrant is soft, because the trunk and tusks add visible front weight.
- Use invisible decreases only on closing rounds. Standard decreases leave a ridge that becomes obvious on chenille and can twist the body line.
- Install the eyes before the head closes past 24 stitches. Waiting too long forces the eye backs through dense stuffing and often shifts the placement off-center by one stitch.
- Pin both ears before sewing either one down. The common failure is asymmetry, especially when one ear cups farther forward than the other.
- Keep trunk stuffing light. Overstuffing removes the downward bend and makes the plush look like an elephant tube rather than a mammoth face.
- Weave each tail at least 5 cm through a perpendicular path. Short tail burying slips out faster in velvet yarn because the pile reduces friction.
Conclusion
This version keeps the shape readable: wide ears, a narrow hanging trunk, rolled tusks, and enough forehead bulk for the curl tuft. That combination is what makes a woolly mammoth amigurumi register correctly instead of drifting into generic elephant territory. The next step is practical. Crochet the head first, pin the trunk in place, and check the eye line before making the limbs. After assembly, photograph the plush from the front and profile, then share it to Pinterest and Instagram with #WoollyMammothPattern. One question matters for this character more than most: did you angle the tusks low enough to keep the trunk visually centered?









