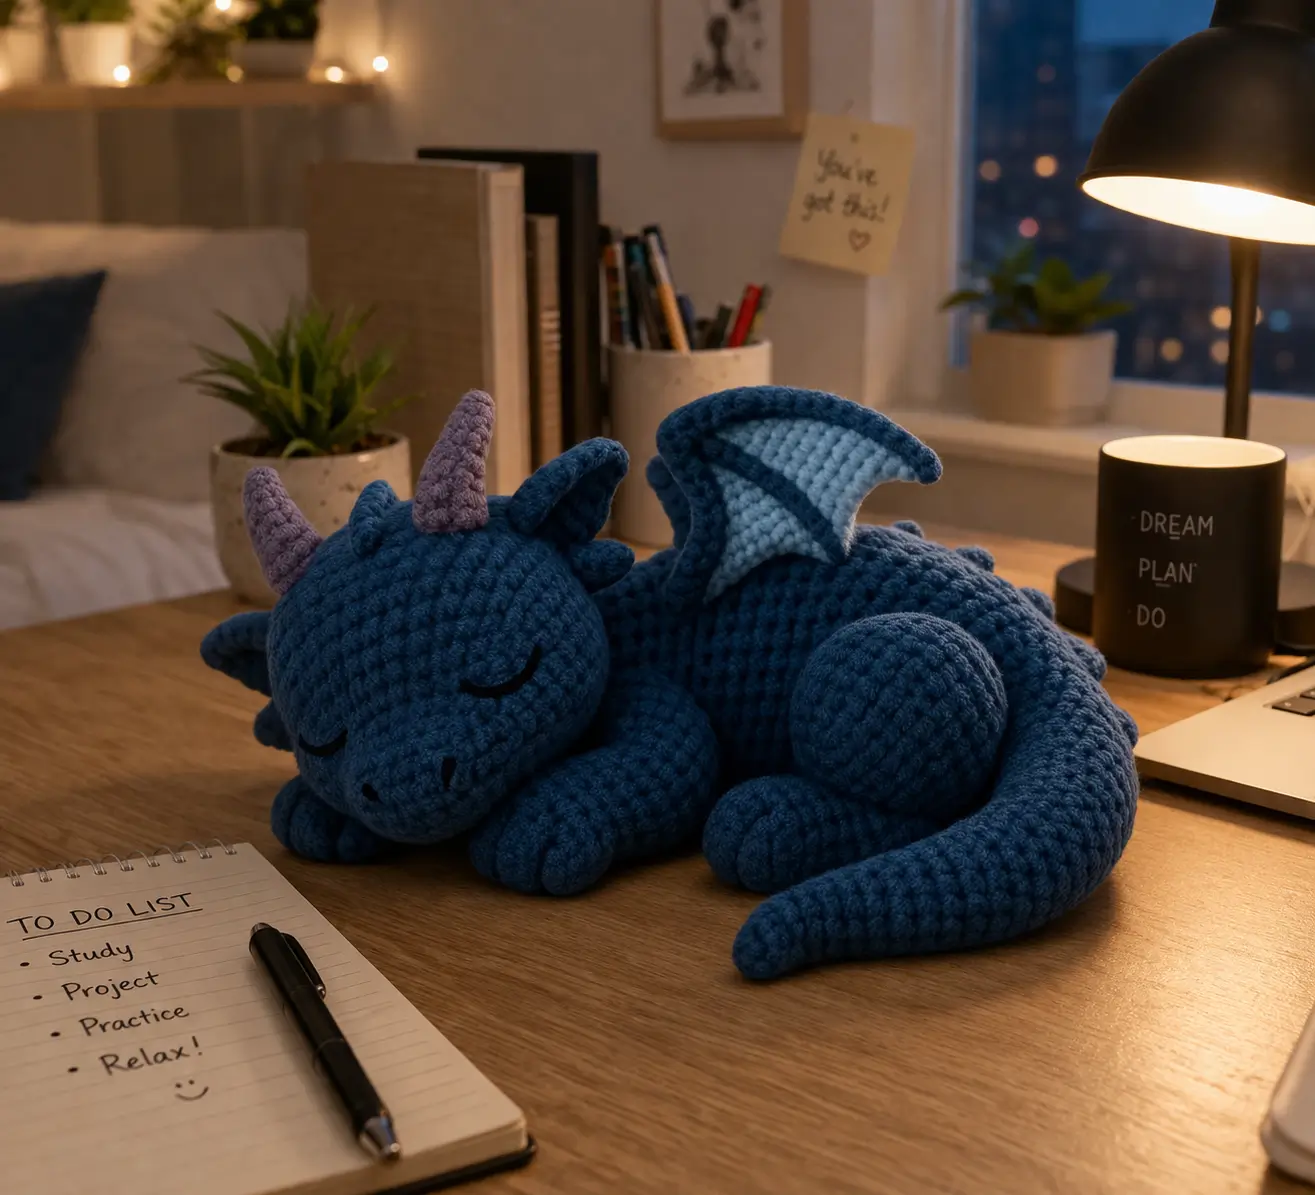
A sleeping dragon fails the moment the tail arc outweighs the forelegs. This sleeping dragon amigurumi crochet pattern solves that with chunky plush yarn, embroidered eyes instead of safety eyes, and a finished size that tracks well with small dragon builds in the 24–27 cm range when worked in thicker yarn. It suits an intermediate maker and works well as a shelf plush or nursery prop.
The Design: What Makes This Dragon Different
This dragon is not built like an upright mascot. It sits low, with the chest spread forward and the hindquarters acting as ballast. That choice matters because a sleeping pose looks wrong when the neck rises too high or the body cylinder is too narrow. The second structural decision is the head size. It needs a broad forehead and short snout so the embroidered lashes read clearly from the side, which is where a plush dragon crochet pattern usually gets photographed. A third choice is the wing scale: small enough to stay decorative, large enough to break the back line. Many dragon tutorials assume 9 mm safety eyes or a standing pose; that approach clashes with a sleepy dragon crochet pattern like the one in the photo. Online examples also show dragon sizes shifting sharply with yarn weight and hook selection, so proportion control matters more than copying a single measurement.
Project Info at a Glance
| Skill Level | Time | Finished Size | Hook | Best For |
|---|---|---|---|---|
| Intermediate | 6–8 hours | about 27 cm long in plush yarn | 5.0 mm | shelf plush, nursery decor, fantasy gift |
Finished-size and plush-yarn benchmark based on published dragon pattern ranges and plush-yarn references.
Materials and Tools
Yarn
- Deep navy blue — chunky plush — about 100 g — Himalaya Dolphin Baby or YarnArt Dolce type plush yarn
- Pale blue — chunky plush — partial skein — wing membrane
- Dusty lavender — chunky plush — small amount — horns
- Black embroidery thread — small amount — lashes and nostrils
Tools
- Hook 5.0 mm
- No safety eyes for this version
- Polyfill stuffing
- Tapestry needle
- Stitch markers
Abbreviations
MR / sc / inc / dec / sl st / ch / BLO / FLO / hdc / dc
Invisible decrease keeps the closing rounds tighter than a standard front-facing decrease, which reduces gaps in plush yarn.
Pattern — Step by Step
Continuous spiral unless noted. This adaptation is photo-derived and written with standard amigurumi count logic.
Head (Make 1)
Yarn: deep navy blue — Source: standard amigurumi math + photo-derived adaptation
R1: 6 sc in MR (6)
R2: inc x6 (12)
R3: (sc, inc) x6 (18)
R4: (2 sc, inc) x6 (24)
R5: (3 sc, inc) x6 (30)
R6: (4 sc, inc) x6 (36)
R7: (5 sc, inc) x6 (42)
R8–R12: sc around (42)
R13: (5 sc, dec) x6 (36)
R14: (4 sc, dec) x6 (30)
R15: (3 sc, dec) x6 (24)
Stuff firmly through the forehead, lighter in the muzzle area.
R16: (2 sc, dec) x6 (18)
Fasten off. Leave a 25 cm tail.
Body (Make 1)
Yarn: deep navy blue — Source: standard amigurumi math + photo-derived adaptation
R1: 6 sc in MR (6)
R2: inc x6 (12)
R3: (sc, inc) x6 (18)
R4: (2 sc, inc) x6 (24)
R5: (3 sc, inc) x6 (30)
R6: (4 sc, inc) x6 (36)
R7–R14: sc around (36)
R15: (4 sc, dec) x6 (30)
R16–R17: sc around (30)
R18: (3 sc, dec) x6 (24)
Stuff the chest and mid-body. Keep the underside slightly flatter than the back.
R19: (2 sc, dec) x6 (18)
Fasten off. Leave a 25 cm tail.
Front Legs (Make 2)
Yarn: deep navy blue — Source: standard amigurumi math + photo-derived adaptation
R1: 6 sc in MR (6)
R2: inc x6 (12)
R3–R5: sc around (12)
R6: (4 sc, dec) x2 (10)
R7–R9: sc around (10)
Light stuffing only in the paw.
Flatten and sc through both layers for 5 sts to close.
Fasten off. Leave a 20 cm tail.
Back Legs (Make 2)
Yarn: deep navy blue — Source: standard amigurumi math + photo-derived adaptation
R1: 6 sc in MR (6)
R2: inc x6 (12)
R3: (sc, inc) x6 (18)
R4–R7: sc around (18)
R8: (4 sc, dec) x3 (15)
R9–R10: sc around (15)
Stuff well. These legs support the tail-side curve.
Flatten and sc through both layers for 7 sts to close.
Fasten off. Leave a 20 cm tail.
Horns (Make 2)
Yarn: dusty lavender — Source: photo-derived adaptation
R1: 6 sc in MR (6)
R2–R4: sc around (6)
R5: (sc, dec) x2 (4)
R6: sc around (4)
Do not stuff.
Fasten off. Leave a 15 cm tail.
Wings (Make 2)
Yarn: pale blue inner membrane, deep navy blue edging — Source: wing part structure cross-checked with published dragon wing tutorials.
In pale blue:
Ch 8.
Row 1: sc in 2nd ch from hook and across (7)
Row 2: ch 1, turn, sc 2, hdc 1, dc 2, hdc 1, sc 1 (7)
Row 3: ch 1, turn, sc 2, hdc 1, dc 1, ch 3, sl st in same st, dc 1, hdc 1, sc 1 (7)
Edging in deep navy blue:
Work 1 round of sc evenly around the wing, placing 3 sc in the tip chain space.
Fasten off. Leave a 20 cm tail.
Tail (Make 1)
Yarn: deep navy blue — Source: standard amigurumi math + photo-derived adaptation
R1: 6 sc in MR (6)
R2: sc around (6)
R3: (2 sc, inc) x2 (8)
R4–R6: sc around (8)
R7: (3 sc, inc) x2 (10)
R8–R12: sc around (10)
R13: (4 sc, inc) x2 (12)
R14–R20: sc around (12)
R21: (5 sc, inc) x2 (14)
R22–R30: sc around (14)
Stuff lightly toward the tip, firmer at the base.
Fasten off. Leave a 25 cm tail.
Dorsal Spikes (Make 5)
Yarn: deep navy blue — Source: photo-derived adaptation
For each spike:
R1: 4 sc in MR (4)
R2: sc around (4)
R3: (sc, inc) x2 (6)
R4: sc around (6)
Flatten.
Fasten off. Leave a 10 cm tail.
Cheek Patches (Make 2)
Yarn: deep navy blue — Source: flat circle standard amigurumi math
R1: 6 sc in MR (6)
R2: inc x6 (12)
Sl st to finish.
Fasten off. Leave a 12 cm tail.
Nostril Embroidery
Yarn: black embroidery thread — Source: photo-derived adaptation
Work two short vertical satin stitches on the snout, spaced 3–4 stitches apart.
Eye Embroidery
Yarn: black embroidery thread — Source: photo-derived adaptation
Stitch one curved sleeping lash on each side of the face, angled slightly downward toward the snout.
Assembly
- Sew the head to the front third of the body, keeping the chin low and the forehead slightly forward.
- Attach the front legs under the head-body join, angled ahead rather than straight down.
- Sew the back legs to the rear sides of the body, centered so the dragon rests on them instead of rolling.
- Fix the tail to the back of the body and curve it around the right side.
- Attach the horns on top of the head, spaced evenly behind the forehead line.
- Sew the wings to the upper back, one on each side, with the tips angled upward.
- Add the five dorsal spikes from crown to upper tail base.
- Sew the cheek patches low on the face if extra contour is needed under the lashes.
- Embroider the eyes and nostrils after the head angle is final.
- Shape the body by hand, flattening the belly slightly and rounding the hip area.
The finished toy should rest on its belly with the tail acting as a side counterweight.
7 Technical Tips
- Mark the first stitch of every round. Plush yarn hides round starts fast, and a missed increase in the head will shift the muzzle by several stitches.
- Stuff the head harder than the body. A soft head collapses the lash line and makes the snout sag toward the table.
- Use invisible decreases on all closing rounds. Standard decreases open holes in chenille and expose white stuffing.
- Embroider the eyes only after test-pinning the head to the body. A face that looks centered in the hand can read too low once the dragon is lying down.
- Keep wing tension tighter than body tension. Loose wing fabric folds inward and loses the crisp upper edge visible in sleeping dragon samples.
- Pin the tail in three places before sewing. One pin at the base is not enough to hold the curve, and the tip will drift out of line.
- Weave tails back through at least 4 cm of interior stitches. Plush yarn sheds under friction, and short woven ends work free sooner than cotton.
Conclusion
A lying dragon needs different engineering from a standing one. The body has to stay broad, the forelegs must read as support rather than decoration, and the tail cannot pull the plush off axis. That is the core of this sleeping dragon amigurumi crochet pattern. Start by making the head and one front leg first, then test the scale against your yarn before committing to all pieces. Share the finished dragon on Pinterest and Instagram with #SleepingDragonPattern. One build question matters here: did you place the wings high enough that they still show once the tail curls across the side?