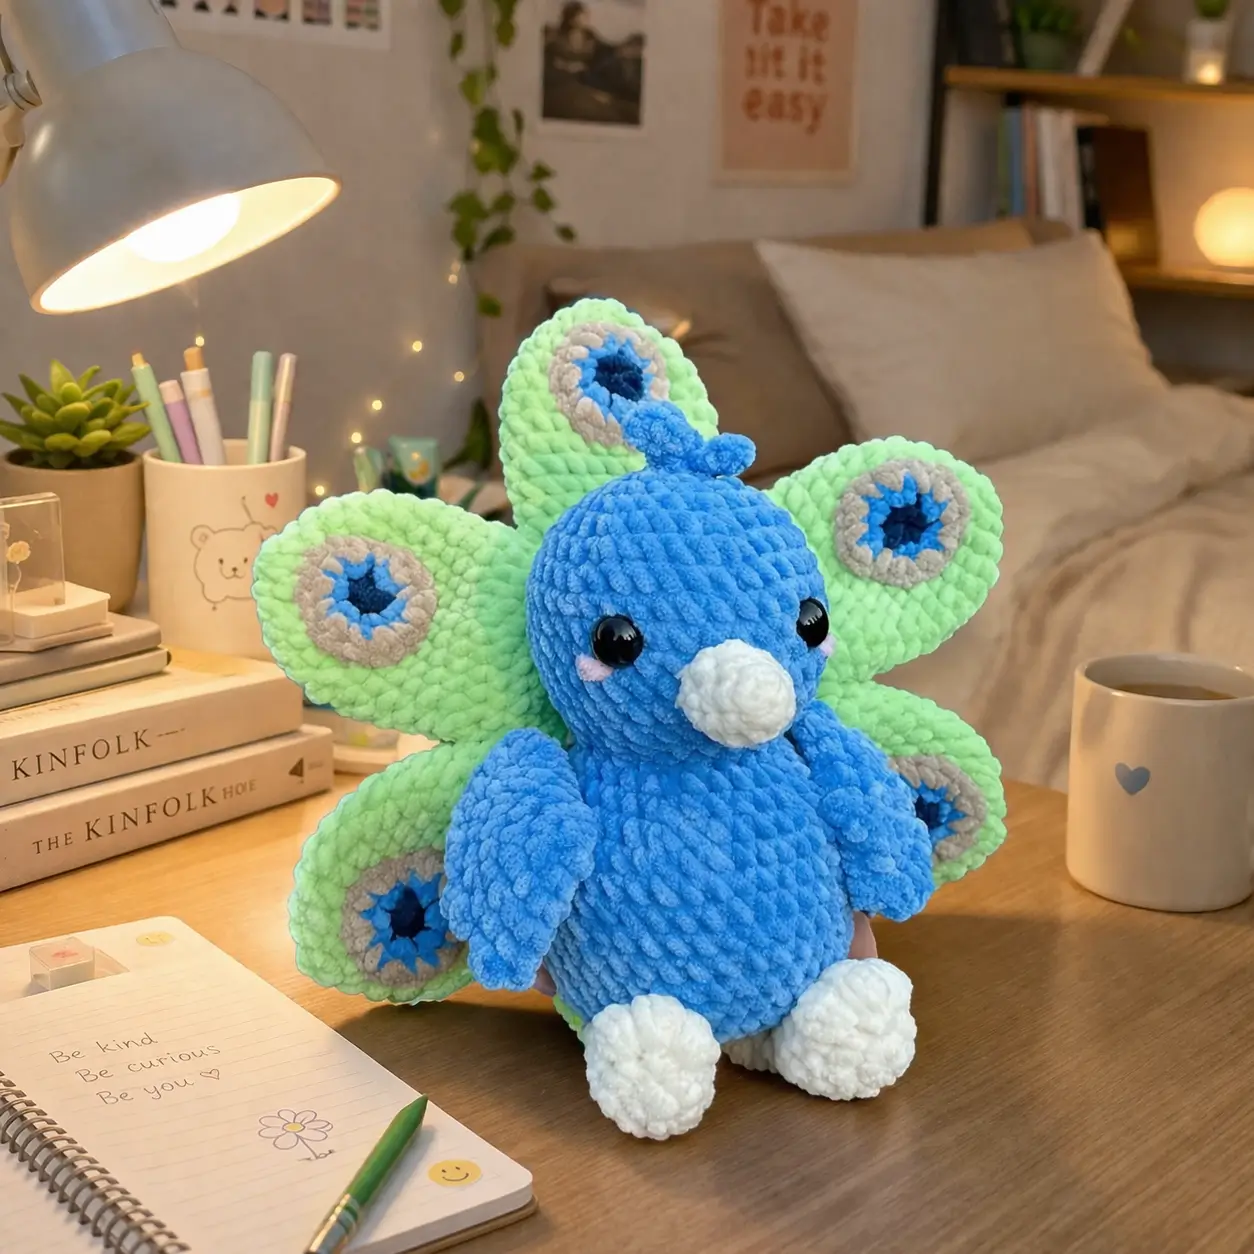
A peacock falls apart visually the moment the tail fan sits too low. That is the first engineering problem in this peacock amigurumi crochet pattern. You will build a chunky chenille version with a rounded body, separate feather panels, a short crest, and a protruding beak. The project suits an intermediate maker, lands around hand size in plush yarn, and works well as nursery decor or a shelf display.
The Design: What Makes This Peacock Different
The photo points to a plush-first peacock, not a realistic one. The head and body read as one continuous soft mass, which keeps the bird stable once the tail is attached. A second decision is the fan tail: six separate feather paddles give width without the drape and drag of a single oversized semicircle. That matters because peacock crochet plush designs often tip backward when the tail is built as one heavy sheet.
The third choice is facial simplification. A blunt beak, wide-set safety eyes, and flat cheek patches hold the kawaii look while keeping the front view clean. Many published peacock patterns online focus on slim necks, cotton yarn, and realistic feather layering instead. This version shifts toward a chenille crochet peacock pattern with a firmer silhouette and fewer fiddly joins. In keyword terms, it sits closer to a peacock amigurumi free pattern style rewrite than a naturalistic bird study.
Project Info at a Glance
| Skill Level | Time | Finished Size | Hook | Best For |
|---|---|---|---|---|
| Intermediate | 5–7 hours | Approx. 20–24 cm seated in chunky chenille; published cotton peacocks often land at 12–15 cm | 4.5–5.0 mm for chunky chenille adaptation | Shelf decor, nursery display, bird-themed gift |
Published peacock patterns commonly use 2.0–3.0 mm hooks with super fine or DK/cotton yarn, while general amigurumi hook guides place chunky and plush yarn builds several hook sizes higher.
Materials and Tools
Yarn
- Bright blue chenille — chunky/super bulky plush — about 120 g — Himalayan Dolphin Baby or similar
- Mint green chenille — chunky/super bulky plush — about 80 g — same line for tail feathers
- Cream chenille — chunky/super bulky plush — about 25 g — beak and feet
- Beige chenille — chunky/super bulky plush — about 15 g — feather eye rings
- Dark blue chenille — chunky/super bulky plush — about 10 g — feather eye centers
- Pale pink chenille or felt — very small amount — cheek patches
Tools
- Hook 4.5 mm
- Safety eyes 12 mm
- Polyfill stuffing
- Yarn needle
- Stitch markers
- Pins or clips
For comparison, published peacock patterns in lighter yarns often use 5–9 mm eyes and 2.0–3.0 mm hooks; this plush adaptation scales those choices upward to match chenille bulk and the photo proportions.
Abbreviations
MR / sc / inc / dec / sl st / ch / BLO / FO = fasten off
Use invisible decrease for all visible shaping rounds so the head, body, and feather edges stay cleaner on plush yarn.
Pattern — Step by Step
Continuous spiral unless noted.
Head (Make 1)
Yarn: bright blue — Source: standard amigurumi math adapted to photo proportions
R1: 6 sc in MR (6)
R2: inc x6 (12)
R3: (sc, inc) x6 (18)
R4: (2 sc, inc) x6 (24)
R5: (3 sc, inc) x6 (30)
R6: (4 sc, inc) x6 (36)
R7-R12: sc around (36)
R13: (4 sc, dec) x6 (30)
R14: (3 sc, dec) x6 (24)
Insert 12 mm eyes between R10 and R11, about 7 stitches apart. Stuff firmly.
R15: (2 sc, dec) x6 (18)
FO. Leave a 20 cm tail.
Body (Make 1)
Yarn: bright blue — Source: standard amigurumi math adapted to photo proportions
R1: 6 sc in MR (6)
R2: inc x6 (12)
R3: (sc, inc) x6 (18)
R4: (2 sc, inc) x6 (24)
R5: (3 sc, inc) x6 (30)
R6: (4 sc, inc) x6 (36)
R7-R13: sc around (36)
R14: (4 sc, dec) x6 (30)
R15: sc around (30)
R16: (3 sc, dec) x6 (24)
Stuff the lower body heavily. Keep the back flatter than the belly so the tail sits against a broad surface.
R17: (2 sc, dec) x6 (18)
R18: sc around (18)
FO. Leave a 25 cm tail.
Wings (Make 2)
Yarn: bright blue — Source: standard amigurumi math adapted to photo proportions
R1: 6 sc in MR (6)
R2: inc x6 (12)
R3: (sc, inc) x6 (18)
R4-R6: sc around (18)
R7: (sc, dec) x6 (12)
Flatten. Crochet 6 sc through both sides to close.
Do not overstuff. A flat wing sits closer to the photo.
FO. Leave a 20 cm tail.
Arms / Front Feather Flaps (Make 2)
Yarn: bright blue — Source: photo analysis + standard amigurumi math
R1: 6 sc in MR (6)
R2: sc around (6)
R3: (sc, inc) x3 (9)
R4-R5: sc around (9)
Flatten lightly.
FO. Leave a 15 cm tail.
Back Legs / Feet Base (Make 2)
Yarn: cream — Source: standard amigurumi math adapted to photo proportions
R1: 6 sc in MR (6)
R2: inc x6 (12)
R3-R4: sc around (12)
R5: (sc, dec) x4 (8)
Stuff lightly. Shape into a rounded oval, not a ball.
FO. Leave a 20 cm tail.
Crest (Make 2 strands attached together)
Yarn: bright blue — Source: photo analysis
Ch 5, sl st in 2nd ch from hook and in next 3 ch.
Repeat once more from the base point.
FO. Leave a 10 cm tail.
Beak (Make 1)
Yarn: cream — Source: standard amigurumi math adapted to photo proportions
R1: 6 sc in MR (6)
R2: (sc, inc) x3 (9)
R3: sc around (9)
R4: (2 sc, inc) x3 (12)
R5-R6: sc around (12)
Stuff very lightly. The beak in the photo is blunt and rounded, not pointed.
FO. Leave a 20 cm tail.
Cheek Patches (Make 2)
Yarn: pale pink — Source: photo analysis
R1: 6 sc in MR (6)
Sl st to first stitch.
FO. Leave a short tail.
Tail Feathers, Mint Base (Make 6)
Yarn: mint green — Source: published peacock patterns confirm separate feather construction; shape adapted to photo
R1: 6 sc in MR (6)
R2: inc x6 (12)
R3: (sc, inc) x6 (18)
R4: (2 sc, inc) x6 (24)
R5-R9: sc around (24)
R10: (2 sc, dec) x6 (18)
R11-R14: sc around (18)
Flatten slightly. Do not stuff.
FO. Leave a 25 cm tail.
Tail Eye Ring, Beige (Make 6)
Yarn: beige — Source: photo analysis
R1: 6 sc in MR (6)
R2: inc x6 (12)
R3: (sc, inc) x6 (18)
FO. Leave a 15 cm tail.
Tail Eye Burst, Blue (Make 6)
Yarn: medium blue — Source: photo analysis
R1: 6 sc in MR (6)
R2: (sc, inc) x3 (9)
FO. Leave a 10 cm tail.
Tail Eye Center, Dark Blue (Make 6)
Yarn: dark blue — Source: photo analysis
R1: 6 sc in MR (6)
FO. Leave a short tail.
Tail Base Join Strip (Make 1)
Yarn: mint green — Source: photo analysis
Ch 16.
Row 1: sc in 2nd ch from hook and across (15)
Row 2-3: ch 1, turn, sc across (15)
FO. Leave a 25 cm tail.
Assembly
- Sew the head to the body with the head tilted slightly forward.
- Attach the beak centered between the eyes, covering roughly rounds 11–14 of the head.
- Stitch the cheek patches just below the eyes and slightly outward from the beak line.
- Sew the crest to the top center of the head.
- Attach the wings to the upper sides of the body, one round below the neck join.
- Add the smaller front feather flaps in front of the wings, angled inward.
- Sew the feet to the lower front of the body so the plush can sit with a slight backward lean.
- Stitch each dark blue center onto a blue burst, then onto a beige ring, then onto a mint feather panel.
- Arrange the six feather panels in a fan on the join strip, then sew the strip to the back of the body.
- Adjust the tail angle upward before locking the last stitches and weave in all tails.
The plush should finish with the body acting as the weight anchor and the tail acting as a visual frame.
7 Technical Tips
- Mark the first stitch of every round on the head and body. Plush yarn hides round breaks fast, and one missed marker can shift the eye line by a full stitch column.
- Stuff the head firmer than the body. A soft head collapses under the beak seam and makes the eyes rotate inward.
- Use invisible decreases on all visible shaping rounds. Standard decreases leave ridges that show clearly on chenille, especially along the forehead and belly.
- Insert the eyes before the final head decreases. Past the 24-stitch stage, safety-eye washers become harder to seat cleanly through plush fibers.
- Pin the six tail feathers before sewing. Even a 5 mm mismatch in spacing reads immediately because the peacock fan is supposed to look radial.
- Keep the tail feathers unstuffed. Filled panels become thick, heavy, and more likely to pull the body backward.
- Weave yarn tails at least 4 cm through internal stuffing paths. Short tail finishes slip more often in velvet yarn because the surface friction is lower than cotton.
Conclusion
This peacock amigurumi crochet pattern works because the tail is treated as a controlled fan, not a blanket hanging off the back. Build the feather panels first, check the spacing dry, then attach them only after the body can sit on its own. That sequence reduces assembly drift. Save the finished piece to Pinterest, post the result on Instagram, and tag the build with #PlushPeacockPattern. Before you close the last seam, check one detail: does your crest sit exactly between the first and second tail feathers when viewed from the front? That alignment decides whether the peacock reads balanced or off-center.









