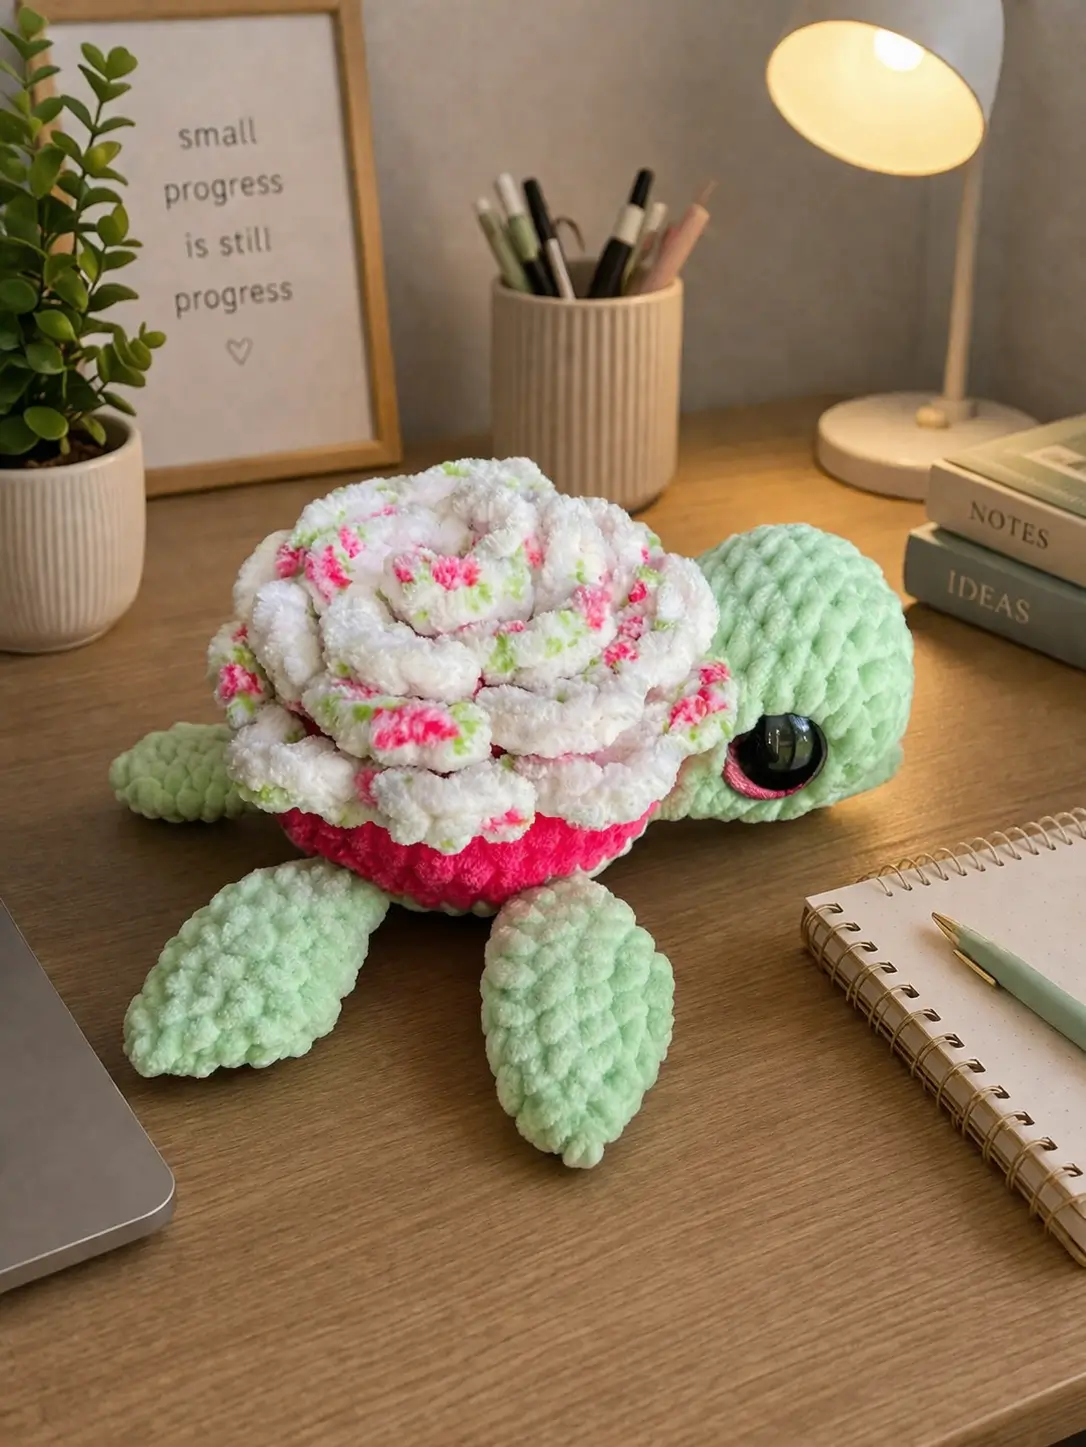
Sea turtles do not carry stacked petals on their backs. That is the first shape problem this flower turtle amigurumi has to solve. This plush design uses super bulky chenille yarn, a 4 mm hook, and oversized safety eyes to build a toy around 16 cm long. Skill level sits at advanced beginner to intermediate. The result works well as a gift, market item, or spring display piece.
The Design: What Makes Peony Turtle Different
A standard turtle shell is a dome. A peony shell is a layered mass, so the shell base has to stay broad and stable before the petals go on. That is why the body in comparable flower-turtle patterns expands to 40 stitches before closing; the wide platform prevents the blossom from tipping the head downward.
The flippers matter too. Short, flat paddles read more like a sea turtle than stubby bear legs, and they spread the visual weight under the flower. In a rose turtle crochet pattern or crochet turtle with flower shell, that proportion is what stops the toy from looking like a round plush with random petals. Common mistake: making the head too large. Then the turtle starts reading as frog-like from the side instead of marine.
Project Info at a Glance
| Skill Level | Time | Finished Size | Hook | Best For |
|---|---|---|---|---|
| Advanced beginner / intermediate | About 1–2 hours in plush yarn | 16 cm | 4.0 mm | Gifts, markets, spring decor |
Materials and Tools
Yarn
- Mint green — super bulky plush chenille — about 20–25 g — Premier Parfait Chunky or similar
- Hot pink — super bulky plush chenille — about 25–30 g — for shell base
- White with pink/lime speckles — super bulky plush chenille — about 30–35 g — for layered peony petals
- Soft pink — small amount — for eye surround / cheek accent
Tools
- Hook 4.0 mm
- Safety eyes 20 or 25 mm
- Polyester stuffing
- Tapestry needle
- Stitch markers
- Scissors
Abbreviations
- MR = magic ring
- sc = single crochet
- inc = increase
- dec = invisible decrease
- sl st = slip stitch
- ch = chain
- BLO = back loop only
- hdc = half double crochet
- dc = double crochet
- FO = fasten off
Invisible decrease keeps the plush surface flatter than a standard decrease, which matters on chenille where open gaps show stuffing.
Pattern — Step by Step
Continuous spiral unless noted. This is an original photo-matched pattern built with standard amigurumi count logic and plush proportions, while the material range and size target follow verified flower-turtle sources.
Head (Make 1)
Yarn: mint green — Source: standard amigurumi math
R1: 6 sc in MR (6)
R2: inc ×6 (12)
R3: (sc, inc) ×6 (18)
R4: (2 sc, inc) ×6 (24)
R5: (3 sc, inc) ×6 (30)
R6–9: sc around (30) [4 rounds]
R10: (3 sc, dec) ×6 (24)
Insert 20–25 mm safety eyes between R7 and R8, about 8 sts apart.
R11: sc around (24)
R12: (2 sc, dec) ×6 (18)
Stuff firmly at the snout, lighter toward the neck.
R13: (sc, dec) ×6 (12)
R14: dec ×6 (6)
Fasten off. Leave a 25 cm tail.
Body Base (Make 1)
Yarn: hot pink — Source: standard amigurumi math adapted to verified 40-st body scale in flower-turtle patterns
R1: 6 sc in MR (6)
R2: inc ×6 (12)
R3: (sc, inc) ×6 (18)
R4: (2 sc, inc) ×6 (24)
R5: (3 sc, inc) ×6 (30)
R6: (4 sc, inc) ×6 (36)
R7: (5 sc, inc) ×6 (42)
R8–9: sc around (42) [2 rounds]
R10: BLO sc around (42)
This back-loop round creates a clean ledge for the petal cap to sit on.
R11: (5 sc, dec) ×6 (36)
R12: sc around (36)
Pause before closing. Add tail and flippers first.
Do not fasten off.
Front Flippers (Make 2)
Yarn: mint green — Source: standard amigurumi math
R1: 6 sc in MR (6)
R2: inc ×6 (12)
R3: (sc, inc) ×6 (18)
R4–5: sc around (18) [2 rounds]
R6: (sc, dec) ×6 (12)
R7: sc around (12)
Flatten. Crochet 6 sc through both layers (6).
Fasten off. Leave 18 cm tail for sewing.
Back Flippers (Make 2)
Yarn: mint green — Source: standard amigurumi math
R1: 6 sc in MR (6)
R2: inc ×6 (12)
R3: (sc, inc) ×6 (18)
R4: sc around (18)
R5: (sc, dec) ×6 (12)
R6: sc around (12)
Flatten. Crochet 6 sc through both layers (6).
Fasten off. Leave 18 cm tail.
Tail (Make 1)
Yarn: mint green — Source: inspired by verified flower-turtle tail method
R1: 4 sc in MR (4)
R2: sc around (4)
R3: (sc, inc) ×2 (6)
R4: sc around (6)
R5: dec, 2 sc, dec (4)
Fasten off. Leave 12 cm tail.
Eye Surround / Cheek Patches (Make 2)
Yarn: soft pink — Source: standard amigurumi math
R1: 6 sc in MR (6)
R2: inc ×6 (12)
sl st to first stitch.
Fasten off. Leave 15 cm tail.
Peony Petal Base Disc (Make 1)
Yarn: white speckled plush — Source: standard amigurumi math
R1: 6 sc in MR (6)
R2: inc ×6 (12)
R3: (sc, inc) ×6 (18)
R4: (2 sc, inc) ×6 (24)
R5: (3 sc, inc) ×6 (30)
R6: (4 sc, inc) ×6 (36)
R7: (5 sc, inc) ×6 (42)
Fasten off. Leave 25 cm tail.
Inner Peony Petals (Make 6)
Yarn: white speckled plush — Source: standard petal shaping
Ch 5.
Row 1: starting in 2nd ch from hook, sc, hdc, dc, sl st.
Work a sl st back into the base ring or disc edge where placed.
Fasten off for each petal, or work continuously if preferred. Leave short tails.
Middle Peony Petals (Make 12)
Yarn: white speckled plush — Source: standard petal shaping
Ch 6.
Row 1: starting in 2nd ch from hook, sc, hdc, dc, dc, sl st.
Fasten off. Leave short tails.
Outer Peony Petals (Make 18)
Yarn: white speckled plush — Source: standard petal shaping
Ch 7.
Row 1: starting in 2nd ch from hook, sc, hdc, dc, dc, hdc, sl st.
Fasten off. Leave short tails.
Optional Center Knot (Make 1)
Yarn: white speckled plush
R1: 6 sc in MR (6)
R2: sc around (6)
Fasten off. Leave 10 cm tail.
Assembly
- Sew the head to the front of the body over R10–R12 of the body base. Angle it slightly upward so the flower does not visually crush the face.
- Stitch the front flippers to the lower sides, about 6 stitches apart from the head base.
- Attach the back flippers one round farther back than the front pair. Keep them flatter and slightly wider apart.
- Sew the tail centered at the back between the rear flippers.
- Add the pink eye surrounds first, then install or secure the eyes through them if not already fixed.
- Stuff the body until it is firm at the lower edge but still compressible at the top center.
- Close the remaining body opening: R13: (4 sc, dec) ×6 (30), R14: (3 sc, dec) ×6 (24), R15: (2 sc, dec) ×6 (18), R16: (sc, dec) ×6 (12), R17: dec ×6 (6). Fasten off and close.
- Position the peony base disc over the shell ledge and sew it down around the outer edge only.
- Stitch the outer petals in the back third first, then the middle ring, then the inner ring. Overlap each layer so the hot pink base shows slightly underneath.
- Sew the center knot into the middle and fluff the petals by hand.
The finished piece should sit low, with the blossom centered between the flippers and head.
7 Technical Tips
- Mark round starts from the first stitch. Plush yarn hides the turning point fast, and missing one stitch on a 42-st round throws off the shell symmetry.
- Do not overstuff the head. A head packed hard at the neck pushes forward and drags the face downward once sewn.
- Use invisible decreases on all visible shaping rounds. Standard decreases leave wider holes, and chenille shows fiberfill through them.
- Place eyes before the final third of the head is closed. On this size, install them around R7–R8 or access becomes cramped.
- Keep petal tension one step looser than body tension. Tight petals curl into spikes instead of rounded peony folds.
- Pin the petal disc in four compass points first. Without north-south-east-west anchoring, the flower drifts off center by 1–2 stitches and the shell looks lopsided.
- Weave tails through at least 3 direction changes. Plush yarn sheds grip, so a straight buried tail can slip out after handling.
Conclusion
This version of the flower turtle amigurumi works because the turtle shape stays readable even after the shell turns into a dense peony. The broad body, flat flippers, and compact head keep the proportions stable, while plush chenille yarn gives the petals enough volume to stack. Next step: swatch one petal in your chosen yarn before committing to the full shell, then build the body to match. Share the finished turtle on Pinterest and Instagram with #FlowerTurtlePeony. One question remains useful for this specific design: did your outer petals sit flatter when sewn to round 7, or did they need a slight upward tilt?









