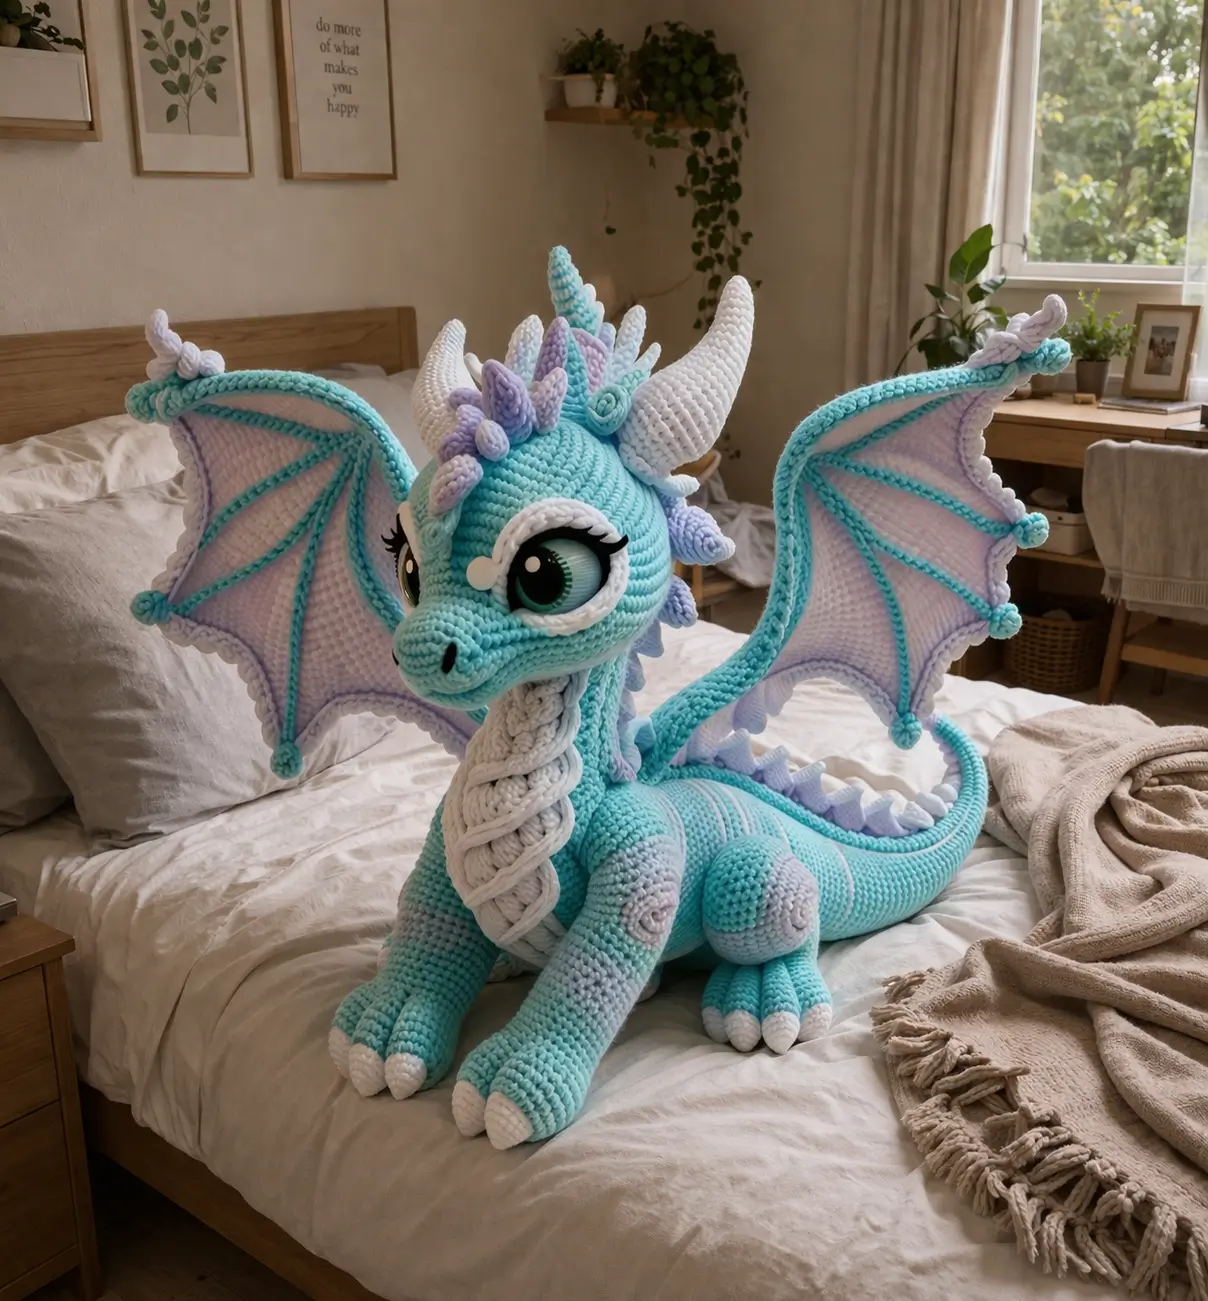
A dragon that has to sit upright with full spread wings needs the tail to act like a third support point. This dragon amigurumi crochet pattern is built for that job, using chunky plush yarn, a 5 mm hook, and an intermediate construction plan to produce a display piece about 50 cm tall. It works well as nursery decor, shelf decor, or a statement gift.
The Design: What Makes This Dragon Different
This version uses a long body cylinder instead of a compact egg body because the photo shows a stretched torso and a tail that curves around the front line of the piece. That tail is not decorative. It shifts weight backward and stabilizes the seated pose. The second decision is the wing scale. A standard fantasy dragon amigurumi often keeps wings small for easier sewing, but this pastel dragon crochet pattern needs broad membranes and a firm outer edge so the silhouette reads correctly from a distance. The third decision is the face. Oversized eye surrounds and a separate snout create the juvenile look that many dragon roundup patterns do not address. One common failure appears in large crochet dragon wings pattern attempts: makers attach the wings too low, which forces the neck forward and makes the whole figure look compressed.
Project Info at a Glance
| Skill Level | Time | Finished Size | Hook | Best For |
|---|---|---|---|---|
| Intermediate | 14–18 hours | Approx. 50 cm seated, photo-inspired scale | 5.0 mm | Display plush, nursery decor, fantasy gift |
Materials and Tools
Yarn
- Aqua plush yarn — super bulky/chunky — approx. 450 g — Himalaya Dolphin Baby or similar
- White plush yarn — super bulky/chunky — approx. 180 g — for horns, chest braid, claws, eye surrounds, belly
- Pale lavender plush yarn — super bulky/chunky — approx. 160 g — for wing lining and dorsal spikes
- Turquoise cotton or smooth acrylic — light worsted — approx. 40 g — for wing vein edging
- Black yarn or embroidery thread — small amount — nostrils and lash details
Tools
- Hook 5.0 mm
- Safety eyes 12 mm under crocheted eye surrounds for structure benchmarks seen in comparable dragon patterns
- Polyfill stuffing
- Tapestry needle
- Stitch markers
- Pins
- Optional florist wire for wing edge support
Abbreviations
MR = magic ring, sc = single crochet, inc = increase, dec = invisible decrease, sl st = slip stitch, ch = chain, BLO = back loop only, hdc = half double crochet, dc = double crochet. Invisible decrease keeps the front surface tighter than a standard decrease, which matters most at the snout, tail base, and upper thighs.
Pattern — Step by Step
Continuous spiral unless noted.
Head (Make 1)
Yarn: aqua
- R1: 6 sc in MR (6)
- R2: inc x6 (12)
- R3: (sc 1, inc) x6 (18)
- R4: (sc 2, inc) x6 (24)
- R5: (sc 3, inc) x6 (30)
- R6: (sc 4, inc) x6 (36)
- R7: (sc 5, inc) x6 (42)
- R8-R14: sc around (42)
- R15: (sc 5, dec) x6 (36)
- R16: (sc 4, dec) x6 (30)
- R17: (sc 3, dec) x6 (24)
- Stuff firmly before closing.
- R18: (sc 2, dec) x6 (18)
- R19: (sc 1, dec) x6 (12)
- R20: dec x6 (6)
Fasten off. Leave 20 cm tail.
Snout (Make 1)
Yarn: aqua
- R1: 6 sc in MR (6)
- R2: inc x6 (12)
- R3: (sc 1, inc) x6 (18)
- R4-R5: sc around (18)
- R6: (sc 1, dec) x6 (12)
Fasten off. Leave 25 cm tail.
Embroider nostrils before sewing. Attach centered on lower front head.
Eye Surrounds / Cheek Patches (Make 2)
Yarn: white
- R1: 6 sc in MR (6)
- R2: inc x6 (12)
- R3: (sc 1, inc) x6 (18)
- R4: (sc 2, inc) x6 (24)
- Sl st to close.
Fasten off. Leave 20 cm tail.
Sew around mounted eyes or appliqué eyes.
Horns (Make 2)
Yarn: white
- R1: 6 sc in MR (6)
- R2: sc around (6)
- R3: (sc 2, inc) x2 (8)
- R4-R5: sc around (8)
Fasten off. Leave 18 cm tail.
Do not overstuff.
Crest Spikes (Make 8 small, 1 large)
Yarn: lavender
Small spike:
- R1: 4 sc in MR (4)
- R2: sc around (4)
- R3: (sc 1, inc) x2 (6)
- R4: sc around (6)
Fasten off.
Large center spike:
- R1: 6 sc in MR (6)
- R2: sc around (6)
- R3: (sc 2, inc) x2 (8)
- R4-R5: sc around (8)
Fasten off.
Body (Make 1)
Yarn: aqua
- R1: 6 sc in MR (6)
- R2: inc x6 (12)
- R3: (sc 1, inc) x6 (18)
- R4: (sc 2, inc) x6 (24)
- R5: (sc 3, inc) x6 (30)
- R6: (sc 4, inc) x6 (36)
- R7: (sc 5, inc) x6 (42)
- R8-R15: sc around (42)
- R16: (sc 5, dec) x6 (36)
- R17-R20: sc around (36)
- R21: (sc 4, dec) x6 (30)
- R22-R24: sc around (30)
Fasten off. Leave 30 cm tail.
Stuff very firmly through R20, then moderate stuffing at neck edge.
Belly Panel (Make 1)
Yarn: white
- Row 1: ch 9, sc in 2nd ch from hook and across (8)
- Rows 2-10: ch 1, turn, sc across (8)
- Row 11: ch 1, turn, dec, sc 4, dec (6)
Fasten off. Leave 25 cm tail.
Front Legs / Arms (Make 2)
Yarn: aqua
- R1: 6 sc in MR (6)
- R2: (sc 1, inc) x3 (9)
- R3-R9: sc around (9)
- R10: (sc 1, dec) x3 (6)
- R11-R12: sc around (6)
Fasten off. Leave 25 cm tail.
Stuff lower half only. Add three white claw tips when sewing.
Back Legs (Make 2)
Yarn: aqua
- R1: 6 sc in MR (6)
- R2: inc x6 (12)
- R3: (sc 1, inc) x6 (18)
- R4-R5: sc around (18)
- R6: (sc 1, dec) x6 (12)
- R7-R10: sc around (12)
- R11: (sc 2, dec) x3 (9)
- R12-R13: sc around (9)
Fasten off. Leave 30 cm tail.
Stuff foot and lower leg firmly; upper section medium.
Feet Claws (Make 10)
Yarn: white
- R1: 4 sc in MR (4)
- R2: sc around (4)
Fasten off.
Sew three to each back foot and two to each front foot, or embroider substitutes if preferred.
Tail (Make 1)
Yarn: aqua
- R1: 6 sc in MR (6)
- R2: sc around (6)
- R3: (sc 2, inc) x2 (8)
- R4-R5: sc around (8)
- R6: (sc 3, inc) x2 (10)
- R7-R8: sc around (10)
- R9: (sc 4, inc) x2 (12)
- R10-R12: sc around (12)
- R13: (sc 5, inc) x2 (14)
- R14-R18: sc around (14)
- R19: (sc 6, inc) x2 (16)
- R20-R28: sc around (16)
Fasten off. Leave 35 cm tail.
Stuff lightly toward tip, firmly at base. Curve before final closing.
Wings (Make 2)
Yarn: lavender inner membrane, aqua outer edge, turquoise vein overlay
- Row 1: ch 2, 2 sc in 2nd ch from hook (2)
- Row 2: ch 1, turn, inc x2 (4)
- Row 3: ch 1, turn, inc, sc 2, inc (6)
- Row 4: ch 1, turn, inc, sc 4, inc (8)
- Row 5: ch 1, turn, inc, sc 6, inc (10)
- Row 6: ch 1, turn, inc, sc 8, inc (12)
- Row 7: ch 1, turn, inc, sc 10, inc (14)
- Row 8: ch 1, turn, inc, sc 12, inc (16)
- Row 9: ch 1, turn, inc, sc 14, inc (18)
- Row 10: ch 1, turn, inc, sc 16, inc (20)
- Edging: sc evenly around in aqua, making 3 sc in each corner.
- Veins: surface crochet 4 radiating turquoise lines from lower inside corner to outer edge.
Fasten off. Leave 30 cm tail.
For a stiffer display wing, sandwich light craft wire under the aqua edge.
Dorsal Spikes (Make 10)
Yarn: lavender
- R1: 4 sc in MR (4)
- R2: sc around (4)
- R3: (sc 1, inc) x2 (6)
Fasten off.
Sew from crown to tail base.
Braided Chest Beard / Neck Mane (Make 3 strands)
Yarn: white
- Ch 36 for each strand.
- Row 1: sl st in 2nd ch from hook and across.
- Make 3 strands. Braid loosely and knot ends.
Fasten off. Leave long tails for sewing.
Sew from chin to upper chest.
Assembly
- Sew the snout to the lower front of the head.
- Insert or attach the eyes, then sew the white eye surrounds in place.
- Attach the horns to the top of the head, angled slightly outward.
- Sew the large crest spike between the horns, then add the remaining spikes down the back of the head.
- Sew the head to the body, matching the 30-stitch neck opening.
- Attach the belly panel to the front body.
- Sew on the front legs first, then the back legs, checking that the seated base stays level.
- Attach the tail low on the back body and curve it forward to help support the pose.
- Sew the wings high on the back, just behind the neck line.
- Attach the braided chest beard, then add claws, nostrils, and final shaping. The finished dragon should sit without tipping when the tail and back legs share the load.
7 Technical Tips
- Mark round 1 on every major piece. Losing the first increase round on a 42-stitch head changes symmetry by 6 stitches and throws off the snout centerline.
- Pack the lower body harder than the neck. A soft base collapses under wing weight and shifts the dragon backward.
- Use invisible decrease on the head, thighs, and tail base. Standard decreases leave a stepped ridge that shows badly in plush yarn.
- Install eyes before the final head closure. On heads above 36 stitches, late eye insertion often distorts the fabric and widens the face unevenly.
- Keep wing tension tighter than body tension. Loose wing rows ripple at the membrane edge and reduce the clean bat-wing outline.
- Pin both wings before sewing either one permanently. A height difference of even 1 row is obvious on a symmetrical dragon.
- Weave tails through a second anchor path before trimming. Large plush pieces pull harder at joins, especially where the tail braces the body.
Conclusion
This dragon amigurumi crochet pattern works because the structure answers the pose. The tail supports the seated body, the wings sit high enough to keep the torso open, and the separate face pieces control expression better than shaping alone. Follow the pattern in assembly order, pin the wings before committing, and check balance before the final tail seam. After finishing, photograph the dragon from the front and side, then save one image for Pinterest and one for Instagram with #LargePastelDragonPattern. For this specific dragon type, the useful question is simple: did you place the tail low enough to keep the wings from pulling the body backward?









