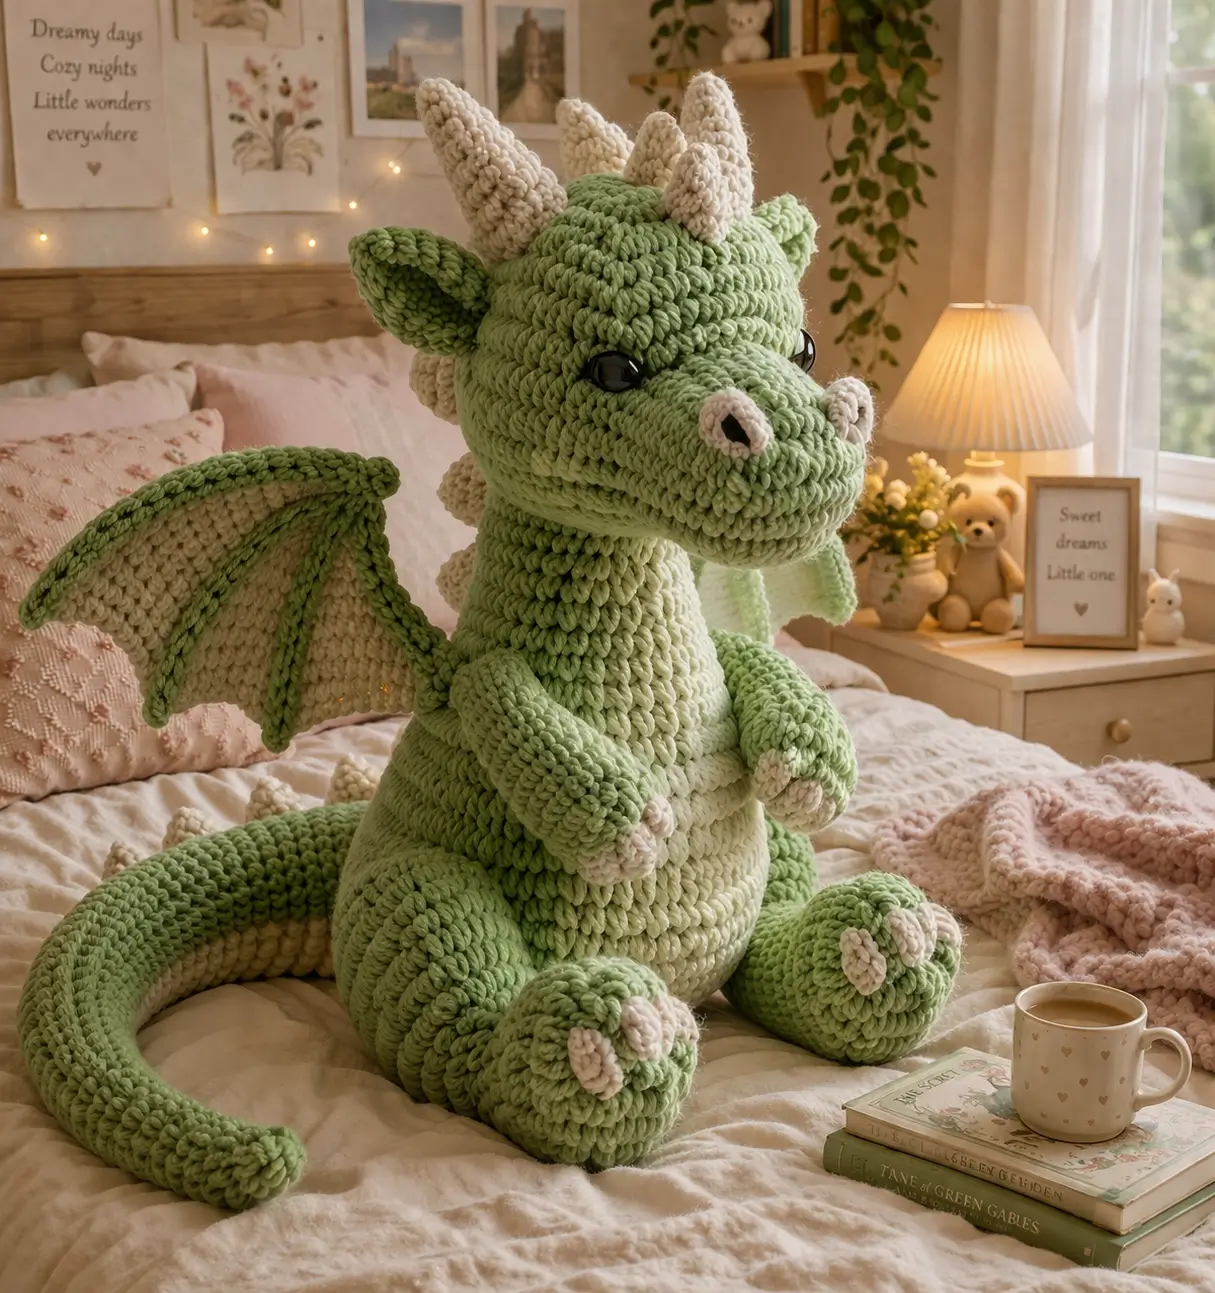
Four cream horns on a sage-green dragon shift the visual weight upward before the first stitch is made. This dragon amigurumi crochet pattern is built for plush yarn, a 5.5 mm hook, roughly 30 cm finished height, and an intermediate maker who needs a stable sitting shape with wings, claws, and a counterweight tail. It works as nursery decor because the silhouette reads clearly from across a room.
The Design: What Makes This Dragon Different
You are not building a generic round animal here. The long snout changes center of gravity, so the body has to sit back slightly and the tail has to act like a brace. The wings also matter more than decoration. On a plush dragon, oversized wings can pull backward unless the shoulder seam is kept high and narrow, which is why row-built wing panels work well for this shape. The horns need contrast and restraint too; smaller cream points read cleaner than oversized cones. In most dragon amigurumi free pattern results, either the snout is short or the plush scale is small. This version follows the photo more closely with a broader head, raised nostril pads, and a sitting posture that lets the dragon crochet plush hold its line on a bed or shelf. A common mistake is setting the legs too high, which forces the body to pitch forward.
Project Info at a Glance
| Skill Level | Time | Finished Size | Hook | Best For |
|---|---|---|---|---|
| Intermediate | 8–10 hrs | 30 cm reference plush | 5.5 mm | Nursery shelf, photo prop, large gift |
Materials and Tools
Yarn
- Sage green plush yarn — super bulky chenille-style — about 300 g — Bernat Blanket or similar plush yarn
- Pale green plush yarn — super bulky chenille-style — about 120 g
- Cream plush yarn — super bulky chenille-style — about 80 g
Tools
- Hook 5.5 mm
- 20 mm safety eyes
- Polyfill stuffing
- Yarn needle
- Stitch markers
- Straight pins
Abbreviations
MR = magic ring; sc = single crochet; inc = increase; dec = invisible decrease; sl st = slip stitch; ch = chain; BLO = back loop only; FO = fasten off; hdc = half double crochet; dc = double crochet.
Use invisible decrease in all shaping rounds so the plush surface stays cleaner and the gaps around stuffing stay smaller.
Pattern — Step by Step
Continuous spiral unless noted. This is a photo-led adaptation written with standard amigurumi stitch math and shaped to match the dragon in the image.
Head
Yarn: sage green plush
R1: 6 sc in MR (6)
R2: inc x6 (12)
R3: (sc 1, inc) x6 (18)
R4: (sc 2, inc) x6 (24)
R5: (sc 3, inc) x6 (30)
R6: (sc 4, inc) x6 (36)
R7: (sc 5, inc) x6 (42)
R8-R13: sc around (42)
R14: (sc 5, dec) x6 (36)
R15: (sc 4, dec) x6 (30)
Insert eyes between R10 and R11, about 8 stitches apart. Stuff firmly at forehead and cheeks.
R16: (sc 3, dec) x6 (24)
R17: (sc 2, dec) x6 (18)
R18: (sc 1, dec) x6 (12)
R19: dec x6 (6)
Fasten off. Leave a 25 cm tail.
Snout
Yarn: sage green plush
R1: 6 sc in MR (6)
R2: inc x6 (12)
R3: (sc 1, inc) x6 (18)
R4-R7: sc around (18)
R8: (sc 1, dec) x6 (12)
R9: sc around (12)
Stuff lightly. Flatten opening.
Fasten off. Leave a 30 cm tail.
Nostril Pads / Cheek Patches (Make 2)
Yarn: cream plush
R1: 6 sc in MR (6)
R2: inc x6 (12)
R3: sc around (12)
Fasten off. Leave a 15 cm tail.
Horns (Make 4)
Yarn: cream plush
R1: 6 sc in MR (6)
R2: sc around (6)
R3: (sc 2, inc) x2 (8)
R4: sc around (8)
R5: (sc 3, inc) x2 (10)
R6: sc around (10)
Stuff very lightly.
Fasten off. Leave a 20 cm tail.
Ears (Make 2)
Yarn: sage green plush
R1: 6 sc in MR (6)
R2: (sc 1, inc) x3 (9)
R3: (sc 2, inc) x3 (12)
R4: (sc 3, inc) x3 (15)
R5: sc around (15)
R6: (sc 3, dec) x3 (12)
R7-R8: sc around (12)
Flatten. Do not stuff.
Fasten off. Leave a 22 cm tail.
Body
Yarn: pale green plush
R1: 6 sc in MR (6)
R2: inc x6 (12)
R3: (sc 1, inc) x6 (18)
R4: (sc 2, inc) x6 (24)
R5: (sc 3, inc) x6 (30)
R6: (sc 4, inc) x6 (36)
R7: (sc 5, inc) x6 (42)
R8-R13: sc around (42)
R14: (sc 5, dec) x6 (36)
R15: (sc 4, dec) x6 (30)
R16: (sc 3, dec) x6 (24)
Stuff the lower half firmly. Keep the upper chest slightly softer so the head seats cleanly.
R17: (sc 2, dec) x6 (18)
R18: (sc 1, dec) x6 (12)
R19: dec x6 (6)
Fasten off. Leave a 30 cm tail.
Belly Panel
Yarn: cream plush
Row 1: ch 7, sc in 2nd ch from hook and across (6)
Row 2: ch 1, turn, sc across (6)
Row 3: ch 1, turn, sc across (6)
Row 4: ch 1, turn, sc across (6)
Row 5: ch 1, turn, sc across (6)
Row 6: ch 1, turn, dec, sc 2, dec (4)
Fasten off. Leave a 20 cm tail.
Arms / Front Legs (Make 2)
Yarn: sage green plush, cream claws
With cream:
R1: 6 sc in MR (6)
Change to sage green.
R2: sc around (6)
R3: (sc 1, inc) x3 (9)
R4-R8: sc around (9)
R9: (sc 1, dec) x3 (6)
R10-R11: sc around (6)
Stuff lightly at paw only. Flatten top.
Fasten off. Leave a 25 cm tail.
Back Legs (Make 2)
Yarn: sage green plush, cream claws
With cream:
R1: 6 sc in MR (6)
R2: inc x6 (12)
Change to sage green.
R3-R4: sc around (12)
R5: (sc 1, inc) x6 (18)
R6-R9: sc around (18)
R10: (sc 1, dec) x6 (12)
R11: sc around (12)
R12: (sc 2, dec) x3 (9)
Stuff foot firmly and thigh lightly. Flatten top.
Fasten off. Leave a 30 cm tail.
Tail
Yarn: sage green plush
R1: 6 sc in MR (6)
R2: sc around (6)
R3: (sc 2, inc) x2 (8)
R4: sc around (8)
R5: (sc 3, inc) x2 (10)
R6: sc around (10)
R7: (sc 4, inc) x2 (12)
R8: sc around (12)
R9: (sc 5, inc) x2 (14)
R10-R18: sc around (14)
Stuff gradually, but keep the final 4 cm softer so the tail can curve.
Fasten off. Leave a 35 cm tail.
Back Spikes (Make 7)
Yarn: cream plush
R1: 6 sc in MR (6)
R2: (sc 1, inc) x3 (9)
R3: sc around (9)
Fasten off. Leave a 12 cm tail.
Wings (Make 2)
Yarn: pale green inner wing, sage green border
With pale green:
Row 1: ch 2, 2 sc in 2nd ch from hook (2)
Row 2: ch 1, turn, inc x2 (4)
Row 3: ch 1, turn, inc, sc 2, inc (6)
Row 4: ch 1, turn, inc, sc 4, inc (8)
Row 5: ch 1, turn, inc, sc 6, inc (10)
Row 6: ch 1, turn, inc, sc 8, inc (12)
Do not stuff. Switch to sage green and sc evenly around the wing edge, working 3 pointed arches along one side to suggest bat-wing bones.
Fasten off. Leave a 30 cm tail.
Claws for Front Paws (Make 6)
Yarn: cream plush
R1: 4 sc in MR (4)
R2: sc around (4)
Fasten off. Leave a 10 cm tail.
Claws for Back Paws (Make 6)
Yarn: cream plush
R1: 4 sc in MR (4)
R2: sc around (4)
Fasten off. Leave a 10 cm tail.
Assembly
- Sew the snout to the front of the head, centered below the eyes.
- Attach the nostril pads to the snout front, one on each side, then embroider dark nostrils.
- Sew the four horns to the crown in two staggered pairs.
- Attach the ears slightly below the back horn line and angle them outward.
- Sew the head to the body with extra stuffing packed into the neck seam.
- Stitch the belly panel to the body front, centered.
- Sew the back legs low on the body so the feet project forward and the dragon sits without tipping.
- Attach the arms high on the chest so the paws rest over the belly.
- Sew the tail to the lower back, then add the spikes from crown to tail base.
- Attach the wings high on the back, close together at the top edge, and test the finished dragon on a flat surface.
The finished piece should sit upright with the tail acting as the rear stabilizer.
7 Technical Tips
- Mark the first stitch of every round. Plush yarn hides the spiral seam fast, and missing one increase will throw the 42-stitch head off by round 7.
- Stuff the forehead firmer than the jaw. A soft forehead lets 20 mm eyes sink inward and distorts the dragon profile.
- Put the safety eyes in before the final third of head closure. On dense chenille, forcing washers in after R16 can stretch visible holes around the eye posts.
- Keep the eyes about 8 stitches apart on this large version. Narrower spacing makes the snout look wider and flatter than the photo.
- Use invisible decrease, not a standard decrease. Plush fibers separate at the decrease point and make stuffing flash through.
- Pull just tight enough to close the stitch. Over-tightening velvet or chenille can snap the core thread.
- Pin the back legs before sewing. If the top edge sits above the lower third of the body, the dragon will roll forward instead of sitting.
- Test on a table before knotting tails. Two minutes here saves a full seam removal later.
- Leave the thigh area lightly stuffed. A hard leg cylinder cannot flatten against the body and creates gaps at the side seam.
- Pack the paw section firmly. That contrast helps the foot hold its rounded shape.
- Keep wing attachment narrow. If you sew more than about 5 cm of the wing root flat to the back, the wing loses lift and reads like a cape.
- Set the top corners close together. Dragons look broader through the shoulders when the wing roots start high.
- Weave every tail through at least three direction changes. Plush yarn grips poorly when a tail runs in one straight path.
- Trim only after tug-testing the seam. Tail pullout on chenille is a common late-stage failure.
Conclusion
The key to this dragon amigurumi crochet pattern is proportion, not ornament. Keep the head broad, the snout separate, the wings high, and the back legs low enough to support a true sitting pose. Start by crocheting the head and one back leg first, then check scale before cutting all remaining yarn. Once finished, photograph the dragon from the front and side, then share it on Pinterest and Instagram with #SageDragon so the wing angle and horn spacing are visible. One question matters on this build: did you place the tail low enough to stop the snout from pulling the dragon forward in your dragon amigurumi crochet pattern?









