Introduction
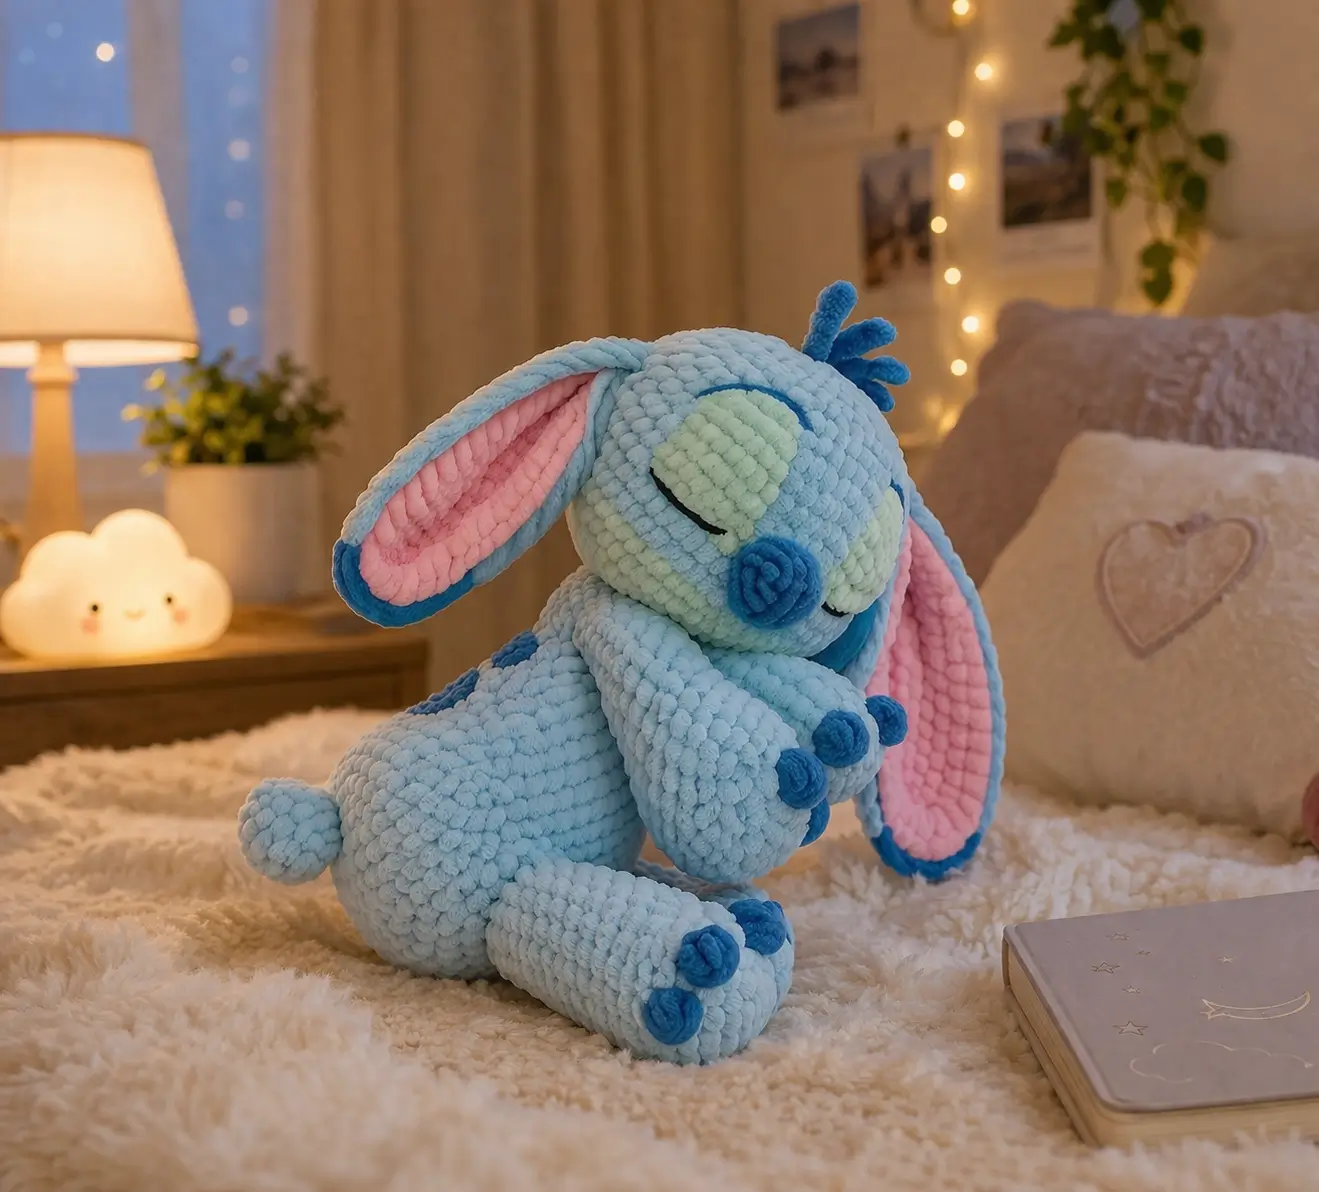
Stitch’s ears are wider than his torso. That proportion decides the whole build. This Stitch amigurumi crochet pattern is drafted for chunky velvet yarn, a 5.0 mm hook, an intermediate maker, and a seated display plush about 32 cm tall from ear tip to base. It suits nursery decor or a character shelf because the sleepy face reads clearly even when the toy is turned sideways.
The Design: What Makes Stitch Different
A Stitch plush fails fast when the head is too narrow, the ears are too short, or the muzzle sits flat. The photographed toy solves that by using an oversized head, a compact pear body, and long ears that hinge low enough to collapse under their own weight. That combination matches the character silhouette seen across published Stitch patterns, where large ears and a broad head dominate the shape.
For a sleeping Stitch plush crochet build, the face also shifts. Instead of safety eyes, the design relies on padded eye patches and stitched black lids, which keeps the expression calm and works better in plush yarn. Many free tutorials lean on awake eyes or felt-heavy faces; the gap is a cleaner sleepy version with fewer flat appliqué pieces. That is where this blue alien amigurumi draft differs.
Project Info at a Glance
| Skill Level | Time | Finished Size | Hook | Best For |
|---|---|---|---|---|
| Intermediate | 8–12 hours | approx. 32 cm seated in plush yarn | 5.0 mm | Character shelf plush, nursery decor, gift make |
Materials and Tools
Yarn
- Pale blue plush yarn — super bulky / size 6 — approx. 180 g — Premier Parfait Chunky style yarn is a close benchmark to published Stitch plush patterns.
- Dark blue plush yarn — super bulky / size 6 — approx. 35 g — for nose, toe pads, back spots, and tuft
- Pink plush yarn — super bulky / size 6 — approx. 45 g — for inner ears
- Mint plush yarn — super bulky / size 6 — approx. 30 g — for muzzle and eye patches
- Black embroidery floss or fine yarn — small amount — for closed eyelids
Tools
- Hook 5.0 mm — matches the plush-yarn benchmark used in Wonder Crochet’s Stitch plush.
- Safety eyes 15 mm — optional only for an open-eye variation; published free patterns commonly use about 15 mm.
- Polyester stuffing
- Yarn needle
- Stitch markers
- Pins or clips
- Fabric glue — optional for securing eyelid line before stitching
Abbreviations
MR = magic ring; sc = single crochet; inc = increase; dec = invisible decrease; sl st = slip stitch; ch = chain; BLO = back loop only; FO = fasten off. Published Stitch patterns also use standard amigurumi continuous rounds and invisible decrease for a cleaner surface.
Invisible decrease matters here because plush yarn exaggerates every front-loop gap.
Pattern — Step by Step
Continuous spiral unless noted. This is a photo-based original draft using standard amigurumi shaping and verified stitch math.
Head (Make 1)
Yarn: pale blue — Source: Standard amigurumi math benchmarked against published Stitch head expansion ranges
R1: 6 sc in MR (6)
R2: inc x6 (12)
R3: (sc, inc) x6 (18)
R4: (2 sc, inc) x6 (24)
R5: (3 sc, inc) x6 (30)
R6: (4 sc, inc) x6 (36)
R7: (5 sc, inc) x6 (42)
R8: (6 sc, inc) x6 (48)
R9: (7 sc, inc) x6 (54)
R10-R17: sc around (54)
R18: (7 sc, dec) x6 (48)
R19: (6 sc, dec) x6 (42)
R20: (5 sc, dec) x6 (36)
Stuff firmly, especially the lower cheeks.
R21: (4 sc, dec) x6 (30)
R22: (3 sc, dec) x6 (24)
R23: (2 sc, dec) x6 (18)
R24: (sc, dec) x6 (12)
R25: dec x6 (6)
Fasten off. Leave 35 cm tail.
Body (Make 1)
Yarn: pale blue — Source: Standard amigurumi math with 36-stitch medium plateau
R1: 6 sc in MR (6)
R2: inc x6 (12)
R3: (sc, inc) x6 (18)
R4: (2 sc, inc) x6 (24)
R5: (3 sc, inc) x6 (30)
R6: (4 sc, inc) x6 (36)
R7-R12: sc around (36)
R13: (4 sc, dec) x6 (30)
R14-R16: sc around (30)
R17: (3 sc, dec) x6 (24)
R18-R19: sc around (24)
Stuff lower half firmly. Keep upper body slightly softer for head tilt.
R20: (2 sc, dec) x6 (18)
R21: sc around (18)
Fasten off. Leave 30 cm tail.
Front Arms (Make 2)
Yarn: pale blue — Source: Standard amigurumi math
R1: 6 sc in MR (6)
R2: (sc, inc) x3 (9)
R3-R10: sc around (9)
R11: flatten and sc through both sides 4 sts (4)
Stuff lightly only in the lower two-thirds.
Fasten off. Leave 20 cm tail.
Back Legs (Make 2)
Yarn: pale blue — Source: Standard amigurumi math
R1: 6 sc in MR (6)
R2: inc x6 (12)
R3-R7: sc around (12)
R8: (2 sc, dec) x3 (9)
R9-R10: sc around (9)
R11: flatten and sc through both sides 4 sts (4)
Stuff firmly at the foot, lightly near the join.
Fasten off. Leave 20 cm tail.
Ears (Make 2)
Yarn: pale blue outer, pink inner — Source: Standard amigurumi shaping informed by reviewed Stitch ear constructions
Outer ear:
R1: 6 sc in MR (6)
R2: inc x6 (12)
R3: (sc, inc) x6 (18)
R4: (2 sc, inc) x6 (24)
R5: (3 sc, inc) x6 (30)
R6-R10: sc around (30)
R11: (3 sc, dec) x6 (24)
R12-R16: sc around (24)
Flatten lightly. Do not stuff.
Fasten off. Leave 40 cm tail.
Inner ear panel:
Ch 10.
R1: Starting in 2nd ch from hook, 8 sc, 3 sc in last ch; working on opposite side, 7 sc, inc in last st (20)
R2: inc, 7 sc, 3 inc, 7 sc, 2 inc (26)
R3: sc around (26)
Fasten off. Leave 25 cm tail.
Sew the pink panel inside the blue ear, keeping a 0.5–1 cm blue border visible.
Tail (Make 1)
Yarn: pale blue — Source: Standard amigurumi math
R1: 6 sc in MR (6)
R2: inc x6 (12)
R3-R4: sc around (12)
R5: (2 sc, dec) x3 (9)
R6: sc around (9)
Stuff only the base half.
Fasten off. Leave 18 cm tail.
Muzzle/Eye Patch Piece (Make 2)
Yarn: mint — Source: Standard amigurumi math
R1: 6 sc in MR (6)
R2: inc x6 (12)
R3: (sc, inc) x6 (18)
R4: sc around (18)
Flatten slightly into an oval when sewing.
Fasten off. Leave 20 cm tail.
Nose (Make 1)
Yarn: dark blue — Source: Standard amigurumi math
R1: 6 sc in MR (6)
R2: inc x6 (12)
R3: sc around (12)
Stuff lightly.
Fasten off. Leave 20 cm tail.
Toe Pads / Claws (Make 8)
Yarn: dark blue — Source: Standard amigurumi math
R1: 6 sc in MR (6)
Fasten off. Leave 10 cm tail.
Sew 3 to each back leg and 1 to each front arm as shown in the photo.
Cheek Patches (Make 2)
Yarn: pale pink or very light blush — Source: Standard amigurumi math
R1: 6 sc in MR (6)
R2: inc x6 (12)
Fasten off. Leave 12 cm tail.
Optional. The photographed plush reads more as a sleepy nursery version, so these can be placed low and subtle or omitted.
Back Spots (Make 2)
Yarn: dark blue — Source: Standard amigurumi math with simple leaf form
Ch 6.
R1: Starting in 2nd ch from hook, sc, hdc, dc, hdc, sc.
Work opposite side of chain: sc, hdc, dc, hdc, sc.
Fasten off. Leave 15 cm tail.
Hair Tuft (Make 3 strands)
Yarn: dark blue — Source: Photo observation
Cut 3 strands about 9 cm each.
Latch them through the top center of the head and trim into a short tuft.
Sleeping Eyelids (Make 2)
Yarn: black embroidery floss — Source: Photo observation
Embroider a slightly curved line 6–7 stitches wide over each mint patch.
Angle the outer end down slightly for a sleeping expression.
Assembly
- Sew the head to the body, tilting it forward and slightly to one side.
- Attach the two mint muzzle/eye patch pieces to the front of the head, overlapping them slightly near the nose area.
- Sew the dark blue nose where the two mint patches meet, centered low on the face.
- Embroider the closed eyelids across the upper third of each mint patch.
- Attach the ears low on the sides of the head so they drape rather than stand.
- Sew the front arms high on the body so they angle inward and touch beneath the chin.
- Attach the back legs at the lower front of the body to create the seated pose.
- Sew three toe pads to each back leg and one pad to each front arm.
- Attach the tail at the back base and sew the two dark blue back spots across the upper back area.
- Add the hair tuft, shape the stuffing by hand, and weave in all tails securely.
The completed plush should sit without support, with the ears falling below the jawline.
7 Technical Tips
- Use one marker for the round start and one for the face centerline. Losing either reference point on plush yarn is how noses end up one stitch off-center.
- Stuff the head harder than the body. A soft head collapses into the muzzle patches and makes the sleeping lids wrinkle.
- Stop decreasing the head only after redistributing stuffing into the cheeks. Hollow lower cheeks make the face read as generic bunny instead of Stitch.
- Do not overstuff the ears. Even a thin layer of filling will keep them from draping, which breaks the photographed silhouette.
- Place the arms before closing the body tail completely. Test the “hands under chin” angle first; a 1 cm shift changes the entire sleepy pose.
- Keep the body’s upper third softer than the base. That difference lets the head tilt forward without making the plush topple.
- Weave dark blue tails back into dark blue elements only. Velvet sheds when tails are dragged across light blue stitches, and the contrast shows immediately.
Related Patterns
- Angel Amigurumi Pattern — Pink counterpart with matching ear architecture and face placement. — [INTERNAL LINK NEEDED: angel amigurumi pattern]
- Scrump Doll Crochet Pattern — Small accessory project that pairs naturally with Stitch displays. — [INTERNAL LINK NEEDED: scrump crochet pattern]
- Velvet Bunny Plush Pattern — Useful for comparing drooping-ear construction in plush yarn. — [INTERNAL LINK NEEDED: velvet bunny amigurumi]
- Character Sleepy Face Embroidery Guide — Helps with closed lids, curved lashes, and patch symmetry. — [INTERNAL LINK NEEDED: amigurumi sleepy face embroidery]
Conclusion
This sleeping version focuses on proportion first: broad head, low ear hinge, compact body, and arms set inward. Those choices matter more than surface detail. Use the verified yarn and hook benchmarks from published Stitch references to keep scale under control, then follow the stitch math here for the photo-based plush shape. For the next step, pin every part on the stuffed body before sewing anything permanent. Share the finished Stitch amigurumi crochet pattern result on Pinterest and Instagram with a side-profile photo so the ear drop is visible. #SleepingStitchPlush How far below the jawline did your ears fall once the plush was fully stuffed?
Sources used for benchmark data: Wonder Crochet free Stitch pattern; Ngoc Lan Handmade free Stitch pattern; Ravelry Stitch listings; Etsy Stitch category pages.









