SEO Meta
Title:
Meta description:
Focus keyword: sleeping dragon amigurumi crochet pattern
Secondary keywords: dragon crochet pattern pdf, baby dragon amigurumi, crochet sleeping dragon, plush dragon crochet pattern, velvet yarn amigurumi dragon
Introduction
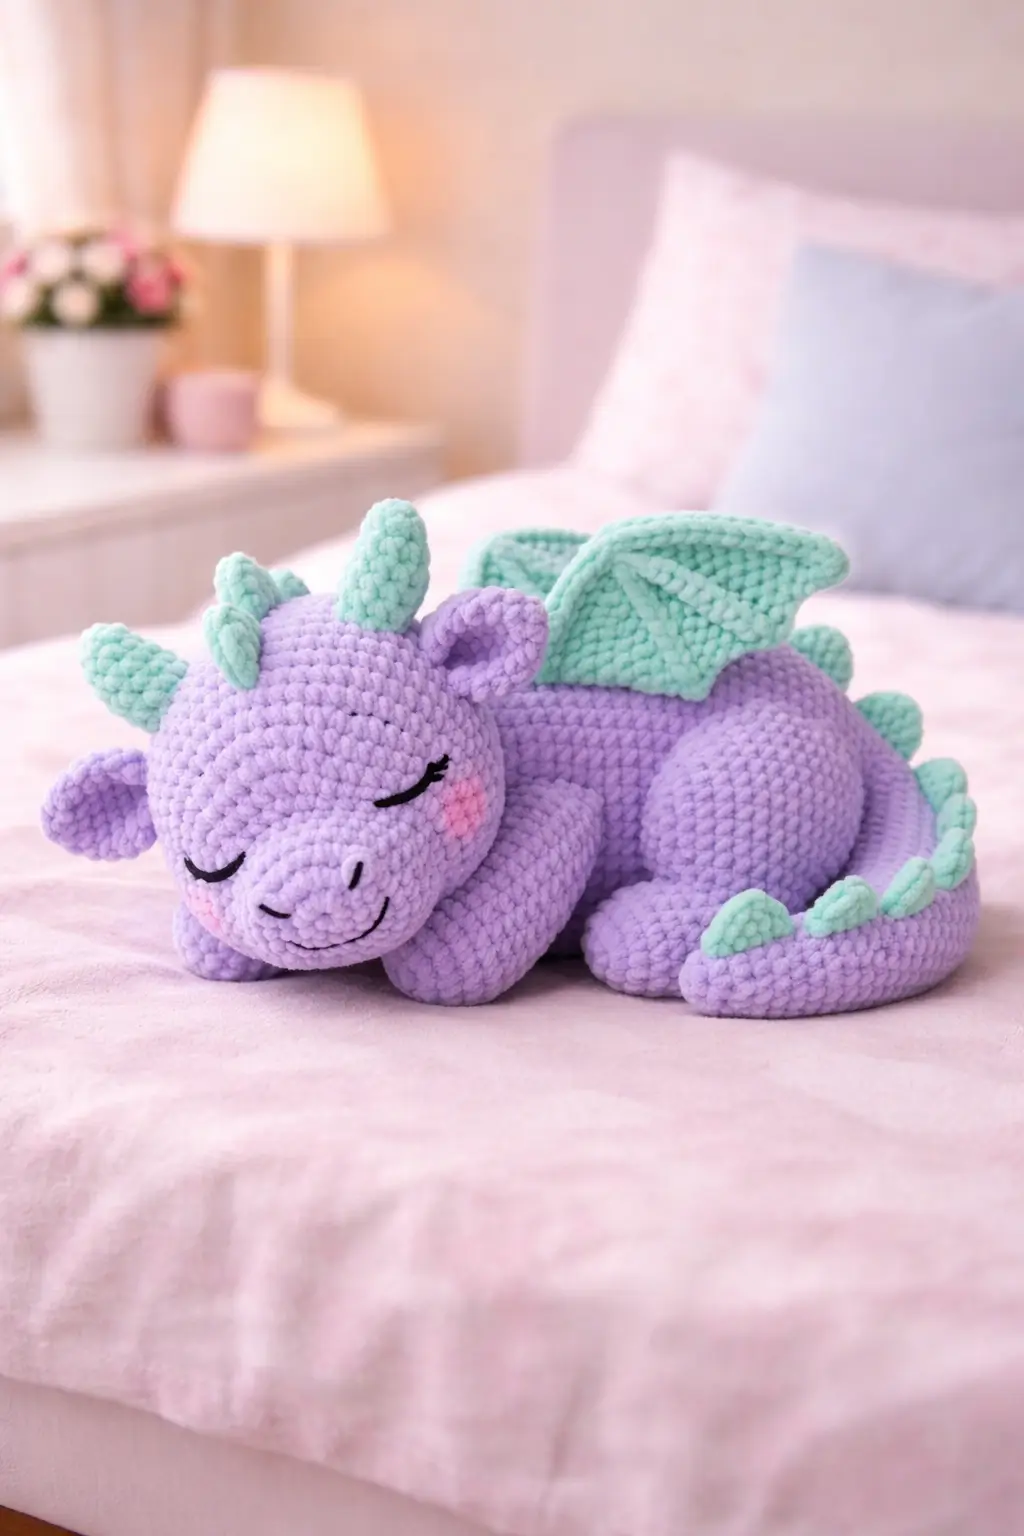
A sleeping dragon only works if the head looks heavy enough to rest on the paws. That is the first design rule. This sleeping dragon amigurumi crochet pattern is shaped for the exact low-profile pose shown in the photo, with a broad head, tucked forelegs, folded wings, short horns, rounded spikes, and a curled tail that frames the body instead of extending behind it.
Why This Sleeping Dragon Design Works
This plush reads as a sleeping baby dragon because the proportions stay compact. The head is oversized, the muzzle is short, and the neck is almost hidden once the face is angled downward onto the front legs. A taller neck would break the pose immediately. So would a narrow snout. The photo clearly favors a nursery-style plush silhouette rather than a standing fantasy dragon.
The yarn texture matters too. This is a chenille or velvet-style build, not smooth cotton. That changes the engineering. Stitch definition drops, seams look softer, and shaping needs to stay simple or the form gets muddy. The rounded horns and back spikes work because they are blunt and short. Sharp pieces would disappear visually in plush yarn. Same issue with the wings. They are folded and lightly structured, not stretched wide. Good choice. Open wings would overpower the sleeping body and make the dragon look alert instead of at rest.
The tail also does real structural work. It curves around the body, closes the silhouette, and balances the large rear leg. Without that curve, the plush would look unfinished from the side view.
Project Snapshot
| Item | Pattern Target |
|---|---|
| Character type | Sleeping baby dragon |
| Skill level | Advanced beginner to intermediate |
| Yarn | Chunky chenille / velvet yarn |
| Hook size | 4.5 mm to 5 mm |
| Safety eyes | Not used in visible face; embroidered closed eyes instead |
| Finished size | Approx. 28–34 cm long when curled |
Materials and Tools
- Main yarn: pastel lavender chunky chenille
- Accent yarn: mint chenille for wings, horns, and spikes
- Detail yarn: black cotton or acrylic for embroidered eyes and smile
- Blush: soft pink yarn, pastel chalk, or blush powder for cheeks
- Hook: 4.5 mm for tighter shaping or 5 mm for softer fabric
- Stuffing: polyester fiberfill
- Tapestry needle
- Stitch markers
- Straight pins
Abbreviations
MR = magic ring
sc = single crochet
inc = increase
dec = invisible decrease
sl st = slip stitch
ch = chain
hdc = half double crochet
dc = double crochet
st = stitch
Use invisible decrease throughout. In chenille yarn, regular decreases leave thick notches that catch light on the head and tail curve.
Character Breakdown From the Photo
- large rounded head
- short snout
- two ears
- three short horns on the crown
- embroidered closed eyes with lashes
- embroidered nostrils and smile
- blush cheeks
- front legs tucked beneath the head
- rounded back legs
- two folded wings
- curled tail
- small rounded back and tail spikes
Step-by-Step Sleeping Dragon Pattern
This custom pattern is written to match the photographed plush and uses standard amigurumi shaping adapted for chunky chenille yarn.
Head (Make 1)
Yarn: Pastel lavender
Source: Standard amigurumi math
R1: 6 sc in MR (6)
R2: inc x6 (12)
R3: (sc 1, inc) x6 (18)
R4: (sc 2, inc) x6 (24)
R5: (sc 3, inc) x6 (30)
R6: (sc 4, inc) x6 (36)
R7: (sc 5, inc) x6 (42)
R8-R13: sc around (42)
R14: (sc 5, dec) x6 (36)
R15: (sc 4, dec) x6 (30)
R16: (sc 3, dec) x6 (24)
Stuff firmly, keeping the lower face rounded.
R17: (sc 2, dec) x6 (18)
R18: (sc 1, dec) x6 (12)
R19: dec x6 (6)
Fasten off. Leave a 25 cm tail.
Snout (Make 1)
Yarn: Pastel lavender
Source: Standard amigurumi math
R1: 6 sc in MR (6)
R2: inc x6 (12)
R3: (sc 1, inc) x6 (18)
R4: (sc 2, inc) x6 (24)
R5-R7: sc around (24)
R8: (sc 2, dec) x6 (18)
Lightly stuff.
Fasten off. Leave 20 cm tail.
Sew low on the face, centered. Keep the top edge slightly flattened so the embroidered sleeping eyes sit clearly above it.
Ears (Make 2)
Yarn: Pastel lavender
Source: Standard amigurumi math
R1: 4 sc in MR (4)
R2: inc x4 (8)
R3: sc around (8)
R4: (sc 2, dec) x2 (6)
Flatten lightly.
Fasten off. Leave 15 cm tail.
Horns (Make 3)
Yarn: Mint
Source: Standard amigurumi math
R1: 4 sc in MR (4)
R2: sc around (4)
R3: (sc 1, inc) x2 (6)
R4-R5: sc around (6)
Do not overstuff. A very light fill is enough.
Fasten off. Leave 12 cm tail.
Body (Make 1)
Yarn: Pastel lavender
Source: Standard amigurumi math
R1: 6 sc in MR (6)
R2: inc x6 (12)
R3: (sc 1, inc) x6 (18)
R4: (sc 2, inc) x6 (24)
R5: (sc 3, inc) x6 (30)
R6: (sc 4, inc) x6 (36)
R7-R12: sc around (36)
R13: (sc 4, dec) x6 (30)
R14-R16: sc around (30)
Stuff firmly through the center and hip area.
R17: (sc 3, dec) x6 (24)
R18: sc around (24)
Fasten off. Leave a 30 cm tail.
Front Legs / Paws (Make 2)
Yarn: Pastel lavender
Source: Standard amigurumi math
R1: 6 sc in MR (6)
R2: inc x6 (12)
R3-R5: sc around (12)
R6: (sc 1, dec) x4 (8)
R7-R10: sc around (8)
Stuff the paw section only. Keep the upper tube softer so it bends under the head.
Flatten and fasten off. Leave 18 cm tail.
Back Legs (Make 2)
Yarn: Pastel lavender
Source: Standard amigurumi math
R1: 6 sc in MR (6)
R2: inc x6 (12)
R3: (sc 1, inc) x6 (18)
R4-R6: sc around (18)
R7: (sc 1, dec) x6 (12)
R8-R10: sc around (12)
Stuff firmly and shape into a round haunch.
Fasten off. Leave 20 cm tail.
Wings (Make 2)
Yarn: Mint
Source: Standard amigurumi math
R1: ch 2, 2 sc in 2nd ch from hook (2)
R2: inc x2, ch 1, turn (4)
R3: inc, sc 2, inc, ch 1, turn (6)
R4: inc, sc 4, inc, ch 1, turn (8)
R5: inc, sc 6, inc, ch 1, turn (10)
R6: sc across, ch 1, turn (10)
R7: sl st 1, sc 2, hdc 2, dc 2, hdc 2, sc 1 (10)
Fasten off. Leave 18 cm tail.
Fold slightly before sewing so the wing sits upward at the base and downward at the tip.
Tail (Make 1)
Yarn: Pastel lavender
Source: Standard amigurumi math
R1: 4 sc in MR (4)
R2: inc x4 (8)
R3-R6: sc around (8)
R7: (sc 2, dec) x2 (6)
R8-R20: sc around (6)
Stuff lightly at the base and leave the outer curve soft.
Fasten off. Leave 25 cm tail.
Back Spikes (Make 9)
Yarn: Mint
Source: Standard amigurumi math
R1: 4 sc in MR (4)
R2: sc around (4)
R3: (sc 1, dec) x2 (2)
Fasten off.
Make 4 medium spikes for the upper back and 5 smaller spikes for the tail line by reducing the height one round if desired.
Cheek Blush (Optional, Make 2)
Material: pink yarn, blush powder, or pastel chalk
Add a circular blush patch under each eye after embroidery is complete.
Assembly
- Sew the snout to the front of the head.
- Embroider the closed eyes, lashes, nostrils, and smile before joining the head to the body.
- Attach the ears to the upper sides of the head.
- Sew three horns across the crown, keeping the center horn slightly taller.
- Sew the front legs under the chin area so the head can rest against them.
- Attach the body behind the head with the face angled downward in a sleeping pose.
- Sew the back legs to the sides of the rear body, keeping them rounded and low.
- Attach the wings high on the back and angle them inward slightly.
- Sew the spikes from the back of the head down the spine and along the tail.
- Attach the tail and curve it around the body before closing the final stitches.
Technical Tips That Actually Matter
Head angle:
Pin the head in place before sewing. Even a 1 cm lift at the chin changes the plush from sleeping to alert.
Chenille tension:
Do not yank the yarn tight on decrease rounds. Chenille snaps more easily than cotton and sheds at stressed join points.
Embroidery timing:
Stitch the eyes before final assembly. Working black embroidery thread through finished chenille seams is slower and less accurate.
Front leg softness:
Keep the upper halves underfilled. Overstuffed front paws force the head upward and ruin the resting pose.
Wing placement:
Set the wings behind the shoulder line, not directly on top of it. Too far forward and the side silhouette gets crowded.
Tail curve:
Sew the base first, then pin the outer tail arc before closing the last stitches. This helps hold the curled frame seen in the photo.
Spike spacing:
Leave roughly 1.5 to 2 cm between large back spikes in chunky yarn. Pack them too close and the spine line looks bulky instead of neat.
SEO Notes and Search Positioning
This topic fits a strong plush-toy search niche. The best target phrase is sleeping dragon amigurumi crochet pattern, supported by related terms like dragon crochet pattern pdf, baby dragon amigurumi, and velvet yarn amigurumi dragon. Use those naturally in image alt text, product descriptions, and FAQ sections. Do not overstuff the keyword block. This topic ranks better when the pose, yarn texture, and plush format are described clearly.
Internal Link Ideas
- [INTERNAL LINK NEEDED: how to crochet with chenille yarn]
- [INTERNAL LINK NEEDED: amigurumi embroidery face tutorial]
- [INTERNAL LINK NEEDED: beginner dragon crochet patterns]
- [INTERNAL LINK NEEDED: best stuffing for plush amigurumi]
Conclusion
This sleeping dragon amigurumi crochet pattern works because every piece supports the pose. The head is broad, the front legs stay soft enough to cradle it, the wings fold inward, and the curled tail closes the shape cleanly. Use chunky chenille yarn, keep the assembly low and compact, and do not sharpen any of the features too much. The plush style depends on rounded forms. Share the finished dragon on Pinterest and Instagram with #SleepingDragonPattern.
Question for the post comments: would you keep the mint wings and spikes, or shift this same sleeping dragon into a dusty pink and cream color palette?









