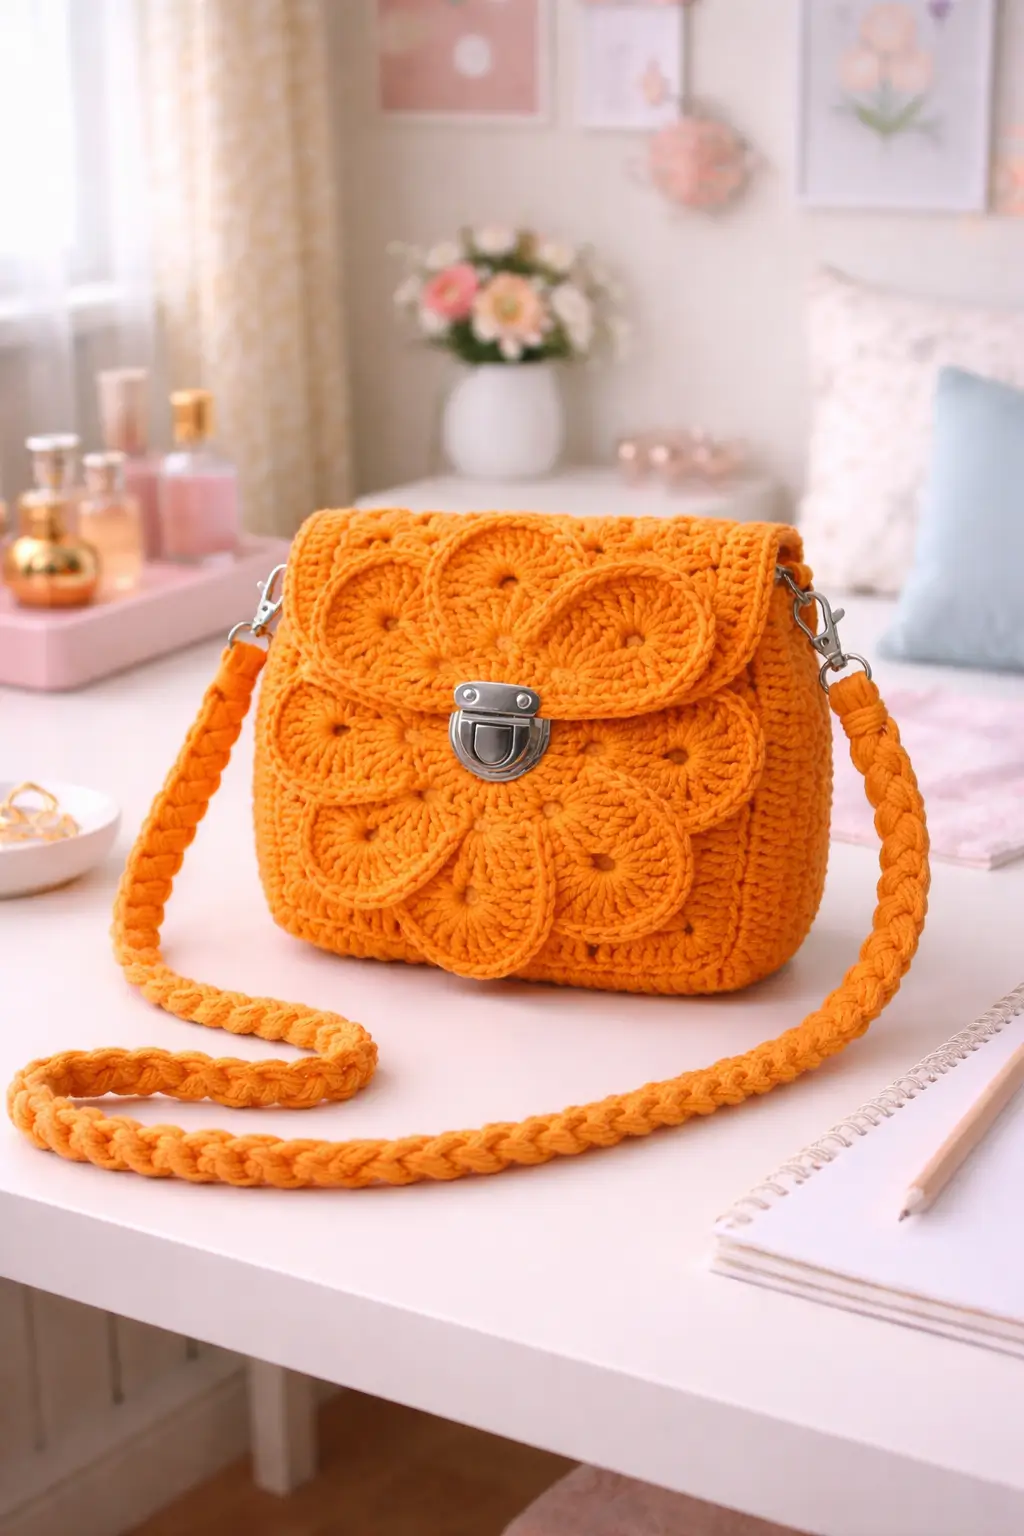
A crochet bag like this depends on two things: a firm body and petals that sit cleanly without curling into chaos. This orange flower crochet bag pattern gives you the full build for the bag in the photo, including the rectangular body, flap, layered petal motif, side depth, braided strap, and front clasp placement. It works well as a statement handbag because the flower design covers the front without losing the practical bag shape underneath.
The Design: What Makes This Bag Different
This bag is built around one oversized floral composition rather than repeated small motifs. That matters. A scattered motif layout would make the surface look busy, but this design keeps the flower centralized and readable. The rectangular shell stays structured, while the rounded petals soften the front panel and flap edge. Then the monochrome orange palette does the rest. It lets the layered construction stand out without introducing competing color blocks. The clasp sits directly in the center, which reinforces the floral symmetry and makes the bag feel balanced from top to bottom. Common mistake: making the petals too loose. Then they collapse over each other and hide the flower outline instead of defining it.
Project Information at a Glance
| Skill Level | Time | Finished Size | Hook | Best For |
|---|---|---|---|---|
| Intermediate | 5–7 hours | Small to medium crossbody bag | 3.5–4.5 mm | Statement outfits, gifts, everyday small bag use |
Materials and Tools
Yarn
- Orange — cotton yarn or t-shirt yarn — 180g — for body, flap, petals, and strap
Tools
- 3.5 mm to 4.5 mm crochet hook
- Yarn needle
- Stitch markers
- Sharp scissors
- 2 swivel clasps
- 2 side rings
- 1 bag clasp or turn lock
- Optional lining fabric
Crochet Abbreviations
MR / sc / sl st / ch / hdc / dc / tr / inc / BLO
Keep the body stitches tight and even. Loose fabric makes the clasp area buckle and weakens the petal layering.
Step-by-Step Orange Flower Crochet Bag Pattern
Work the bag body first, then create the flap and layered flower petals separately.
Base (Make 1)
Yarn: orange
Source: Standard crochet bag math
R1: ch 25
Row 1: starting in 2nd ch from hook, sc 23, 3 sc in last ch, rotate, sc 22, inc in final ch (50)
R2: inc, sc 22, inc x3 across curve, sc 22, inc x2 across curve (56)
R3: inc, sc 24, inc x3 across curve, sc 24, inc x2 across curve (62)
R4: sc around (62)
R5: sc around (62)
This forms a rounded rectangular base.
Body Walls (Make 1 continuous section)
Yarn: orange
Source: Standard crochet bag math
R1: BLO sc around (62)
R2: sc around (62)
R3: sc around (62)
R4: sc around (62)
R5: sc around (62)
R6: sc around (62)
R7: sc around (62)
R8: sc around (62)
R9: sc around (62)
R10: sc around (62)
R11: sc around (62)
R12: sc around (62)
Fasten off.
Add more rounds if you want a taller bag.
Top Edge Band (Make 1)
Yarn: orange
Source: Standard crochet bag math
R1: join yarn, sc around (62)
R2: sc around (62)
R3: sc around (62)
Fasten off.
This gives the opening a firm finished rim.
Flap Base (Make 1)
Yarn: orange
Source: Standard crochet flap shaping
R1: ch 25
Row 1: starting in 2nd ch from hook, sc across (24)
Row 2: ch 1, turn, sc across (24)
Row 3: ch 1, turn, sc across (24)
Row 4: ch 1, turn, dec, sc 20, dec (22)
Row 5: ch 1, turn, sc across (22)
Row 6: ch 1, turn, dec, sc 18, dec (20)
Row 7: ch 1, turn, sc across (20)
Fasten off. Leave a long tail.
This forms the flap underlayer.
Flower Center Circle (Make 1)
Yarn: orange
Source: Standard motif math
R1: 12 dc in MR (12)
R2: 2 dc in each st around (24)
R3: (dc, inc) repeat around (36)
Fasten off. Leave 20 cm tail.
This center supports the layered petals.
Petals (Make 10)
Yarn: orange
Source: Standard petal shaping
R1: ch 10
Row 1: starting in 2nd ch from hook, sc 2, hdc 2, dc 3, 5 dc in last ch, rotate, dc 3, hdc 2, sc 2 (19)
Fasten off. Leave 14 cm tail.
Shape each petal into a rounded teardrop.
Front Flower Layer Assembly
Yarn: orange
Source: Standard applique assembly
Sew 6 petals around the lower front flower center.
Sew 4 petals above and around the upper section so the motif continues onto the flap.
Overlap slightly so the flower looks full without hiding the center.
Side Rings Tabs (Make 2)
Yarn: orange
Source: Standard bag tab math
R1: ch 7
Row 1: starting in 2nd ch from hook, sc across (6)
Row 2: ch 1, turn, sc across (6)
Row 3: ch 1, turn, sc across (6)
Fasten off. Leave long tails.
Fold through side rings before sewing to the bag body.
Braided Strap Strands (Make 3)
Yarn: orange
Source: Standard strap math
Strand 1: ch 101, sl st back across (100)
Strand 2: ch 101, sl st back across (100)
Strand 3: ch 101, sl st back across (100)
Braid the three strands together and secure both ends.
Fasten off. Leave long finishing tails.
Attach clasps after braiding.
Assembly Instructions
- Sew the flap base to the back top edge of the bag body.
- Place the flower center on the front panel so it overlaps the flap visually when closed.
- Attach the lower petals first, then the upper petals so the flower continues onto the flap.
- Sew the side tabs through the metal rings and secure them to the upper side seams.
- Braid the strap and attach swivel clasps to both ends.
- Install the front clasp so it sits centered within the flower layout.
- Check flap closure before tightening the clasp completely.
- Add optional lining if you want extra structure and cleaner inside finishing.
- Weave all yarn tails deeply into the body or applique sections.
- Lightly steam the bag if needed, but keep heat away from metal hardware.
The orange flower crochet bag is complete.
7 Technical Tips for Cleaner Crochet Bags
- Keep the base tight. A soft base makes the whole bag tilt forward once the flap is closed.
- Count every body round. One missed stitch throws off the flap alignment and clasp center.
- Pin all petals before sewing the first one. Uneven petal overlap breaks the flower symmetry immediately.
- Use firm cotton yarn. Stretchy yarn makes the petals curl and the clasp area sag.
- Reinforce the side tabs twice. Those points take the most pull when the strap is attached.
- Install the clasp after the flap is fully shaped. Setting it too early often shifts the closure line off-center.
- Add a lining for everyday use. It helps the bag hold shape and protects the petal stitching from interior friction.
Conclusion
This crochet flower bag pattern works because the structure stays simple while the layered petals carry the visual weight. The rectangular body keeps it practical. The flap makes the flower composition feel intentional. The monochrome orange palette lets the texture do all the work. Use this construction as a base, then change the color, clasp style, or petal count instead of rebuilding the full bag. Photograph the finished purse from a front-facing angle so the petal symmetry, flap curve, clasp, and braided strap all stay visible in one frame. Share it on Pinterest and Instagram with #OrangeFlowerCrochetBag. Will your next version stay monochrome, or switch to two-tone petals for a bolder floral effect?









