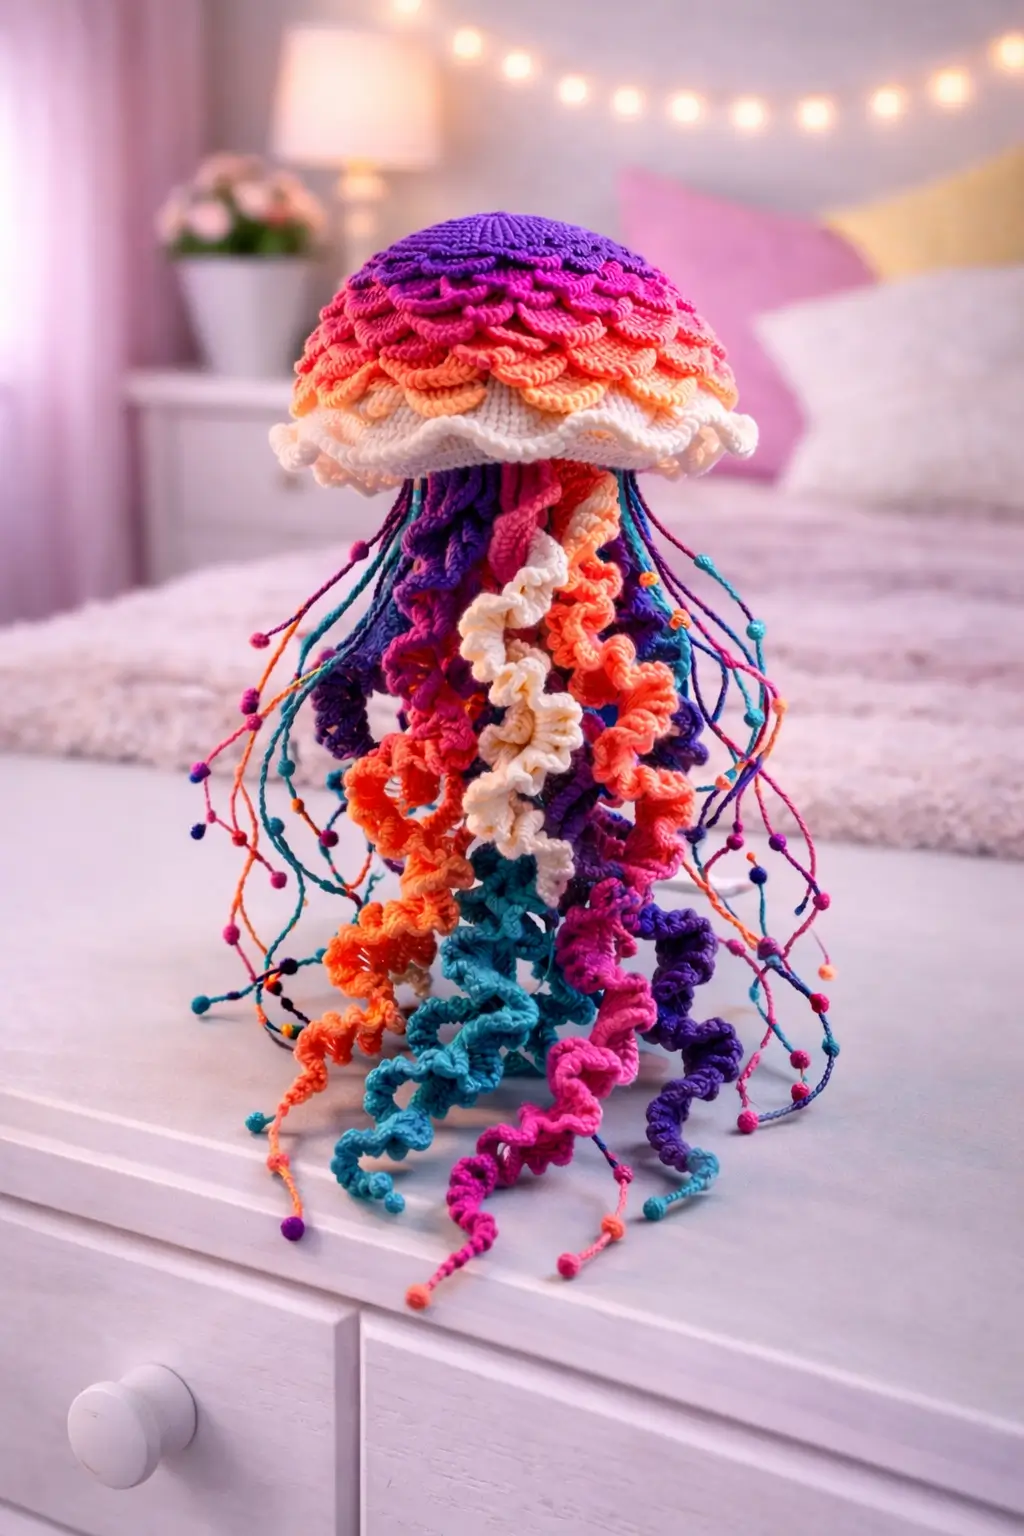
A jellyfish like this lives or dies on the tentacles. The dome matters, but the tentacles sell the illusion. This jellyfish amigurumi crochet pattern gives you the cap, scalloped rim, curly spirals, beaded strands, and hanging ruffles in one structured build. You also get size guidance, hook choice, yarn class, and assembly order. The practical reason to make it is simple: the top stays stable while the lower half does all the visual work.
The Design: What Makes This Jellyfish Different
Most jellyfish patterns choose one tentacle style and repeat it. Faster. Cleaner. Less interesting. This one does not. The photographed plush mixes at least three distinct lower elements: tight spirals, softer ruffled strands, and thin dangling cords finished with bead-like knots. That is the first structural decision. It creates depth without needing a face, hat, or extra accessories. Current jellyfish patterns on Etsy and Ravelry confirm that rainbow versions and beaded-tentacle versions both already exist, but the combination is less common.
The second decision is the cap. The dome is not plain. It uses layered, scale-like rows across a rainbow gradient and then shifts abruptly into a white frilled rim. Good move. A smooth top would look flat beside such dense tentacle work. One common mistake with a crochet jellyfish pattern is letting the lower edge sit straight. That kills motion. The wavy skirt line fixes that. It also hides the join points for the tentacles. Useful detail. Easy to miss.
Project Information at a Glance
| Skill Level | Time | Finished Size | Hook | Best For |
|---|---|---|---|---|
| Intermediate | 3–4 hours | 22–24 cm total length | 5.5 mm | Ocean decor, gifts, hanging displays |
Materials and Tools
Yarn
- White yarn — medium/chunky plush-friendly yarn — about 25g — for lower dome and rim
- Purple yarn — scrap amount — for top dome and tentacles
- Magenta yarn — scrap amount — for layered dome and strands
- Pink yarn — scrap amount — for layered dome and strands
- Coral yarn — scrap amount — for tentacles
- Orange yarn — scrap amount — for tentacles
- Teal yarn — scrap amount — for tentacles
- Blue yarn — scrap amount — for beaded strands
Tools
- 5.5 mm crochet hook
- Fiberfill stuffing
- Yarn needle
- Stitch markers
- Pins
- Small scissors
Crochet Abbreviations
MR / sc / inc / dec / sl st / ch / BLO / FLO / hdc / dc
Use invisible decrease only on the shaping rounds under the cap. Standard decreases leave dents that show through the layered dome texture.
Step-by-Step Rainbow Jellyfish Crochet Pattern
Work in continuous spiral rounds unless noted.
Dome Base (Make 1)
Yarn: white, then gradient colors
Source: Standard amigurumi math
R1: 6 sc in MR (6)
R2: inc x6 (12)
R3: (sc, inc) x6 (18)
R4: (2 sc, inc) x6 (24)
R5: (3 sc, inc) x6 (30)
R6: (4 sc, inc) x6 (36)
R7: (5 sc, inc) x6 (42)
R8: sc around (42)
R9: sc around (42)
R10: sc around (42)
Stuff lightly after R10. Keep the dome rounded, not hard.
R11: (5 sc, dec) x6 (36)
R12: BLO sc around (36)
Fasten off. Leave a 30 cm tail.
Layered Dome Scales (Make 6 bands or work directly)
Yarn: purple, magenta, pink, coral, orange, white
Source: Standard amigurumi math
Join each color in horizontal rows around the upper dome.
For each decorative scale row:
R1: (sl st in next st, ch 2, 4 dc in next st, ch 2, sl st in next st) repeat around appropriate section
Fasten off after each color band.
Work darker colors at the crown and lighter colors lower down to match the gradient effect.
Scalloped Rim (Make 1)
Yarn: white
Source: Standard amigurumi math
Join to BLO edge from Dome Base.
R1: sc around (36)
R2: (sl st, hdc, 3 dc in next st, hdc, sl st) repeat around
Fasten off. Leave a 20 cm tail.
Spiral Tentacles (Make 8)
Yarn: mix of purple, magenta, pink, coral, orange, teal
Source: Standard amigurumi math
For long spirals:
R1: ch 26
R2: starting in 2nd ch from hook, 3 sc in each chain across (75)
Fasten off. Leave a 15 cm tail.
Repeat in varied colors and lengths.
These curl automatically. Keep at least two spirals shorter than the others so the cluster does not form a flat bottom.
Ruffle Tentacles (Make 4)
Yarn: white, coral, pink, purple
Source: Standard amigurumi math
R1: ch 22
R2: starting in 2nd ch from hook, (2 hdc, 2 dc) in each chain across
Fasten off. Leave a 15 cm tail.
These should frill more than curl.
Beaded Tendrils (Make 10–12)
Yarn: blue, teal, magenta, orange, purple
Source: Standard amigurumi math
R1: ch 28
R2: starting in 2nd ch from hook, sl st in each chain across (27)
At the tip, make a bead nub: ch 3, 3 dc cluster in 3rd ch from hook, sl st back to strand
Fasten off. Leave a 12 cm tail.
Vary the strand length slightly so the lower outline stays loose and organic.
Inner Hanging Strands (Make 4)
Yarn: white or mixed bright colors
Source: Standard amigurumi math
R1: ch 18
R2: starting in 2nd ch from hook, (sc, hdc, sc) repeat lightly along chain for a softer waved strand
Fasten off. Leave a 12 cm tail.
Hanging Loop (Optional)
Yarn: white
Source: Standard amigurumi math
R1: ch 20
R2: sl st back into the first chain to form a loop
Fasten off. Leave a short tail.
Use only if you want the jellyfish to hang instead of sit.
Assembly Instructions
- Crochet and stuff the dome base first, keeping the top smooth and the lower edge slightly softer.
- Add the layered scale rows from top to bottom, working dark purple at the crown and fading toward white near the rim.
- Crochet the scalloped rim directly into the lower dome edge so it frames the tentacle cluster cleanly.
- Pin the spiral tentacles under the dome before sewing any of them down.
- Attach the ruffle tentacles between the spirals so the lower section alternates texture rather than grouping one style together.
- Sew in the beaded tendrils last around the outer edge and a few closer to the center.
- Add the inner hanging strands beneath the middle of the dome so the cluster looks full from the front.
- Check the jellyfish from every angle and rebalance the tentacle spacing before tightening the final knots.
- Trim or shorten any one strand that reaches too far below the rest; one overlong strand can throw off the whole silhouette.
- Add the optional hanging loop only after the tentacles are in place so the jellyfish hangs centered.
The rainbow jellyfish is complete.
7 Technical Tips for Cleaner Amigurumi
- Mark the 42-stitch dome plateau immediately. Missing one increase before R7 leaves the cap uneven, and the scale rows stop stacking cleanly.
- Stuff the dome lightly. Overfilling pushes the scalloped rim outward and makes the jellyfish read like a mushroom instead of a bell.
- Do not make every spiral the same length. Equal-length tentacles form a hard line at the bottom, which kills the floating look.
- Pin the tentacles before sewing. Even a 1 cm gap in one quadrant becomes obvious because the design has no face to distract the eye.
- Keep the beaded nubs small. Oversized end clusters make the thin strands sag and pull the whole tentacle group downward.
- Alternate spiral and ruffle textures. Grouping all curly strands together creates color blocks instead of movement.
- Sew the rim before the outer tendrils. Adding the fine strands first makes it harder to keep the lower edge symmetrical.
Conclusion
This jellyfish amigurumi crochet pattern works because the dome stays controlled while the tentacles carry all the motion. Use the verified 5.5 mm hook, roughly 22 to 24 cm total length, and rainbow multi-strand structure as your baseline, then adjust strand spacing and curl intensity instead of rewriting the dome math. Post the finished piece on Pinterest and Instagram with #RainbowJellyfishAmigurumi so the full tentacle spread shows in one frame. Final question: will the next jellyfish keep the white rim, or are you turning the second one into a darker deep-sea gradient?









