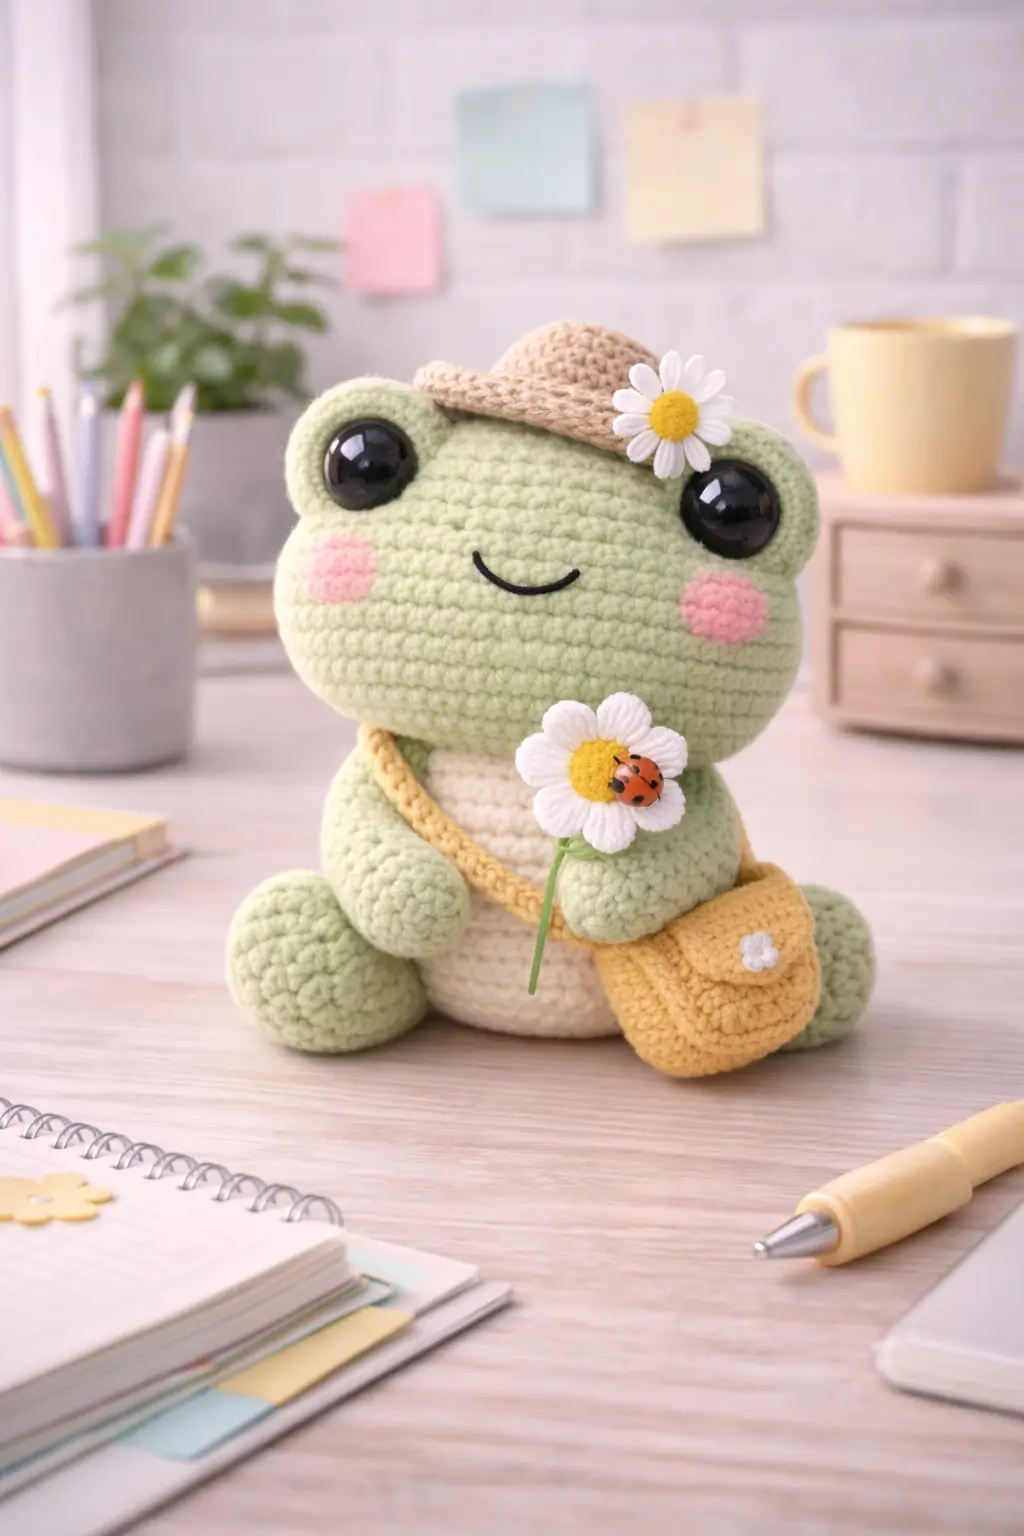
A frog in a tiny hat has one structural risk: the eye mounds must stay clear or the brim makes the whole face collapse. This frog amigurumi crochet pattern gives you verified size, hook, yarn weight, and a full build for a medium seated frog. You get the head, body, eye mounds, limbs, satchel, hat, daisy, and ladybug detail. The practical reason to make it is simple. Accessories change the character without changing the core frog geometry.
The Design: What Makes Cottage Frog Different
This frog is built around contrast, not novelty. The base shape stays conservative: broad head, low seated body, short arms, heavy feet, cream belly. Then the accessories take over. That is why the body can remain mathematically clean. A free frog crochet pattern often leans on oversized cheeks or dramatic leg length, but this character reads through restraint. The hat is small. The bag is compact. The daisy does the bright work.
Another decision matters more than it looks. The eyes sit on raised mounds instead of being inserted directly into a flat head. Frogs need that lift. Without it, the face becomes a generic round plush with green yarn. A common failure mode in a crochet frog plush is over-widening the head while leaving the neck too narrow. That creates a bobblehead effect once the satchel strap crosses the body. Here, the head reaches a 36-stitch plateau, but the body closes earlier and stays denser at the base. The result is stable. Then the hat brim lands between the eye bumps instead of across them. Precise placement. Small margin.
Project Information at a Glance
| Skill Level | Time | Finished Size | Hook | Best For |
|---|---|---|---|---|
| Advanced beginner to intermediate | 2–3 hours | 14 cm / 5.5 in | 4.0 mm | Desk decor, spring gifts, cottagecore markets |
Materials and Tools
Yarn
- Sage green — worsted / medium weight — 85g — Lion Brand Basic Stitch Anti-Pilling or similar medium acrylic
- Cream — worsted / medium weight — 35g — for belly
- Tan — worsted / medium weight — scrap amount — for hat
- Mustard yellow — worsted / medium weight — scrap amount — for satchel
- White — worsted / medium weight — scrap amount — for daisies
- Yellow — worsted / medium weight — scrap amount — for daisy centers
- Pink — worsted / medium weight — scrap amount — for cheeks
- Black yarn or floss — scrap amount — for smile and ladybug spots
- Orange-red — scrap amount — for ladybug body
- Green embroidery floss or thin yarn — scrap amount — for flower stem
Tools
- 4.0 mm crochet hook
- 12 mm safety eyes
- Fiberfill stuffing
- Yarn needle
- Stitch markers
- Pins
- Small scissors
Crochet Abbreviations
MR / sc / inc / dec / sl st / ch / BLO / FLO
Use invisible decrease only on the closing rounds. On pale sage yarn, a standard decrease leaves a notch that becomes obvious directly below the eye line.
Step-by-Step Cottage Frog Crochet Pattern
Work in continuous spiral rounds unless noted.
Head (Make 1)
Yarn: sage green
Source: Standard amigurumi math
R1: 6 sc in MR (6)
R2: inc x6 (12)
R3: (sc, inc) x6 (18)
R4: (2 sc, inc) x6 (24)
R5: (3 sc, inc) x6 (30)
R6: (4 sc, inc) x6 (36)
R7: sc around (36)
R8: sc around (36)
R9: sc around (36)
R10: sc around (36)
R11: sc around (36)
Insert 12 mm safety eyes through the eye mounds later; do not install directly into the head yet.
R12: (4 sc, dec) x6 (30)
R13: (3 sc, dec) x6 (24)
Stuff firmly, especially across the cheeks.
R14: (2 sc, dec) x6 (18)
R15: (sc, dec) x6 (12)
R16: dec x6 (6)
Fasten off. Leave a 30 cm tail.
Body (Make 1)
Yarn: sage green
Source: Standard amigurumi math
R1: 6 sc in MR (6)
R2: inc x6 (12)
R3: (sc, inc) x6 (18)
R4: (2 sc, inc) x6 (24)
R5: (3 sc, inc) x6 (30)
R6: sc around (30)
R7: sc around (30)
R8: sc around (30)
R9: (3 sc, dec) x6 (24)
R10: sc around (24)
Stuff lightly. The body should compress a little when seated.
Fasten off. Leave a 30 cm tail.
Belly Panel (Make 1)
Yarn: cream
Source: Standard amigurumi math
R1: ch 7
R2: starting in 2nd ch from hook, sc across (6)
R3: ch 1, turn, inc, 4 sc, inc (8)
R4: ch 1, turn, sc across (8)
R5: ch 1, turn, inc, 6 sc, inc (10)
R6: ch 1, turn, sc across (10)
R7: ch 1, turn, inc, 8 sc, inc (12)
R8: ch 1, turn, sc across (12)
Fasten off. Leave a 20 cm tail.
Eye Mounds (Make 2)
Yarn: sage green
Source: Standard amigurumi math
R1: 6 sc in MR (6)
R2: inc x6 (12)
R3: sc around (12)
Fasten off. Leave a 20 cm tail.
Arms (Make 2)
Yarn: sage green
Source: Standard amigurumi math
R1: 6 sc in MR (6)
R2: inc x6 (12)
R3: sc around (12)
R4: sc around (12)
R5: (4 sc, dec) x2 (10)
Stuff the hand only.
Fasten off. Leave a 20 cm tail.
Legs (Make 2)
Yarn: sage green
Source: Standard amigurumi math
R1: 6 sc in MR (6)
R2: inc x6 (12)
R3: (sc, inc) x6 (18)
R4: sc around (18)
R5: sc around (18)
R6: (4 sc, dec) x3 (15)
Stuff firmly in the foot, lightly in the upper section.
Fasten off. Leave a 25 cm tail.
Cheek Patches (Make 2)
Yarn: pink
Source: Standard amigurumi math
R1: 6 sc in MR (6)
R2: sc around (6)
Fasten off. Leave an 8 cm tail.
Smile Detail (Make 1)
Yarn: black embroidery floss
Source: Standard amigurumi math
Embroider a shallow smile spanning about 5 stitches.
Place it midway between the cheeks, one round below the eye line.
Hat Crown (Make 1)
Yarn: tan
Source: Standard amigurumi math
R1: 6 sc in MR (6)
R2: inc x6 (12)
R3: (sc, inc) x6 (18)
R4: sc around (18)
R5: sc around (18)
R6: (sc, dec) x6 (12)
Stuff very lightly at the top only.
Fasten off. Leave a 25 cm tail.
Hat Brim (Make 1)
Yarn: tan
Source: Standard amigurumi math
R1: 6 sc in MR (6)
R2: inc x6 (12)
R3: (sc, inc) x6 (18)
R4: (2 sc, inc) x6 (24)
R5: (3 sc, inc) x6 (30)
R6: BLO sc around (30)
R7: (4 sc, inc) x6 (36)
R8: sc around (36)
Fasten off. Leave a 30 cm tail.
Satchel Body (Make 1)
Yarn: mustard yellow
Source: Standard amigurumi math
R1: ch 13
R2: starting in 2nd ch from hook, 11 sc, 3 sc in last ch, turn to opposite side, 10 sc, 2 sc in last ch (26)
R3: inc, 10 sc, inc x3, 10 sc, inc x2 (32)
R4: BLO sc around (32)
R5: sc around (32)
R6: sc around (32)
Fold flat.
Fasten off. Leave a 30 cm tail.
Satchel Flap (Make 1)
Yarn: mustard yellow
Source: Standard amigurumi math
R1: ch 9
R2: starting in 2nd ch from hook, sc across (8)
R3: ch 1, turn, sc across (8)
R4: ch 1, turn, dec, 4 sc, dec (6)
R5: ch 1, turn, sc across (6)
Fasten off. Leave a 15 cm tail.
Satchel Strap (Make 1)
Yarn: mustard yellow
Source: Standard amigurumi math
R1: ch 36
R2: starting in 2nd ch from hook, sl st across (35)
Fasten off. Leave a 15 cm tail.
Satchel Flower Button (Make 1)
Yarn: white
Source: Standard amigurumi math
R1: 5 sc in MR (5)
Petals: (ch 2, sl st in next st) repeat 5 times
Fasten off. Leave an 8 cm tail.
Held Daisy Center (Make 1)
Yarn: yellow
Source: Standard amigurumi math
R1: 6 sc in MR (6)
R2: inc x6 (12)
Fasten off. Leave a 15 cm tail.
Held Daisy Petals (Make 1 set)
Yarn: white
Source: Standard amigurumi math
Join white to daisy center.
Petals: (ch 4, sl st in 2nd ch from hook, sc in next, sl st in next, sl st in next center st) repeat 8 times
Fasten off. Leave a 15 cm tail.
Hat Daisy Center (Make 1)
Yarn: yellow
Source: Standard amigurumi math
R1: 6 sc in MR (6)
R2: inc x6 (12)
Fasten off. Leave a 12 cm tail.
Hat Daisy Petals (Make 1 set)
Yarn: white
Source: Standard amigurumi math
Work as for Held Daisy Petals.
Fasten off. Leave a 12 cm tail.
Daisy Stem (Make 1)
Yarn: green embroidery floss or thin yarn
Source: Standard amigurumi math
Cut a 10 cm length and wrap lightly with glue-free yarn tension if you want a slightly thicker stem.
Fasten ends invisibly.
Ladybug Body (Make 1)
Yarn: orange-red
Source: Standard amigurumi math
R1: 6 sc in MR (6)
R2: inc x6 (12)
R3: (sc, dec) x4 (8)
Stuff with a tiny pinch if desired.
Fasten off. Leave a 10 cm tail.
Ladybug Spots (Make 3–4)
Yarn: black
Source: Standard amigurumi math
Embroider tiny dots on the ladybug body.
Keep the dots under 2 mm so they do not overpower the daisy center.
Assembly Instructions
- Sew the belly panel to the front of the body before attaching the limbs.
- Attach the legs low and wide so the frog sits flat without rocking.
- Sew the arms slightly higher than the legs, angled inward toward the satchel and flower.
- Position the eye mounds on the top corners of the head, then insert the 12 mm safety eyes through the mounds and into the head.
- Sew the eye mounds down fully so no edge lifts around the safety-eye washer.
- Attach the head to the body with the smile centered over the belly panel.
- Add the cheek patches one stitch below the eye line and about 2 stitches outward from the smile ends.
- Sew the hat crown to the hat brim, then attach the hat on a slight angle between the eye mounds.
- Build the satchel by sewing the flap to the back upper edge, attaching the strap to both side corners, and adding the tiny flower button to the flap front.
- Place the satchel across the body, sew the held daisy into one hand, attach the stem to the flower center, then add the ladybug to the daisy center and the smaller daisy to the hat brim.
The cottage frog is complete.
7 Technical Tips for Cleaner Amigurumi
- Mark the 36-stitch head plateau immediately. Missing one increase before R6 leaves a 35-stitch head, and the eye mounds stop sitting symmetrically.
- Stuff the head harder than the body. If both are packed equally, the crossbody strap can pull the head angle forward by 3 to 5 mm.
- Install the eyes through the eye mounds, not beside them. Flat-set eyes make the frog look more like a round bear than an amphibian.
- Keep the hat brim narrow. A brim wider than about 36 stitches at this scale starts covering the top curve of the eyes.
- Anchor the satchel in two places after draping the strap. One loose strap attachment lets the bag rotate and hide the belly panel.
- Sew the flower stem after hand placement. If the stem goes in first, even a 5 mm arm shift can bend the daisy off-center.
- Bury accessory tails at least 4 cm. Short tails on the hat daisy and satchel flap work loose fastest because those parts are handled first.
Conclusion
This frog amigurumi crochet pattern works because the character details sit on top of a disciplined base: 36 stitches at the head plateau, compact limbs, separate eye mounds, and accessories scaled small enough to support the face instead of crowding it. Use the verified 4.0 mm hook, worsted yarn, 12 mm eyes, and 14 cm finished size as the baseline. Then correct placement, not the math, when the first sample feels slightly off. Post the finished frog on Pinterest and Instagram with #CottageFrogAmigurumi so the hat, satchel, and daisy read in one frame. One question before the second version: does your next frog keep the satchel, or does the ladybug get the spotlight instead?









