Introduction
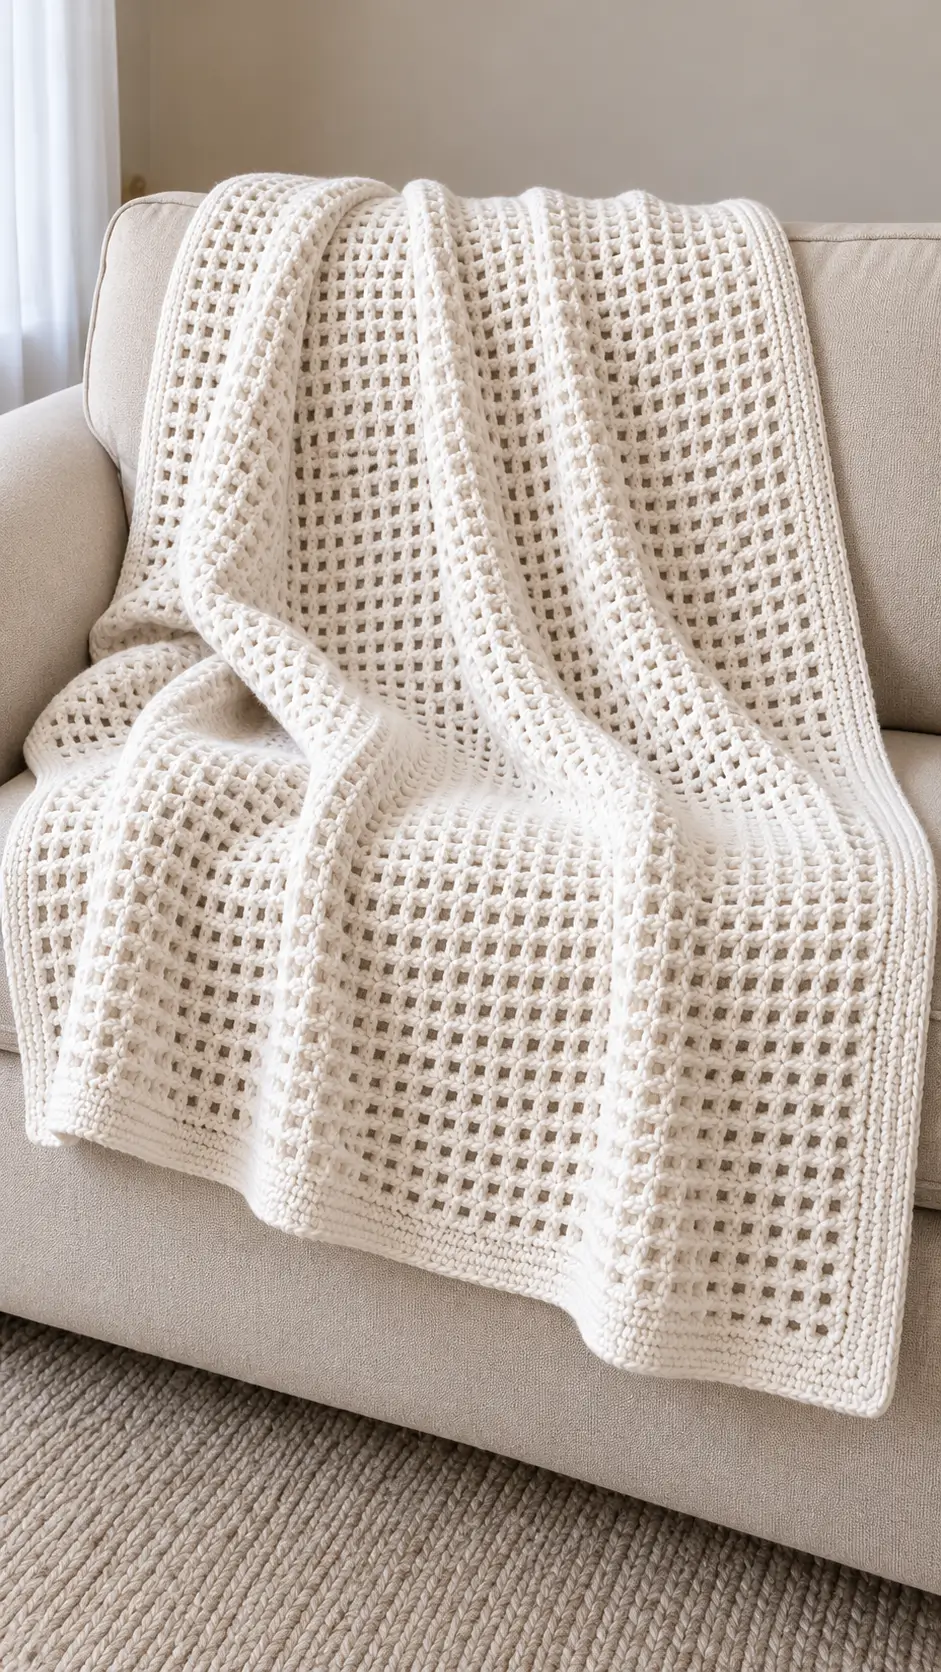
Every open square in this blanket has to stay square while the denser vertical bands resist stretching beside it. This ivory crochet mesh blanket pattern combines an airy grid with narrow textured columns and a firm solid border. Worked as one piece in worsted-weight ivory yarn with a 5.0 mm hook, the construction produces a lightweight sofa throw with enough structure to keep the open mesh aligned.
The Design: Open Mesh with Structural Stripes
The reference blanket uses a restrained one-color construction, so texture does the work normally assigned to color changes. Most of the surface consists of repeated square openings. Narrow vertical bands interrupt that grid at regular intervals, adding weight and helping the blanket maintain its shape when draped.
The critical decision is matching row height. Dense stitches naturally behave differently from chain spaces, and a textured band worked too tightly can shorten the fabric beside it. For that reason, the pattern keeps all sections on the same row schedule and uses tall stitches inside both the mesh and structural columns. A multi-round solid border finishes the perimeter and reduces stretching along the open sides.
Project Info at a Glance
| Skill Level | Construction | Target Size | Hook | Best For |
|---|---|---|---|---|
| Intermediate | One-piece mesh with textured columns | Approx. 120 × 155 cm | 5.0 mm | Sofa throw, bed-end throw |
Materials and Tools
Yarn
- Warm ivory — worsted #4 — approximately 1,500–1,900 g for a 120 × 155 cm throw
The quantity is a project estimate. Open mesh consumes less yarn than dense crochet, but the structural bands and wide border increase total usage. Make and weigh a swatch before purchasing yarn for a substantially different size.
Tools
- 5.0 mm crochet hook
- Worsted #4 yarn
- Yarn needle
- Scissors
- Locking stitch markers
- Tape measure
- Blocking mats and pins
Abbreviations
- ch — chain
- sc — single crochet
- hdc — half double crochet
- dc — double crochet
- fpdc — front post double crochet
- bpdc — back post double crochet
- sl st — slip stitch
- sp — space
- st/sts — stitch/stitches
- RS — right side
- WS — wrong side
Gauge Swatch
Before beginning the full blanket, make a sample containing both mesh and one textured stripe.
Work at least 24 stitches × 18 rows.
Block the sample using the same method planned for the finished blanket.
The mesh openings should remain close to square rather than becoming long vertical rectangles.
If the openings are substantially taller than they are wide, reduce hook size or modify the chain spacing before beginning the blanket.
Basic Mesh Pattern
The main fabric uses a simple two-stitch mesh repeat.
Work:
dc, ch 1, skip 1 st.
Repeat across the designated mesh section.
On the following row, work the dc into the previous dc and ch 1 over the chain space.
This produces aligned square openings rather than a staggered mesh.
Textured Stripe
Each vertical structural stripe uses approximately 5 stitches.
Work the stripe as:
bpdc, fpdc, fpdc, fpdc, bpdc.
The recessed stitches at both sides separate the band from the open mesh.
Keep the center three post stitches raised.
Suggested Blanket Layout
For a balanced throw, alternate wide mesh sections and narrow textured columns.
A useful layout is:
| Section | Approximate Width | Structure |
|---|---|---|
| Side margin | 4–6 cm | Solid stitches |
| Mesh Panel 1 | 18–22 cm | Square mesh |
| Stripe 1 | 3–4 cm | Post-stitch texture |
| Mesh Panel 2 | 18–22 cm | Square mesh |
| Stripe 2 | 3–4 cm | Post-stitch texture |
| Mesh Panel 3 | 18–22 cm | Square mesh |
| Stripe 3 | 3–4 cm | Post-stitch texture |
| Mesh Panel 4 | 18–22 cm | Square mesh |
| Side margin | 4–6 cm | Solid stitches |
Add or remove complete mesh sections to change blanket width.
Foundation
Make a foundation chain based on your blocked swatch and planned number of panels.
The mesh sections require an odd number of stitches so the sequence can begin and end with a solid dc.
Add the stitches required for each five-stitch textured band and both solid side margins.
Do not determine finished width from the unstretched foundation chain alone.
Row 1 — Solid Foundation
Dc in the fourth chain from the hook.
Dc in every chain across.
Turn.
This solid row supports the open mesh and gives the lower border a stable attachment line.
Row 2 — Establish the Layout
Ch 3.
Work the first solid side margin.
Across the first mesh panel repeat:
dc in next st, ch 1, skip 1 st.
At the first marked stripe work five dc.
Continue alternating mesh panels and five-stitch stripe sections.
Finish with the solid side margin.
Row 3 — Establish the Textured Columns
Ch 3 and turn.
Work the side margin in dc.
Maintain the established mesh across every open section.
At each five-stitch stripe work:
bpdc, fpdc, fpdc, fpdc, bpdc.
Continue across.
Row 4
Repeat the mesh pattern.
Maintain the post stitches as they present.
The center of each stripe should remain raised relative to its two outside stitches.
Row 5 and Beyond
Repeat the established structure.
Work each dc above a dc and each ch-1 space above a ch-1 space.
Maintain all five-stitch textured bands without increasing or decreasing.
Continue until the main body reaches the required length minus the top and bottom border depth.
Optional Seed-Texture Stripe
If post stitches create more relief than desired, replace the five-stitch band with a compact alternating texture.
Across the stripe work:
sc, dc, sc, dc, sc.
On the next row, reverse the sequence:
dc, sc, dc, sc, dc.
This creates a smaller pebbled ridge similar to the subtle dense lines visible in the reference.
Keeping the Mesh Openings Square
Measure ten consecutive openings after approximately 15 cm of work.
Measure their combined width and height.
The dimensions should remain reasonably close.
If the openings become noticeably taller, your row height is exceeding the horizontal repeat.
Correct the gauge before continuing through the full blanket.
Preventing Textured Stripes from Contracting
Post stitches consume more yarn than ordinary dc stitches.
Do not pull the yarn tightly after inserting the hook around a post.
Raise the working loop to normal dc height before completing the stitch.
Lay the blanket flat after every 10–15 rows and compare the lengths of the mesh and stripe sections.
Adding Horizontal Structural Bands
The reference contains denser areas that can be reproduced with occasional horizontal bands.
After approximately 35–45 cm of mesh, work one full row of dc across the blanket.
Follow with one row of sc.
Then resume the mesh and vertical stripe pattern.
This optional band adds stability without dividing the blanket into separate pieces.
Top Structural Band
Stop the mesh approximately 4–5 cm before the desired body length.
Work one complete row of dc.
Then work:
3–5 rows of hdc or sc
across the entire width.
This creates a solid top edge matching the foundation area.
Bottom Structural Band
If a deeper bottom band is desired, work several rows of sc or hdc into the foundation edge after the main body is complete.
Keep the stitch count consistent from row to row.
Compare the depth with the top band before fastening off.
Side Border — Setup
Join ivory yarn at one lower corner.
Work sc evenly along the first long edge.
Place approximately 2 sc for every 3 dc row ends as a starting ratio.
Adjust according to your row gauge.
The edge must lie flat before additional border rounds are added.
Border Round 1
Continue sc around all four sides.
At each corner work:
(sc, ch 2, sc).
Join.
Border Round 2
Ch 1.
Sc in every stitch.
At each corner work:
(sc, ch 2, sc).
Join.
Border Round 3
Ch 2.
Hdc in every stitch.
At each corner work:
(2 hdc, ch 2, 2 hdc).
Join.
Border Round 4
Ch 1.
Sc in every stitch.
At each corner work:
(sc, ch 2, sc).
Join and FO.
Optional Ribbed Border
For a more pronounced frame, add one post-stitch round before the final sc round.
Alternate:
fpdc around next stitch, bpdc around next stitch.
Repeat around.
Maintain the established corner increases.
This creates a narrow ribbed line without introducing another color.
Target Blanket Sizes
| Project | Approximate Finished Size |
|---|---|
| Baby Blanket | 75 × 95 cm |
| Lap Blanket | 90 × 120 cm |
| Sofa Throw | 120 × 155 cm |
| Large Throw | 140 × 180 cm |
| Bed-End Throw | 160 × 190 cm |
Use these dimensions as planning targets. Final size should be calculated from your blocked gauge.
Changing the Width
Increase width by adding complete mesh panels and their adjacent textured bands.
For a small adjustment, increase the number of mesh repeats inside each open panel equally.
Do not add stitches to only one panel because the vertical stripes will no longer appear evenly spaced.
Changing the Length
Length adjustments are simpler.
Continue the established rows until the main body reaches the required measurement.
Stop only after completing a full row.
If horizontal structural bands are included, keep their spacing consistent or deliberately center the final interval.
Estimating Yarn from a Swatch
Make a blocked sample containing both mesh and texture.
Measure its dimensions and weight.
Suppose a 25 × 25 cm swatch weighs 55 g.
Its area is:
25 × 25 = 625 cm².
A 120 × 155 cm blanket has an approximate area of:
120 × 155 = 18,600 cm².
Divide:
18,600 ÷ 625 = 29.76.
Then:
29.76 × 55 g = approximately 1,637 g.
Add yarn for the border and approximately 10% for gauge variation, swatching and future repairs.
Replace the example swatch weight with your measured value.
Why One-Piece Construction Works Here
The blanket does not require motif seams to create its geometric appearance.
Continuous rows keep the mesh openings aligned from one side to the other.
They also reduce finishing work and remove bulky joins from an intentionally light fabric.
The vertical textured bands supply enough visual separation to make the surface appear paneled.
Making a Softer Draping Version
Use a yarn with a smooth, flexible fiber blend and move up approximately 0.5 mm in hook size after swatching.
The mesh will open slightly and the fabric will drape more freely.
Check the textured stripes before committing to the larger hook because they must still remain defined.
Making a Firmer Version
Reduce hook size by approximately 0.5 mm.
This makes the mesh openings smaller and gives the border more body.
Make another swatch because the reduced gauge changes both finished dimensions and yarn requirements.
Optional Cotton Version
A cotton or cotton-blend yarn gives the mesh strong stitch definition.
It can also make a large blanket substantially heavier.
Weigh the blocked swatch and calculate the projected full blanket weight before making a bed-size version.
Optional Wool-Blend Version
A wool blend produces a lighter fabric for the same visual volume.
Check the care instructions before blocking.
Do not stretch the mesh aggressively while wet because the open structure can change dimensions more readily than dense crochet.
Checking the Blanket During Construction
Lay the project on a flat surface after approximately every 20 rows.
Measure the width at the lower edge, center and working edge.
The three measurements should remain within approximately 1 cm.
A progressively narrower working edge usually indicates tightening tension.
Checking the Textured Columns
Measure from one textured stripe to the next at several points.
The spacing should remain consistent.
If a stripe begins drifting sideways, count the mesh repeats on both sides before continuing.
An accidental missing dc can shift the entire column.
Correcting a Missed Mesh Stitch
If the error is found within the current row, remove stitches back to the mistake.
Do not compensate by adding an extra stitch several repeats later.
That correction changes the position of the square openings and can make the textured stripe drift.
Preventing a Wavy Border
The long sides require careful stitch distribution because stitches are being worked into row ends rather than ordinary top loops.
Work approximately 15–20 cm of the first border round.
Lay that section flat.
If it ruffles, remove several stitches.
If it pulls inward, add stitches at regular intervals.
Assembly
- Make a 24-stitch by 18-row swatch containing both square mesh and one complete textured stripe, then block and measure it.
- Calculate the blanket width from the blocked swatch and choose the required number of complete mesh panels and structural columns.
- Work a solid foundation row and place markers at both sides of every five-stitch textured stripe.
- Establish the aligned dc-and-chain mesh while maintaining the same number of repeats inside every matching open panel.
- Work the textured stripes on the same row schedule as the mesh and check the fabric flatness after every 10–15 rows.
- Continue to the required length, adding optional horizontal structural bands only at measured intervals.
- Finish the main body with a solid upper section that balances the foundation edge.
- Work the first sc border round around all four sides and correct the side-edge stitch distribution before adding further rounds.
- Add the remaining solid border rounds, weave every yarn tail through dense stitches and inspect all four corners for distortion.
- Block according to the selected fiber, align the vertical textured bands and shape the outer border without stretching the mesh openings out of square.
The finished blanket should show straight vertical structural bands, evenly aligned square openings and a flat solid perimeter.
7 Technical Tips
- Measure ten mesh openings together instead of checking one opening. The larger sample exposes a row-height error that may be difficult to detect in a single 1–2 cm opening.
- Keep exactly five stitches in every textured column. Losing one stitch causes the band to narrow and shifts the neighboring mesh for every subsequent row.
- Check width after approximately every 20 rows. Keep the lower, middle and working-edge measurements within about 1 cm to prevent gradual tension drift.
- Raise each post-stitch loop to normal dc height. Tight post stitches shorten the structural column and can make the mesh beside it buckle.
- Test 15–20 cm of the first border round before continuing. A ruffled side has too many edge stitches, while an inward curve indicates too few.
- Place markers on both sides of every textured stripe. A missed mesh stitch can otherwise move the stripe sideways before the error becomes visually obvious.
- Weave yarn tails through at least 6–8 cm of solid crochet. Avoid hiding ends in the open mesh because the yarn can remain visible through the square openings.
Care and Final Blocking
Follow the care instructions for the selected yarn. Support the blanket when wet because open crochet can stretch under its own weight.
Lay the project flat and align the outside rectangle first.
Next, straighten the vertical textured bands.
Check several mesh openings and correct any sections that have been pulled into elongated rectangles.
Shape the border last and allow the blanket to dry completely before folding.
Conclusion
The repeating square grid is what controls this ivory crochet mesh blanket pattern, while the denser textured columns provide the structure needed to keep a large open fabric stable. Begin with a swatch containing both stitch types, then calculate width from its blocked measurement rather than the foundation chain. Keep every mesh panel consistent, check the five-stitch columns regularly and correct border distribution before completing the perimeter. Your next step is to make a 24-stitch sample and compare the height and width of ten openings. Save the finished throw to Pinterest or share it on Instagram with #IvoryMeshCrochetBlanket. Would you keep the entire blanket ivory or add one contrasting color to the textured stripes?








