Introduction
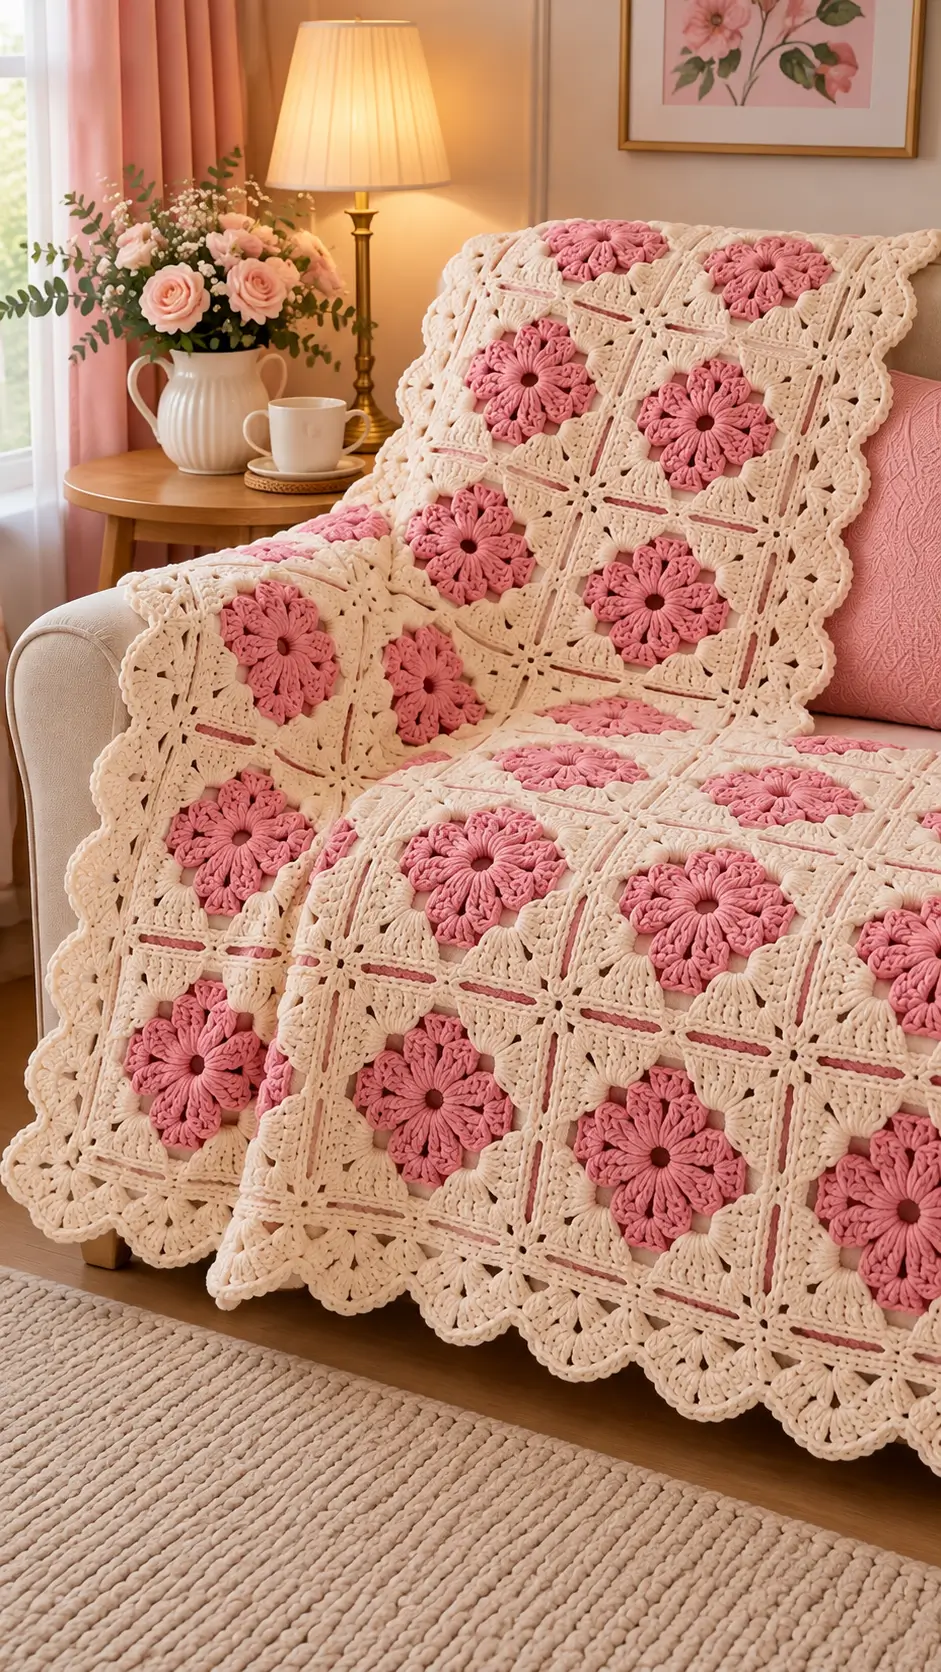
Eight elongated pink petals have to meet the cream corners without turning the flower into an octagon. This pink daisy granny square crochet throw pattern uses a flat floral center, cream fan-shaped corners, narrow pink accents and a scalloped lace border. Worked in worsted-weight yarn with a 4.5–5.0 mm hook, the modular construction is suitable for an intermediate throw, bedspread or matching cushion.
The Design: Pink Flowers Inside a Cream Structural Grid
The photographed design relies on one repeated square rather than several unrelated motifs. Each block contains an eight-petal dusty-pink flower surrounded by cream crochet that expands into four defined corners. Open chain spaces lighten the background, while denser outer rounds create a reliable joining edge. A narrow pink line inside the cream framework repeats the flower color without making the seams visually heavy.
Comparable eight-petal flower squares are commonly worked in DK through worsted yarn, and 20 cm is a practical scale for larger textured blocks. For this photo-inspired version, the target is 19–21 cm after blocking. The main construction risk is adding too much fabric while converting the round flower into a square. Check the motif after every squaring round rather than attempting to correct rippling during final blocking.
Project Info at a Glance
| Skill Level | Construction | Target Square | Hook | Best For |
|---|---|---|---|---|
| Intermediate | Eight-petal flower squared with cream lace | 19–21 cm | 4.5–5.0 mm | Throws, bedspreads and cushions |
Materials and Tools
Yarn
- Dusty pink — worsted #4 — flower centers and narrow accent lines
- Warm cream — worsted #4 — square backgrounds, joining and border
Use both colors from the same yarn range where possible. Make and weigh one complete blocked square before purchasing yarn for a large blanket.
Tools
- 4.5–5.0 mm crochet hook
- Worsted #4 yarn
- Yarn needle
- Scissors
- Stitch markers
- Tape measure
- Blocking mats
- Rust-resistant pins
- Digital scale for yarn calculations
Abbreviations
- MR — magic ring
- ch — chain
- sl st — slip stitch
- sc — single crochet
- hdc — half double crochet
- dc — double crochet
- tr — treble crochet
- sp — space
- st/sts — stitch/stitches
- FO — fasten off
Pattern — Pink Daisy Granny Square
This is an original photo-inspired construction. Make one complete master square before beginning production. Its blocked dimensions should determine the final blanket calculations.
Round 1 — Pink Center
With dusty pink, make a MR.
Ch 1.
Work 16 sc into the ring.
Join with sl st. (16 sc)
Round 2 — Eight Petal Foundations
Ch 1.
Sc in the first stitch.
Repeat:
*ch 5, skip 1 st, sc in next st*
around.
Join.
You should have 8 ch-5 spaces.
Round 3 — Eight Pink Petals
Sl st into the first ch-5 space.
Work:
(sc, hdc, 2 dc, 3 tr, 2 dc, hdc, sc)
into the same space.
Repeat in each of the remaining seven ch-5 spaces.
Join.
You now have 8 elongated petals.
Round 4 — Petal Definition
Continue with dusty pink.
Work one loose sl st around the outer edge of each petal.
At each petal tip work:
(sl st, ch 1, sl st).
Move directly into the next petal.
FO after all eight petals have been outlined.
Round 5 — Cream Foundation Behind the Flower
Turn the flower over.
Join cream between two adjacent petal bases.
Ch 5.
Sc between the next pair of petals.
Repeat around.
Join.
You should have 8 cream ch-5 spaces behind the pink flower.
Round 6 — Cream Background Fans
Sl st into the first ch-5 space.
Work:
(2 dc, ch 2, 2 dc)
into the space.
Ch 2.
Repeat in every ch-5 space.
Join.
The cream stitches should appear between the pink petals rather than covering them.
Round 7 — Establishing Four Corners
Mark every second cream fan. The four marked positions become the square corners.
At a marked position work:
(3 dc, ch 3, 3 dc).
Across the section between corners work:
ch 2, 3 dc in next available space, ch 2.
Repeat the same structure on all four sides.
Join.
Lay the motif flat before continuing.
Round 8 — Cream Fan Corners
Sl st into the first corner.
Work:
(3 dc, ch 2, 3 dc)
into the corner.
Across the side, work 3 dc into each available chain space with ch 1 between groups.
At the next corner repeat:
(3 dc, ch 2, 3 dc).
Continue around.
Join.
Round 9 — Open Lace Section
Ch 1.
Sc in the first stitch.
Across each side repeat:
ch 3, skip 2 sts, sc in next st.
At each corner work:
(sc, ch 4, sc).
Join.
The chain openings should be distributed evenly across all four sides.
Round 10 — Cream Structural Round
Sl st into the first ch-3 space.
Work 3 hdc into each ch-3 side space.
At every corner ch-4 space work:
(3 hdc, ch 2, 3 hdc).
Join.
Round 11 — Pink Accent Line
Change to dusty pink.
Ch 1.
Sc in every stitch.
At each corner work:
(sc, ch 2, sc).
Join and FO.
This narrow pink round repeats the flower color without making the joining frame too dark.
Round 12 — Cream Joining Frame
Join cream at a corner.
Ch 2.
Hdc in every stitch across each side.
At each corner work:
(2 hdc, ch 2, 2 hdc).
Join.
Round 13 — Final Joining Edge
Ch 1.
Sc in every stitch.
At each corner work:
(sc, ch 2, sc).
Join and FO.
Target Square Size
Block the completed motif to approximately 19–21 cm square.
Do not force a smaller square to 21 cm by excessive stretching.
If your motif finishes below the target, add another cream hdc round followed by one sc round.
Use the same additional rounds on every square.
Blocking the Master Square
Place the first completed motif on a blocking mat.
Pin all four corners.
Measure the top and bottom.
Measure both sides.
Then measure both diagonals.
Keep the difference between the diagonals within approximately 5 mm.
Only after the square is accurate should you shape the pink petals.
Keeping the Pink Flower Flat
The petals should have texture but should not form a heavy three-dimensional mound.
If the center cups upward, check the Round 5 cream foundation arches.
Overly short arches can pull the flower inward.
On the next sample, add one chain to those arches rather than stretching the finished square aggressively.
Making the Required Number of Squares
Once the master square is approved, make all remaining motifs using the same hook and tension.
Measure every fifth square against the master.
A difference greater than approximately 5 mm should be corrected before assembly.
Planning a Throw
If the blocked square measures 20 cm, the following layouts provide useful starting dimensions:
| Grid | Squares | Approximate Size Before Border |
|---|---|---|
| 4 × 5 | 20 | 80 × 100 cm |
| 5 × 6 | 30 | 100 × 120 cm |
| 6 × 8 | 48 | 120 × 160 cm |
| 7 × 9 | 63 | 140 × 180 cm |
| 8 × 10 | 80 | 160 × 200 cm |
| 9 × 11 | 99 | 180 × 220 cm |
Add the border measurement separately.
Planning a Bedspread
Measure the mattress width and length.
Then decide how far the crochet should drop over each exposed side.
For example, a 160 cm mattress with a 35 cm drop on both sides requires approximately:
160 + 35 + 35 = 230 cm total width.
Divide that measurement by the blocked square size to estimate the required number of columns.
Estimating Yarn
Weigh one blocked master square.
Suppose one square weighs 65 g.
For 63 squares:
65 g × 63 = 4,095 g
This example covers the motif field only.
Add yarn for joining and the border, then add approximately 10% for gauge differences, sampling and future repairs.
Replace the 65 g example with the actual weight of your master motif.
Estimating Pink and Cream Separately
For better purchasing accuracy, weigh the pink and cream yarn before and after making one square.
For example, suppose one motif consumes:
- Dusty pink — 22 g
- Cream — 43 g
For 63 squares:
Pink: 22 × 63 = 1,386 g
Cream: 43 × 63 = 2,709 g
Add extra cream for joining and the outer lace border.
These figures demonstrate the calculation method rather than fixed requirements.
Arranging the Squares
Place all blocked squares on a clean floor or large table.
Turn every flower in the same orientation.
Check that the narrow pink accent rounds create continuous lines through the layout.
Photograph the complete arrangement before moving the squares.
Flat Cream Joining Method
Use cream yarn.
Place two squares side by side with right sides facing upward.
Insert the hook through corresponding outer loops.
Work relaxed slip stitches from one corner to the next.
Keep the yarn behind the work so the cream seam remains narrow.
Testing the Join
After approximately 5 cm, spread both squares flat.
The joined edge should remain the same length as the blocked edges.
If the seam pulls the squares upward, remove it and work with looser tension.
Do not rely on final blocking to correct a contracted seam.
Optional Pink Detail in the Seam
For the narrow pink line visible between some sections of the photographed design, complete the structural join in cream first.
Then surface slip stitch with dusty pink along selected seam lines.
Do not work the decorative line through every seam unless you want a stronger grid.
Joining Horizontal Rows
Join the squares into horizontal rows first.
Measure each row after completion.
Rows containing the same number of motifs should remain within approximately 1 cm of one another.
Correct a short seam before joining the rows vertically.
Joining the Rows
Place two completed rows side by side.
Match every square intersection.
Join with the same relaxed cream slip-stitch method.
Check the four-square intersections carefully.
A single compact connection is sufficient at each intersection.
Outer Border — Foundation Round
Join cream at one corner.
Work sc evenly around the complete throw.
At each corner work:
(2 sc, ch 2, 2 sc).
Join.
Border Round 2 — Cream Openwork
Ch 1.
Sc in the first stitch.
Repeat:
ch 3, skip 2 sts, sc in next st
around.
At each corner work one ch-5 space.
Border Round 3 — Larger Lace Arches
Sl st into the first ch-3 space.
Work:
sc, ch 5, sc in next ch-3 space.
Repeat around.
At each corner work a ch-7 arch.
Border Round 4 — Scalloped Fans
In each ch-5 space work:
(sc, hdc, 5 dc, hdc, sc).
In each corner ch-7 space work:
(sc, hdc, 7 dc, hdc, sc).
Continue around.
Border Round 5 — Final Edge
Work sl sts along the beginning of the first scallop until reaching its upper section.
At the center of each scallop work:
(sc, ch 2, sc).
Work sc down the remaining section and continue to the next scallop.
Repeat around.
FO.
Making a Deeper Border
For a full bedspread, the photographed style can support a deeper edge than a small throw.
Before the scallop round, repeat the chain-arch round one additional time.
Increase the new arches from ch 5 to ch 6 if the edge begins pulling inward.
Then complete the scallops.
Matching Pink Flower Cushion
The same floral square can be used for a coordinating cushion.
Join four motifs in a 2 × 2 layout.
Work cream hdc rounds around the joined panel until it reaches the required cushion measurement.
Add a small cream scalloped border if the cushion is decorative rather than used for sleeping.
Single-Flower Cushion Option
For a simpler cushion, make one flower square and continue adding cream structural rounds.
Maintain the same corner formula:
(2 hdc, ch 2, 2 hdc)
at every corner.
Continue until the front reaches approximately 40–50 cm, depending on the cushion insert.
Solid Cushion Back
With cream yarn, chain to the width of the blocked cushion front.
Row 1: Hdc in the third chain from hook and across.
Row 2: Ch 2, turn, hdc across.
Repeat until the back matches the front.
FO.
Assembling the Cushion
Place the crochet front and solid back with wrong sides together.
Sc through both layers around three sides.
Insert the cushion form.
Close the final edge or add a button opening.
Making a Cream-and-Pink Bed Runner
For a smaller version, use a 3 × 8 layout.
With 20 cm squares, the motif field measures approximately 60 × 160 cm before the border.
Add the same scalloped cream edging around all four sides.
Alternative Color Combinations
The two-color construction makes recoloring simple because the flower and framework remain clearly separated.
- Dusty blue + ivory — muted floral version
- Sage green + cream — botanical version
- Lavender + warm ivory — cool pastel version
- Burgundy + oatmeal — stronger contrast
- Terracotta + cream — warmer neutral version
Keep the lighter color for the structural background if you want the flower centers to remain dominant.
Controlling the Eight Petals
Mark the first petal before working Round 3.
Count all eight petals before fastening off.
Check that every petal contains the same stitch sequence.
A single petal with one missing treble can appear shorter after blocking and shift the visual center of the motif.
Controlling the Square Transition
Round 7 determines whether the finished block will lie flat.
Place four markers before working that round.
Each marker should correspond to every second flower section.
Compare opposite sides before continuing to the lace rounds.
Preventing Rippled Edges
Do not force too many stitches into the chain spaces during the structural rounds.
If the frame begins rippling, place the square on a flat surface immediately.
Correct the excess in the current round.
A heavily ruffled frame cannot be corrected reliably by aggressive blocking.
Assembly
- Crochet the eight-petal dusty-pink flower and verify that all eight petals use the same stitch sequence before adding the cream background.
- Work the cream foundation behind the flower, mark four evenly spaced corner positions and convert the circular center into a square.
- Add the openwork cream rounds, narrow pink accent and dense cream joining frame to complete one master motif.
- Block the master square to approximately 19–21 cm and keep the difference between its diagonal measurements within about 5 mm.
- Make and block the remaining motifs, comparing every fifth square with the master before continuing production.
- Arrange all squares in the final grid and photograph the layout before stacking them into labeled horizontal rows.
- Join each row with relaxed cream slip stitches, checking approximately every 5 cm that the seam is not contracting the blocked edge.
- Join the completed rows vertically and keep every four-square intersection compact and flat.
- Work the cream foundation and openwork border rounds, then add the large scallops only after the complete blanket lies square.
- Weave all yarn tails through dense structural stitches, complete a light final blocking and reshape the pink petals and cream scallops before drying.
The completed throw should form a regular grid of eight-petal pink flowers surrounded by cream openwork squares and a continuous scalloped lace edge.
7 Technical Tips
- Keep every blocked square within 5 mm of the master motif. A 5 mm difference repeated across ten columns can change the final width by approximately 5 cm.
- Count exactly eight pink petals before starting the cream background. An incorrect petal count prevents the four corner positions from being distributed symmetrically.
- Keep both diagonals within approximately 5 mm. Matching side measurements do not detect a square that has shifted into a parallelogram.
- Check Round 7 on a flat surface before continuing. Excess stitches in the flower-to-square transition are the most likely cause of permanent rippling.
- Test every joining seam after approximately 5 cm. A seam that contracts the edge should be removed immediately instead of being stretched during final blocking.
- Keep four-square intersections compact. Extra stitches concentrated at an intersection produce a hard bump and can push neighboring corners apart.
- Weave each structural tail through at least 5 cm of dense crochet. Avoid hiding tails in the large chain arches because they can become visible when the border stretches.
Care and Final Blocking
Follow the washing instructions for the selected yarn.
Support the complete throw when wet rather than lifting it from one corner.
Lay the project flat and align the square grid first.
Measure the top, center and bottom widths.
Shape the scalloped border only after the main field is aligned.
Arrange the eight pink petals in each motif by hand and allow the throw to dry completely before folding or using it.
Conclusion
The eight-petal center gives this pink daisy granny square crochet throw pattern its identity, but the cream structural rounds determine how well the finished blanket hangs. Begin with one 19–21 cm master square and check its diagonals before producing the remaining motifs. Keep the pink accent narrow, reserve the dense cream outer edge for joining, and test several connected squares before assembling full rows. Once the grid lies flat, add the deeper chain-arch border and cream scallops. Save the finished throw to Pinterest or share it on Instagram with #PinkDaisyCrochetThrow. Would you keep every flower dusty pink, or alternate the pink centers with a second floral color?








